Setting up the sample application
During the course of the tutorial, you create three XPages named Site, SiteFinder, and SiteList. When you first open the sample application, you see existing XPages with similar names. Three of them are final solutions and are named SiteFinal, SiteFinderFinal, and SiteListFinal. Two of them are intermediate solutions and are named Site1 and SiteList1.
About this task
Procedure
- From the menu, click (Ctrl+N).
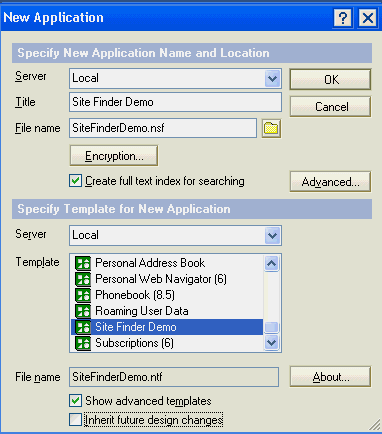
- In the New Application window, do
the following steps:
Here is what the New Application window should look like.
- Click OK.
Domino® Designer creates the new application and its elements display under
Applicationson the left side of the screen. Expand the elements to explore the design of this application. - Expand Code and double-click Agents.
In the list of agents, right-click Create sample data and
select Run.
This agent creates several sample records which you use to test the application. Respond to any dialog boxes. Click the X in the corner to close the pane containing the list of agents.
- Expand XPages and double-click SiteFinderFinal (the final solution for SiteFinder).
- Click or select a specific browser from among those listed.
A mini Web server running on your computer opens a browser, generates HTML for the XPage, and sends the page to the browser using localhost for the server name.
If your computer is not set up to use localhost, the preview URL fails. Open a browser and use 127.0.0.1 or the actual IP address of your computer in the URL, for example, http://127.0.0.1/SiteFinderDemo.nsf/SiteFinderFinal.xsp.
- Specify a value in the Zip code field
(for example,
02108) and click Search.This step submits the page to the server. The server processes the information from the page and sends another page to the client.
- Close the browser when you are done.
- In Domino® Designer,
close the XPage element by clicking the X on
its tab.
The appearance varies. If a pane has more than one tab, you see an X on a tab. If a pane has just one tab, it displays as a window with the X in the corner.