Create a Checks Tile
Use checks tile to track device compliance for specific patches and custom content (tasks and baselines).
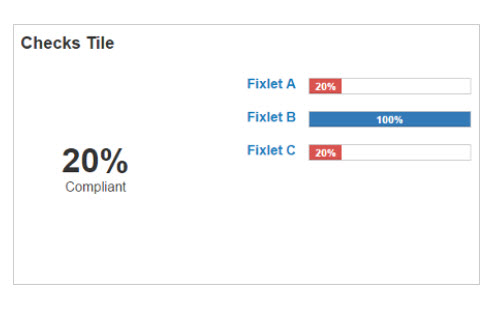
Percentages for each bar are calculated by dividing the number of unique non-relevant devices by the total number of devices. The tile total is calculated by dividing the number of unique non-relevant devices by the total number of devices for all line items on the tile. For example, in the sample tile pictured, 20% of all devices are compliant with Fixlets A, B, and C.
To create a checks tile:
- From the Overview page, select Edit Dashboard > Add Tile > Add Custom Tiles.
- Select Checks.
- Enter a name for your tile.
- Select
Patches
orCustom Items
from the drop-down list, and click Add Item. - Enter a label for this line item on the tile.
- Select a compliance threshold value for this item. Expressed as a percentage, compliance rates equal to or above the threshold are shown on the tile in blue. Compliance rates below the threshold value are shown on the tile in red. The default is 80 percent.
- Hover the mouse over a patch or task name to display the Select button. Click Select to add a compliance line item to the tile. To find a specific patch, task, or baseline, enter its name in the Search box. Click a name in the list to open its document in a separate browser window.
- Repeat Steps 4 – 7 to add up to 5 more compliance line items to the tile. Check the Preview pane to see check tile design as you work. On the Build Tile page, drag compliance line items to arrange them, or click the X to delete a line item.
- Click Done. On the Edit Dashboard page, move the new tile to the place you want it on the dashboard.