Permissions set examples
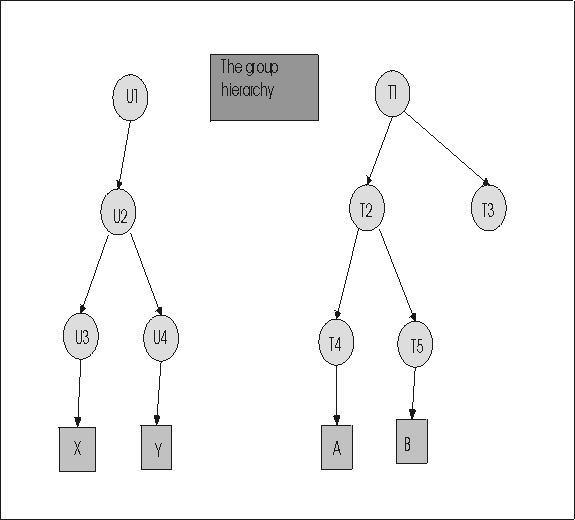
The following examples show how the permissions are determined for a session that involves the following entities.
4 user groups U1 – U4
5 target groups T1 – T5
Users X and Y
Targets A and B
The following steps create the users, targets, user groups, and target groups that are used in the examples. The examples show how policies and permissions are derived for a session.
- Create users X and Y.
- Click .
- Enter relevant details for user X and click Submit.
- Repeat the steps to create user Y.
- Create the required user group U1 to U4.
- Click .
- Type in the group name. For example, U1.
- Click Submit to accept the default template.
- Repeat the steps to create groups U2, U3, and U4.
- Assign user or user group members to the user group.
- Make user X a member of group U3.
- Click .
- Type in the user ID or some other relevant information for user X.
- Select user X and click Manage Group Membership.
- In the user group list, select U3 then click Submit. Note: Make sure that U3 is the only user group that is selected.
- Make user Y a member of group U4
- Click Users.
- Click Search then type in the user ID or some other relevant information for user Y.
- Select user Y then click Manage Group Membership.
- In the user group list, select U4 then click Submit. Note: Make sure that U4 is the only user group that is selected.
- Make groups U3 and U4 members of U2
- Click User groups.
- Click Search then type in U.
- Click Submit.
- Select U3 and U4 then click Manage Group Membership.
- In the user group list, select U2. Note: Make sure that U2 is the only user group that is selected.
- Select add to current group membership.
- Click Submit.
- Make U2 a member of U1
- Click User groups.
- Click Search then type in U2.
- Click Submit.
- Select U2 then click Manage Group Membership.
- In the user group list, select U1 then click Submit.
- Make user X a member of group U3.
- Create the required target groups T1 to T5
- Click .
- Type in the group name. For example, T1.
- Click Submit to accept the default template.
- Repeat the steps to create groups T2,T3,T4, and T5.
- After the target software is installed on target A and target B and the targets contact the
server, assign target or target group members to target groups.
- Make target A a member of group T4
- Click Targets.
- Click Search then type in the serial number or some other relevant information for target A.
- Select target A then click Manage Group Membership.
- In the target group list, select T4 then click Submit. Note: Make sure that T4 is the only target group that is selected.
- Make target B a member of group T5
- Click Targets.
- Click Search then type in the serial number or some other relevant information for target B.
- Select target B then click Manage Group Membership.
- In the target group list, select T5 then click Submit. Note: Make sure that T5 is the only target group that is selected.
- Make group T4 and T5 members of T2
- Click Target groups.
- Click Search then type in T.
- Click Submit.
- Select T4 and T5 then click Manage Group membership.
- In the target group list, select T2. Note: Make sure that T2 is the only target group that is selected.
- Select add to current group membership.
- Click Submit.
- Make T2 and T3 members of T1
- Click Target groups.
- Click Search then type in T.
- Click Submit.
- Select T2 and T3 then click Manage Group Membership.
- In the target group list, select T1. Note: Make sure that T1 is the only target group that is selected.
- Select add to current group membership.
- Click Submit.
- Make target A a member of group T4
- Create permissions links between specific user and target groups. Remembering to enable all relevant policies. Create the links in the following examples.
The following figure shows the group hierarchy that is created.