Adding a Breadcrumb Trail widget to the landing page layout
In this lesson, you begin building the layout by adding the first widget to a slot in the template.
About this task
To learn more about widgets, read the following topics:
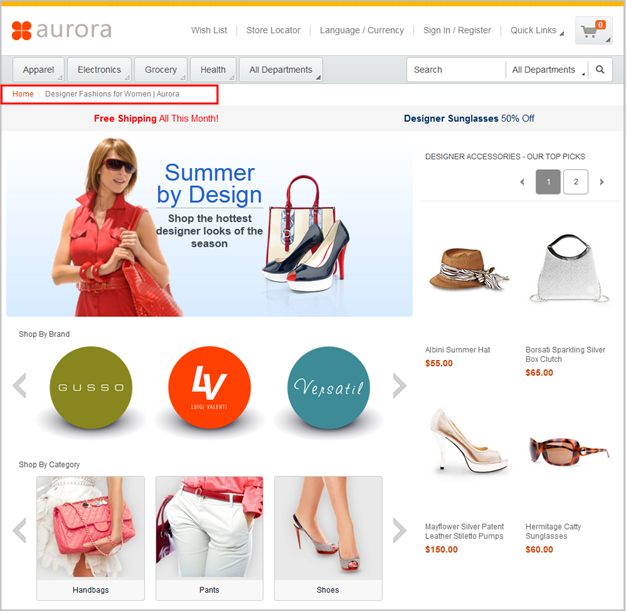
In this lesson, you use a Breadcrumb Trail widget to add the breadcrumb to the top of the layout, as shown in the following screen capture:
Procedure
- In the Women Summer Designers Layout page,
click the Design Layout tab.The Layout Content section shows a wireframe that represents the template that you selected for this layout.

Every layout template contains one or more numbered slots. This template contains five slots. Layout templates have the following notable features: - You can add multiple widgets to the same slot. Widgets that share a slot can be the same type or a different type.
- If you add more than one widget to a slot, the widgets always stack vertically within the slot.
- In most cases, if you do not need a slot in the layout, you can leave the slot empty. When the store page is rendered, the area that represents the slot does not take up vertical space in the page.
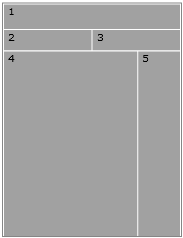
- In the Wireframe image, click slot
1.The Add Widgets to Slots window shows all the available widgets.
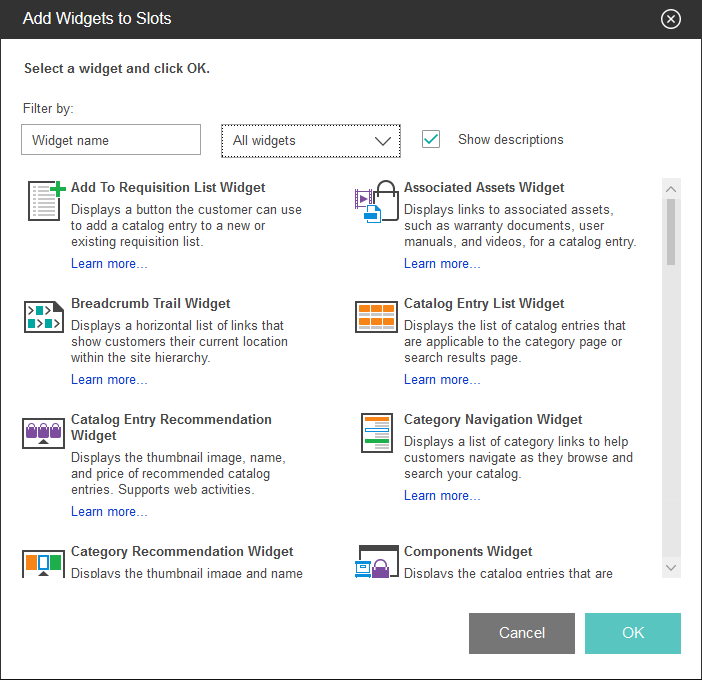
The Add Widgets to Slots window has several features to help you understand and find widgets: - Type the widget name in the Filter by field to view matching widgets.
- Use the All widgets filter to view the subset of widgets that are suited to specific page types. For example, if you select Category page widgets, the list is filtered to display the subset of widgets that are suited to category pages.
- Use the Show descriptions check box to toggle the widget descriptions on and off.
- In the Filter by field, type Bread. Notice that the widget list is filtered to show only the Breadcrumb Trail widget.
- Click Breadcrumb Trail Widget, and
then click OK.The properties for the widget open.
- In the Widget name field, type Breadcrumb
for landing page.
Many widgets, like the Breadcrumb Trail widget, can automatically retrieve and display content. You do not need to specify the breadcrumb trail in the widget. Your layout contains only one widget. However, if you are new to the Commerce Composer tool, it is a good idea to preview your page after you add each widget.
- Click Save and Preview.
In the Commerce Composer tool, the Save and Preview button conveniently opens store preview directly to the page that the layout is assigned to. If the layout has a start date that is in the future, the date in store preview is the start date rather than the current date. Note: If the layout is assigned to or inherited by more than one page, store preview does not open directly to a page. Instead, the Store Preview Options window opens, and you can select the page to view from a list. In this case, if the start date is in the future, you must specify the start date in the Store Preview Options window.Your layout now contains the Breadcrumb Trail widget. Notice that the page title,
Designer Fashions for Women | Aurora, is displayed in the breadcrumb trail.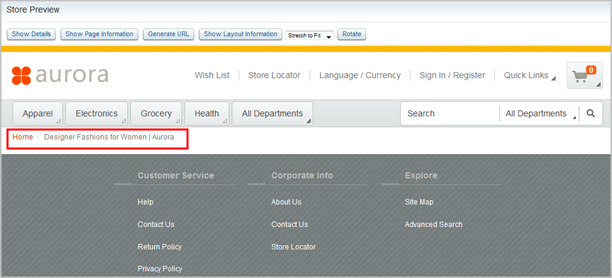
- Familiarize yourself with the informational windows in
store preview, which can help you troubleshoot problems with widgets
and layout assignments:
- Over the breadcrumb trail, click Show Information.
The Widget Information window is displayed.
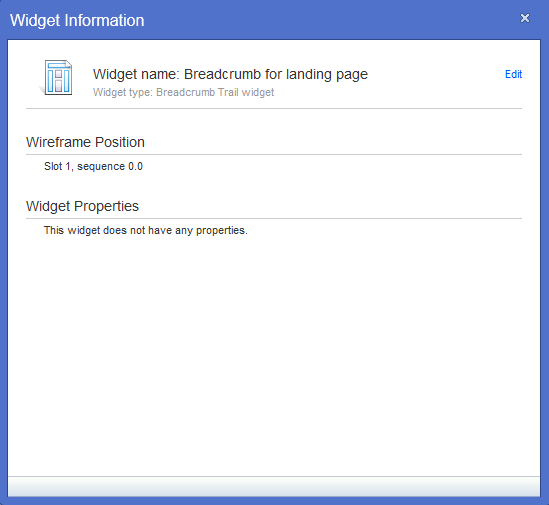
Use the Widget Information window to get information about any widget that you are viewing in store preview. The window displays the following information: - The name and type of widget.
- The slot that the widget is placed in and its sequence relative to other widgets in the slot.
- The widget property settings.
- The source of the content in the widget.
By clicking the Edit link, you can return to the Commerce Composer tool and change the layout that contains the widget.
- At the top of the preview window, click Show
Layout Information.
The Page and Layout Information window is displayed.
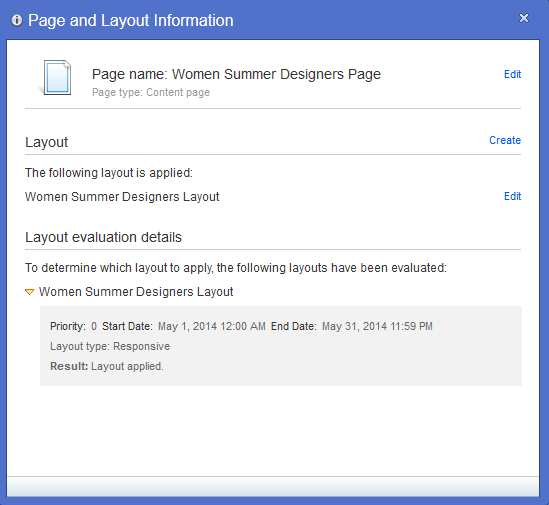
Use the Page and Layout Information window to get the following information about any page that you view in store preview: - The page name and type.
- The name of the layout that is applied to the page. If no layout is assigned to or inherited by the page, the window indicates that the default layout is applied.
- Details about the layouts that were evaluated to determine the correct layout to apply. This detail can prove useful when more than one layout is assigned to or inherited by the page.
By clicking the Edit links, you can return to the Commerce Composer tool and change the page or layout. By clicking the Create link, you can create a new layout for the page.
- Over the breadcrumb trail, click Show Information.