


MigrateEncryptedInfo utility
- WC_installdir/bin/MigrateEncryptedInfo.sh
- WC_installdir/bin/MigrateEncryptedInfo.sh
- WC_installdir/bin/MigrateEncryptedInfo.bat
 WCDE_installdir/bin
When the MigrateEncryptedInfo utility finishes, it generates the following log files.
- CCInfoMigration.log
- MKChangeUserAndCCInfoMigration.log
- MigrateEncryptedInfoError.log
- migrateFailedRecords_TABLENAME.log
in the following directory:
- WC_userdir/instances
- WC_installdir/logs
- WCDE_installdir/logs
Review the information in these log files and ensure that they do not contain any error messages.
If the error happened during the data decryption or encryption, the related failed data records are recorded in the log file WC_installdir/logs/migrateFailedRecords_TABLENAME.log. The TABLENAME is the table name of failed data. It should be one of the USERREG, USERPWDHST, PATTRVALUE, ORDPAYINFO, ORDPAYMTHD, PPCEXTDATA, PPCPAYINST, MERCHCONFINFO, GRUSERAUTH, CSEDITATT, and ISEDITATT tables.
- Restore the database first and run the utility again.
Syntax
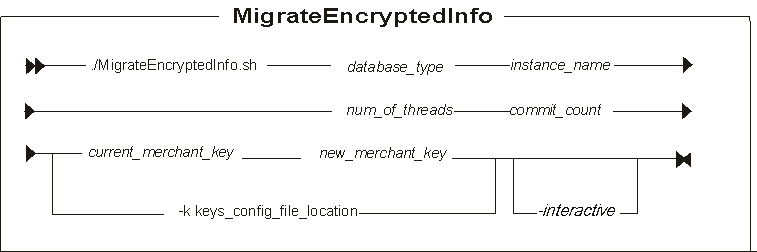
Parameter values
- database_type
-
- Is your database type (db2 for DB2 databases).
- Is your database type (db2 for DB2 databases
or oracle for Oracle databases).
- Is your database type (db2 for DB2 databases or
oracle for Oracle databases or cloudscape for Apache Derby
databases).
- instance_name
- Is a mandatory parameter for the name of the instance that is updated.
- num_of_threads
- The number of threads that are created to re-encrypt the data. The recommendation is that this number should match the number of processors on the server that is running the utility.
- commit_count
- The number of records that are processed before the transaction is committed. The commit_count should be set to the maximum number of transactions that your database transaction log allows. A suggested value for this parameter is 5000.
If the merchant keys are not retrieved from the Key Locator Framework, these are the accepted parameters:
- current_merchant_key
- An optional parameter for the current merchant key, in clear text (ASCII) form. You should specify this parameter only if you are currently using a non-default merchant key, and you are now changing it to a new merchant key. In this case, you should also specify the new_key parameter. If you are currently using the default WebSphere Commerce Suite 5.1 merchant key, do not specify this parameter. The utility detects that you are using the default key.
- new_merchant_key
- A required parameter in clear text (ASCII) form. Specify this parameter if
you are currently using the WebSphere Commerce Suite 5.1 default
merchant key. If you are using a non-default merchant key, then this
parameter is optional. It must conform to the following rules:
- Its length must be 16 hexadecimal characters. Characters can be one of 0, 1, 2, 3, 4, 5, 6, 7, 8, 9, a, b, c, d, e, or f.
- A 32 hexadecimal character is also supported. Characters can be one of 0, 1, 2, 3, 4, 5, 6, 7, 8, 9, a, b, c, d, e, or f.
- It must contain a minimum of one alphabetic character.
- It must contain a minimum of one numeric character.
- It must be in lowercase.
- It cannot contain more than 4 identical consecutive
characters.
For example, aaaa1aaaa1aaaa12 and abcdeaaaa3aaaa12 are allowed. However, aaaaabaaaa1aaaa1 is not allowed as it is greater than 16 characters in length and contains more than 4 identical consecutive characters.
- The key can now be either 16 or 32 characters in length. For example, aaaa1aaaa1aaaa12 and aaaa1aaaa1aaaa12aaaa1aaaa1aaaa12 are allowed.
If the merchant keys are retrieved from the Key Locator Framework, here is the accepted parameter:
- -k keys_config_file_location
- The current and new merchant keys are to be retrieved from the Key Locator Framework using the specified key configuration file. The absolute path of the file must be specified.
- -interactive
- Optional: The administrator is prompted for the new merchant key when this
flag is specified. This flag can be used in offline mode only.
If you want to run the MigrateEncryptedInfo utility without stopping the server, then the -interactive parameter cannot be used.
Example 1
If your merchant key is stored in the
wc-server.xml file and you want to change
the value in that file, run the utility as follows, assuming the encrypted data is
stored in a DB2 database and demo is the instance name:
MigrateEncryptedInfo.bat db2 demo 4 5000 1234567890abcdef abcdef1234567890num_of_threads value to 4 (for a
4-processor server) and the commit_count to 5000.- Start the WebSphere Commerce instance.
- Open a command prompt and navigate to the WC_installdir/bin directory
- Run the following command:
-
WC_installdir/bin/config_ant.sh
-DinstanceName= instance_name UpdateEAR
-
WC_installdir/bin/config_ant.bat
-DinstanceName= instance_name
UpdateEAR
- Restart your WebSphere Commerce instance.
Example 2
If your merchant key is stored in the
wc-server.xml file and you want to change
the value and store the value in an external file, complete these steps:
- Stop the WebSphere Commerce instance.
-
- If you are running the
MigrateEncryptedInfo command to change keys while
the WebSphere Commerce Server is offline, then define a new custom
keys configuration file, CustomKeys.xml, similar to
the following. Place it in a directory relative to an entry on the class
path of the WebSphere Commerce application, such as,
application_dir/WC/xml/config.
<?xml version="1.0" encoding="UTF-8"?>

<keys xmlns="http://www.ibm.com/xmlns/prod/WebSphereCommerce"
xmlns:xsi="http://www.w3.org/2001/XMLSchema-instance"
xsi:schemaLocation="http://www.ibm.com/xmlns/prod/WebSphereCommerce
xsd/WCKeys.xsd">

<key
	name="MerchantKey"
	providerName="WC"
	status="current"
	className="com.ibm.commerce.security.keys.WCMerchantKeyImpl">

	<config
	name="instanceName"
	value="demo"
	/>
</key>

<key
	name="MerchantKey"
	providerName="WC"
	status="new"
	className="com.ibm.commerce.security.keys.WCExternalFileMerchantKeyImpl">

	<config
	name="keyFile"
	value="/opt/WebSphere/AppServer/profiles/default/installedApps/localhost/ts.ear/xml/config/merchantKey.xml"
	/>

	<config
	name="keyEncryptionKeyFile"
	value="/opt/WebSphere/AppServer/profiles/default/installedApps/localhost/ts.ear/xml/config/KeyEncryptionKey.xml"
	/>

	<config
	name="newKeyFile1"
	value="c:/temp/newMerchantKey1.xml"
	/>

	<config
	name="newKeyFile2"
	value="c:/temp/newMerchantKey2.xml"
	/>

</key>
</keys>
See Key Provider Implementations for merchant key for detail descriptions of each parameter and the format of the key files.
- If you are running the
MigrateEncryptedInfo command to migrate
encryption from 3DES to AES, and the WebSphere Commerce Server is
online, then WebSphere Commerce must have a way to differentiate
data encrypted with the original key from data encrypted with the new
key. For this reason, you must specify a unique version number to each
key by using the version parameter.
In this circumstance, the MigrateEncryptedInfo utility decrypts data that is encrypted with the existing ("current") key and re-encrypts it with the new ("new") key.
Valid values for algorithm are
3DESandAES.<?xml version="1.0" encoding="UTF-8"?> <keys xmlns="http://www.ibm.com/xmlns/prod/WebSphereCommerce" xmlns:xsi="http://www.w3.org/2001/XMLSchema-instance" xsi:schemaLocation="http://www.ibm.com/xmlns/prod/WebSphereCommerce xsd/WCKeys.xsd"> <key name="MerchantKey" providerName="WC" status="current" className="com.ibm.commerce.security.keys.WCMerchantKeyImpl" version="2" algorithm="AES"> <config name="instanceName" value="demo" /> </key> <key name="MerchantKey" providerName="WC" status="new" className="com.ibm.commerce.security.keys.WCExternalFileMerchantKeyImpl"> version="3" algorithm="AES" <config name="keyFile" value="/opt/WebSphere/AppServer/profiles/default/installedApps/localhost/ts.ear/xml/config/merchantKey.xml" /> <config name="keyEncryptionKeyFile" value="/opt/WebSphere/AppServer/profiles/default/installedApps/localhost/ts.ear/xml/config/KeyEncryptionKey.xml" /> <config name="newKeyFile1" value="c:/temp/newMerchantKey1.xml" /> <config name="newKeyFile2" value="c:/temp/newMerchantKey2.xml" /> </key> </keys>Note: The CustomKeys.xml and
all other key files (for example,
newMerchantKey1.xml) must be read and write
accessible by wasuser.
- If you are running the
MigrateEncryptedInfo command to change keys while
the WebSphere Commerce Server is offline, then define a new custom
keys configuration file, CustomKeys.xml, similar to
the following. Place it in a directory relative to an entry on the class
path of the WebSphere Commerce application, such as,
application_dir/WC/xml/config.
- Open a command prompt and navigate to the WC_installdir/bin directory
- Run the utility, assuming the encrypted data is stored in a DB2 database and
demo is the instance name:
-
MigrateEncryptedInfo db2 demo 4 5000 -k WC_eardir/xml/config/CustomKeys.xml -
MigrateEncryptedInfo db2 demo 4 5000 -k WC_eardir\xml\config\CustomKeys.xml
- Add a
KeysConfigFileattribute in the workspace_dir/WC/xml/config/wc-server.xml file. This attribute points to an entry on the classpath of the WebSphere Commerce application. For example,KeysConfigFile = "config/CustomKeys.xml" - Remove the old MerchantKey attribute and value references
from the
<Instance>section of the instance.xml and wc-server.xml configuration files. The merchantKey value is now referred to through the KeyConfigFile attribute after running the MigrateEncryptedInfo utility. - Now that all the encrypted data is encrypted with the value retrieved from the
new key provider,
WCExternalFileMerchantKeyImpl, edit the keys configuration file as follow:- Remove the
currentkey provider. - Change the status of the
newkey provider tocurrent.
- Remove the
- Start the WebSphere Commerce instance.
- Run the following command to deploy the changes made to
instance.xml:
- WC_installdir/bin/config_ant.sh
-DinstanceName= instance_name UpdateEAR
-
WC_installdir/bin/config_ant.bat -DinstanceName=
instance_name UpdateEAR
- Deploy the changes to the custom XML files. For example,
merchantKey.xml, CustomKeys.xml,
and KeyEncryptionKey.xml. For steps on deploying multiple
files, see Deploying Java EE assets for a partial application.Note: In clustered environments, if any of your changed custom XML files are outside the EAR, for example merchantKey.xml and KeyEncryptionKey.xml, you must manually copy these files to the other servers.
- Restart your WebSphere Commerce instance.
Example 3
If your merchant key is stored in an external file and you want to change the value, complete these steps:
- Stop the WebSphere Commerce instance.
-
- If you are running the
MigrateEncryptedInfo command to change keys while
the WebSphere Commerce Server is offline, then define a new custom
keys configuration file, CustomKeys.xml, similar to
the following. Place it in a directory relative to an entry on the class
path of the WebSphere Commerce application, such as,
application_dir/WC/xml/config.
<?xml version="1.0" encoding="UTF-8"?>

<keys xmlns="http://www.ibm.com/xmlns/prod/WebSphereCommerce"
xmlns:xsi="http://www.w3.org/2001/XMLSchema-instance"
xsi:schemaLocation="http://www.ibm.com/xmlns/prod/WebSphereCommerce
xsd/WCKeys.xsd">

<key
	name="MerchantKey"
	providerName="WC"
	status="current"
	className="com.ibm.commerce.security.keys.WCMerchantKeyImpl">

	<config
	name="instanceName"
	value="demo"
	/>
</key>

<key
	name="MerchantKey"
	providerName="WC"
	status="new"
	className="com.ibm.commerce.security.keys.WCExternalFileMerchantKeyImpl">

	<config
	name="keyFile"
	value="/opt/WebSphere/AppServer/profiles/default/installedApps/localhost/ts.ear/xml/config/merchantKey.xml"
	/>

	<config
	name="keyEncryptionKeyFile"
	value="/opt/WebSphere/AppServer/profiles/default/installedApps/localhost/ts.ear/xml/config/KeyEncryptionKey.xml"
	/>

	<config
	name="newKeyFile1"
	value="c:/temp/newMerchantKey1.xml"
	/>

	<config
	name="newKeyFile2"
	value="c:/temp/newMerchantKey2.xml"
	/>

</key>
</keys>
See Key Provider Implementations for merchant key for detail descriptions of each parameter and the format of the key files.
- If you are running the
MigrateEncryptedInfo command to migrate
encryption from 3DES to AES, and the WebSphere Commerce Server is
online, then WebSphere Commerce must have a way to differentiate
data encrypted with the original key from data encrypted with the new
key. For this reason, you must specify a unique version number to each
key by using the version parameter.
In this circumstance, the MigrateEncryptedInfo utility decrypts data that is encrypted with the existing ("current") key and re-encrypts it with the new ("new") key.
Valid values for algorithm are
3DESandAES.<?xml version="1.0" encoding="UTF-8"?> <keys xmlns="http://www.ibm.com/xmlns/prod/WebSphereCommerce" xmlns:xsi="http://www.w3.org/2001/XMLSchema-instance" xsi:schemaLocation="http://www.ibm.com/xmlns/prod/WebSphereCommerce xsd/WCKeys.xsd"> <key name="MerchantKey" providerName="WC" status="current" className="com.ibm.commerce.security.keys.WCMerchantKeyImpl" version="2" algorithm="AES"> <config name="instanceName" value="demo" /> </key> <key name="MerchantKey" providerName="WC" status="new" className="com.ibm.commerce.security.keys.WCExternalFileMerchantKeyImpl"> version="3" algorithm="AES" <config name="keyFile" value="/opt/WebSphere/AppServer/profiles/default/installedApps/localhost/ts.ear/xml/config/merchantKey.xml" /> <config name="keyEncryptionKeyFile" value="/opt/WebSphere/AppServer/profiles/default/installedApps/localhost/ts.ear/xml/config/KeyEncryptionKey.xml" /> <config name="newKeyFile1" value="c:/temp/newMerchantKey1.xml" /> <config name="newKeyFile2" value="c:/temp/newMerchantKey2.xml" /> </key> </keys>Note: The CustomKeys.xml and
all other key files (for example,
newMerchantKey1.xml) must be read and write
accessible by wasuser.
- If you are running the
MigrateEncryptedInfo command to change keys while
the WebSphere Commerce Server is offline, then define a new custom
keys configuration file, CustomKeys.xml, similar to
the following. Place it in a directory relative to an entry on the class
path of the WebSphere Commerce application, such as,
application_dir/WC/xml/config.
- Open a command prompt and navigate to the WC_installdir/bin directory
- Run the utility, assuming the encrypted data is stored in a DB2 database and
"demo" is the instance name:
-
MigrateEncryptedInfo db2 demo 4 5000 -k WC_eardir/xml/config/CustomKeys.xml -
MigrateEncryptedInfo db2 demo 4 5000 -k WC_eardir\xml\config\CustomKeys.xml
- Now that all the encrypted data is encrypted with the value retrieved from the
"new" key provider,
WCExternalFileMerchantKeyImpl, edit the keys configuration file as follow:- Remove the
currentkey provider - Change the status of the
newkey provider tocurrent.
- Remove the
- Start the WebSphere Commerce instance.
- Deploy the changes to the custom XML files. For example,
merchantKey.xml, CustomKeys.xml,
and KeyEncryptionKey.xml. For steps on deploying multiple
files, see Deploying Java EE assets for a partial application.Note: In clustered environments, if any of your changed custom XML files are outside the EAR, for example merchantKey.xml and KeyEncryptionKey.xml, you must manually copy these files to the other servers.
- Restart your WebSphere Commerce instance.
Example 4
If your merchant key is stored in an external file and you want to change the value by using the -interactive parameter and store it to a different file, complete these steps:
- Stop the WebSphere Commerce instance.
- Modify your existing custom keys configuration file (For example,
WC_eardir/xml/config/CustomKeys.xml)
to resemble something similar to the following XML:
<?xml version="1.0" encoding="UTF-8"?>
<keys xmlns="http://www.ibm.com/xmlns/prod/WebSphereCommerce"
	xmlns:xsi="http://www.w3.org/2001/XMLSchema-instance"
	xsi:schemaLocation="http://www.ibm.com/xmlns/prod/WebSphereCommerce C:\WebSphere\CommerceServer\wc.ear\xml\config\xsd\WCKeys.xsd">
	<key name="MerchantKey" providerName="WC" status="current"
		className="com.ibm.commerce.security.keys.WCExternalFileMerchantKeyImpl">
		<config name="keyFile"
			value="c:/WebSphere/CommerceServer/instances/demo/xml/merchantKey.xml" />
		<config name="keyEncryptionKeyFile"
			value="c:/WebSphere/CommerceServer/instances/demo/xml/KeyEncryptionKey.xml" />
	</key>

	<key name="MerchantKey" providerName="WC" status="new"
		className="com.ibm.commerce.security.keys.WCExternalFileMerchantKeyImpl">
		<config name="keyFile"
			value="c:/WebSphere/CommerceServer/instances/demo/xml/merchantKey1.xml" />
		<config name="keyEncryptionKeyFile"
			value="c:/WebSphere/CommerceServer/instances/demo/xml/KeyEncryptionKey1.xml" />
		<config name="newKeyFile1" value="c:/temp/newMerchantKey1.xml">
		<config name="newKeyFile2" value="c:/temp/newMerchantKey2.xml">
	</key>
</keys>
See Key Provider Implementations for merchant key for detail descriptions of each parameter and the format of the key files.
Note: The CustomKeys.xml and all other key files (for
example, newMerchantKey1.xml) must be read and write
accessible by wasuser. - Open a command prompt and navigate to the WC_installdir/bin directory
- Run the utility, assuming the encrypted data is stored in a DB2 database and
"demo" is the instance name. Then, you are prompted to input the new merchant
key.
-
MigrateEncryptedInfo db2 demo 4 5000 -k WC_eardir/xml/config/CustomKeys.xml -
MigrateEncryptedInfo db2 demo 4 5000 -k WC_eardir\xml\config\CustomKeys.xml
- Now that all the encrypted data is encrypted with the value retrieved from the
"new" key provider,
WCExternalFileMerchantKeyImpl, edit the keys configuration file as follow:- Remove the
currentkey provider - Change the status of the
newkey provider tocurrent.
- Remove the
- Use a secure removal tool (SDelete or SRM) to remove the old key files (for example, merchantKey.xml and KeyEncryptionKey.xml).
- Start the WebSphere Commerce instance.
- Deploy the changes to the custom XML files. For example,
merchantKey.xml, CustomKeys.xml,
and KeyEncryptionKey.xml. For steps on deploying multiple
files, see Deploying Java EE assets for a partial application.Note: In clustered environments, if any of your changed custom XML files are outside the EAR, for example merchantKey.xml and KeyEncryptionKey.xml, you must manually copy these files to the other servers.
- Restart your WebSphere Commerce instance.