MigrateEncryptedFiles utility
The MigrateEncryptedFiles utility updates the encrypted information in configuration files from 3DES encryption to AES encryption, and sets the encryption mechanism to AES.
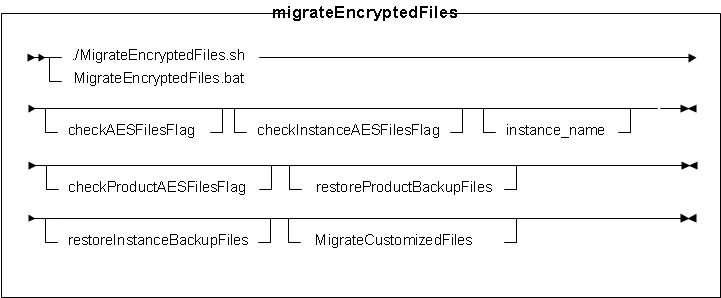
Parameter values
- checkAESFilesFlag
- Checks if the current encryption mechanism is set as AES_Files.
- checkInstanceAESFilesFlag
- Checks if the current instance encryption mechanism is set as AES_Files.
- instance_name
- The name of the WebSphere Commerce instance with which you are working (for example,
demo).Note: If you do not specify an instance, the utility updates all instances on your environment.
- checkProductAESFilesFlag
- Checks if the current runtime product encryption mechanism is set as AES_Files.
- restoreProductBackupFiles
- Restores the product backup files.
- restoreInstanceBackupFiles
- Restores the instance backup files.
- MigrateCustomizedFiles
- Migrates the runtime customized files.
Usage
- To migrate configuration files to use AES encryption:
- Go to the following directory:
- WC_installdir/bin
 WCDE_installdir\bin
- Run the MigrateEncryptedFiles utility:


 MigrateEncryptedFiles.sh
 MigrateEncryptedFiles.bat
- MigrateEncryptedFiles.bat
- Verify that the utility completed successfully:
- Review the information in the log file to ensure that it does not contain any error messages:
- WC_installdir/logs/MigrateEncryptedFiles_timestamp.log
- Review the following file and ensure that the
AES_FILESparameter is set totrue:- WC_installdir/xml/product.xml
- WAS_installdir\profiles\instance_name\installedApps\instance_name_cell\instance_name.ear\xml\config\wc-server.xml
- workspace_dir\WC\xml\config\wc-server.xml
- Review the information in the log file to ensure that it does not contain any error messages:
- Go to the following directory:
- To verify the current encryption mechanism to ensure that it is set as AES_Files:
- Go to the following directory:
- WC_installdir/bin
- WCDE_installdir\bin
- Run the MigrateEncryptedFiles utility to check for the flag:
- MigrateEncryptedFiles.sh
checkAESFilesFlag
- MigrateEncryptedFiles.bat checkAESFilesFlag
- MigrateEncryptedFiles.bat checkAESFilesFlag
- Verify the utility results.
- Go to the following directory:
- To verify the current instance encryption mechanism to ensure that it is set as AES_Files:
- Go to the following directory:
- WC_installdir/bin
- WCDE_installdir\bin
- Run the MigrateEncryptedFiles utility to check for the flag:
- MigrateEncryptedFiles.sh checkInstanceAESFilesFlag
-DinstanceName=instance_name
- MigrateEncryptedFiles.bat checkInstanceAESFilesFlag
-DinstanceName=instance_name
- MigrateEncryptedFiles.bat checkInstanceAESFilesFlag
-DinstanceName=instance_name
- Verify the utility results.
- Go to the following directory:
- To verify the current runtime product encryption mechanism to ensure that it is set as AES_Files:
- Go to the following directory:
- WC_installdir/bin
- WCDE_installdir\bin
- Run the MigrateEncryptedFiles utility to check for the flag:
- MigrateEncryptedFiles.sh
checkProductAESFilesFlag
- MigrateEncryptedFiles.bat
checkProductAESFilesFlag
- MigrateEncryptedFiles.bat
checkProductAESFilesFlag
- Verify the utility results.
- Go to the following directory:
- To restore the product backup files:
- Go to the following directory:
- WC_installdir/bin
- WCDE_installdir\bin
- Run the MigrateEncryptedFiles utility to restore the files:
- MigrateEncryptedFiles.sh
restoreProductBackupFiles
- MigrateEncryptedFiles.bat
restoreProductBackupFiles
- MigrateEncryptedFiles.bat
restoreProductBackupFiles
- Verify the utility results.
- Go to the following directory:
- To restore the instance backup files:
- Go to the following directory:
- WC_installdir/bin
- WCDE_installdir\bin
- Run the MigrateEncryptedFiles utility to restore the files:
- MigrateEncryptedFiles.sh restoreInstanceBackupFiles
-DinstanceName=instance_name
- MigrateEncryptedFiles.bat restoreInstanceBackupFiles
-DinstanceName=instance_name
- MigrateEncryptedFiles.bat restoreInstanceBackupFiles
-DinstanceName=instance_name
- Verify the utility results.
- Go to the following directory:
- To migrate the product customized files:
- Go to the following directory:
- WC_installdir/bin
- WCDE_installdir\bin
- Run the MigrateEncryptedFiles utility to migrate the files:
- MigrateEncryptedFiles.sh MigrateCustomizedFiles
-DinputFile=absoluteInputFile
- MigrateEncryptedFiles.bat MigrateCustomizedFiles
-DinputFile=absoluteInputFile
- MigrateEncryptedFiles.bat MigrateCustomizedFiles
-DinputFile=absoluteInputFile
- Verify the utility results.
- Go to the following directory:
- To migrate the runtime instance customized files:
- Go to the following directory:
- WC_installdir/bin
- WCDE_installdir\bin
- Run the MigrateEncryptedFiles utility to migrate the files:
- MigrateEncryptedFiles.sh MigrateCustomizedFiles
-DinputFile=absoluteInputFile
-DinstanceName=instance_name
- MigrateEncryptedFiles.bat MigrateCustomizedFiles
-DinputFile=absoluteInputFile
-DinstanceName=instance_name
- MigrateEncryptedFiles.bat MigrateCustomizedFiles
-DinputFile=absoluteInputFile
-DinstanceName=instance_name
- Verify the utility results.
- Go to the following directory: