Building and deploying the store
The custom React Store application is built as a React SPA static model and can be deployed to any web server of your choice. The Store SDK build process supports the building of multiple apps.
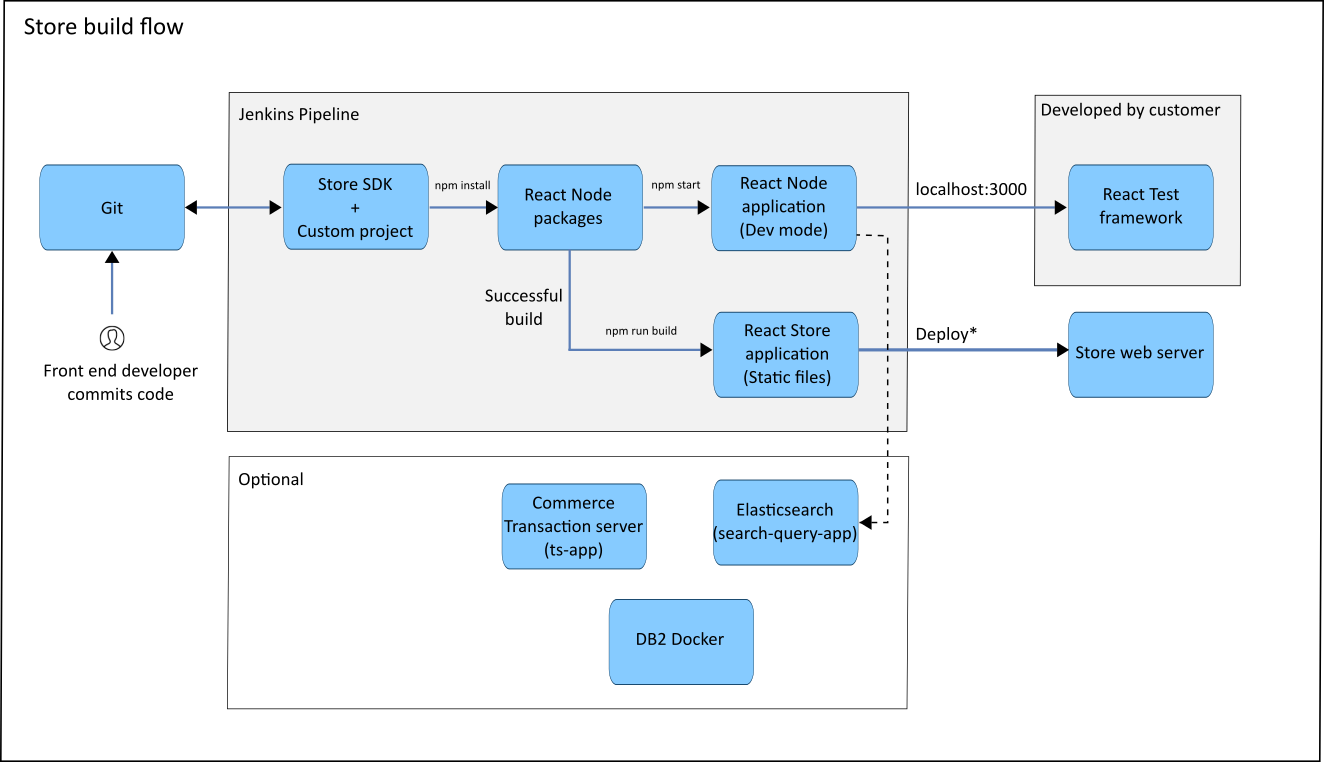
React Store application build flow
The following diagram shows the typical React Store application build flow.
Build process
The Store SDK contains two Reference Store applications: the B2C store based Emerald app and the B2B store based Sapphire app.
When you run the production build, the bundle files are output into the dist/Emerald and dist/Sapphire folders. The React route basename for the apps is set by default to Emerald and Sapphire respectively.
The Store SDK build process is built on top of the react-script from the Create React App. For more information, see https://create-react-app.dev/docs/getting-started.
To customize the build process, see Customizing the build process.
Build scripts
The build scripts are located in the tools/scripts folder.
- start.js is used when a user runs the
npm start,npm run mock, ornpm run previewcommands that start a React development server. - build.js is used when a user runs
npm run buildto build the app bundles. - buildConstant.js defines the constants that are used during the build.
- The other scripts in the folder are helper scripts for both build.js and start.js.
Build Assets
The build assets are located in the assets folder.
- The common sub folder has all the common assets that are used by the apps.
- The Emerald and Sapphire sub folders are named based on the app names. All app specific assets are located in these folders.
- The template sub folder is for the template files that are used during the build process. A template file usually contains tokens that correspond to values in the build scripts.
During the build process, all files in sub folders are copied to the destination with the same folder structure as in the project. For example, .env.development.template in the template folder is output to project root as .env.development.
- The default folder is copied first.
- For the mock mode, when you run
npm run mock, the files in the mock folder is copied and the default folder is overwritten. - For the preview mode, when you run
npm run preview, the files in the preview folder is copied and the default folder is overwritten. - If a mode is not specified and you run
npm start, only the default folder is copied. - For the production build, when you run
npm run build, the production folder is copied and the default folder is overwritten.
Build process flow
The following actions occur when you run a build command:
npm start, npm run preview, and npm run
mock commands:- Clean public folder. The public folder is the Create React app assets folder. For more information, see https://create-react-app.dev/docs/using-the-public-folder/.
- Copy app assets from the assets folder to the default public folder.
- Copy templates from the template folder, including environment variables, in .env.
- Run
react-script start.
npm run build- Clean dist folder. The dist is where the bundles are output by the build process.
- Clean public folder.
- Copy app assets from the assets folder to the default public folder.
- Copy templates from the template folder, including environment variables, in .env.
- Run
react-script build. - Copy files from build folder to the dist/<appName> folder.
- Clean public folder.
- Continue with building the second app if applicable.