Create a widget display group to organize the widgets that are available within
the Add Widgets to Slots window. When business users select to add a widget to
a layout template slot, the user can use the widget display group to filter the widgets that show
within the Add Widgets to Slots window.
About this task
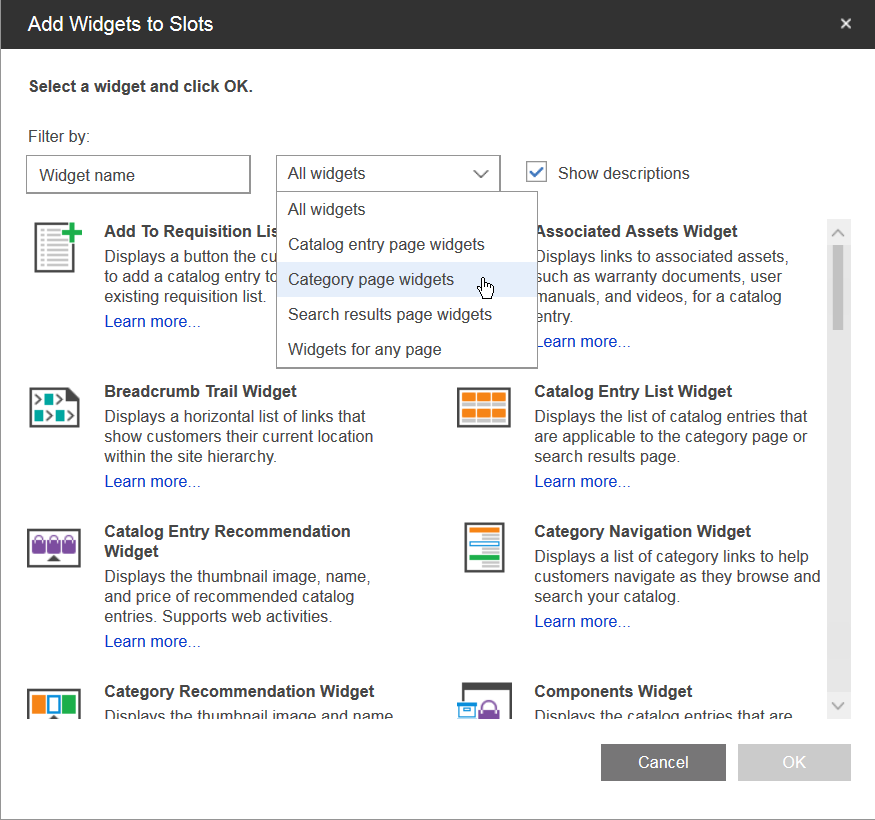
The Add Widgets to Slots window includes all of the widgets that a
store subscribes to and that are registered in the Commerce Composer framework. By default, these
widgets are organized into the following widget display groups for filtering the widgets that
display in the window at a time:
AnyPage
Set of widgets for use on any page. This group displays as the Widgets for any
page option within the Add Widgets to Slots window.
CategoryPage
Set of widgets for use on category pages. This group displays as the Category page
widgets option within the Add Widgets to Slots window.
CatalogEntryPage
Set of widgets for use on catalog entry pages. This group displays as the Catalog
entry page widgets option within the Add Widgets to Slots
window.
SearchPage
Set of widgets for use on a search results page. This group displays as the Search
results page widgets option within the Add Widgets to Slots
window.
Figure 1. Add Widgets to Slots window. The window includes the drop-down list with the available widget display groups.
If you are creating custom widgets, you might want to create a widget display group to
include your custom widgets. If you are creating new page types to be managed with the Commerce
Composer tool, you might want to create a widget display group for that page type. Your new group
can include all of the widgets that a Management Center user can add to layout template slots for
that new page type.
To create a widget display group, you must create a Management Center
object definition for the group and define the text properties for the group. After you define the
object definition for your new group and rebuild the LOBTools project, the Management Center
framework updates to include your group in the Commerce Composer tool. To create the source code
files for defining the widget display group object definition and text properties, you can use one
of the following options:
Use an existing widget display group object definition as a model for creating the object
definition for your new widget display group. The following steps outline the procedure for this
option.
Use the JET Transformation with a pattern input file to generate a new code package that
includes the source code files for your new widget display group. If you choose to use this method,
you must move or merge the generated files into your existing LOBTools project. When you are
creating the pattern input file for use with the JET Transformation, ensure that you include the
<widgetGroup> element and corresponding attributes to generate the files for
your widget display group. If you are only creating the source code files for a widget display
group, do not include the <widgetDef> element. You can use the JET
Transformation to create the source code files for only a single widget display group when you run
the transformation.
Optional: If the file structure does not exist, create the file structure to include your custom Commerce
Composer assets.
Go to the LOBTools\WebContent\WEB-INF\src\xml directory.
Create a folder to contain your custom assets.
For example, you can name the directory MyCompany.
Within this directory, create the pagelayout\widgetDefinitions folder
structure.
Go to the LOBTools\src\com directory.
Create a folder to contain your custom assets.
For example, you can name the directory MyCompany.
Within this directory, create the
commerce\pagelayout\client\lobtools\properties folder structure.
Go to the LOBTools\WebContent\WEB-INF\src\xml directory.
Create a folder to contain your custom assets.
For example, you can name the directory MyCompany.
Within this directory, create the pagelayout directory.
Create object definition file for your new widget display group.
Go to the
LOBTools\WebContent\WEB-INF\src\xml\commerce\pagelayout\widgetDefinitions
directory.
Copy of one the widget group object definition files that are provided by default.
For example, copy the AnyPageWidgetGroup.xml file.
Go to the
LOBTools\WebContent\WEB-INF\src\xml\MyCompany\pagelayout\widgetDefinitions
directory.
Add your copied object definition file into this directory.
Rename your copied object definition file. Use the format
WidgetGroupIdentifierWidgetGroup.xml, where
WidgetGroupIdentifier is the value of the identifier for your new widget display
group
For example, if you are creating a widget display group for custom widgets that are created
by your company, you can name the file,
MyCompanyCustomPageWidgetGroup.xml.
Open the file for editing.
By default the file includes the following code to define a widget display
group:
<?xml version="1.0" encoding="UTF-8"?>
<!--
 =================================================================
  Licensed Materials - Property of IBM

  HCL Commerce

  (C) Copyright IBM Corp. 2015 All Rights Reserved.

  US Government Users Restricted Rights - Use, duplication or
  disclosure restricted by GSA ADP Schedule Contract with
  IBM Corp.
 =================================================================
-->
<Definitions>
	<LayoutWidgetGroup definitionName="cmc/pagelayout/AnyPageWidgetGroup"
                          displayName="${pageLayoutResources.widgetGroupDisplayName_AnyPage}"
                          identifier="AnyPage"
                          package="cmc/pagelayout"
                          parentDefinition="cmc/pagelayout/NewPageLayoutWidgetDialog">
		<dependency localName="pageLayoutResources" moduleName="cmc/pagelayout/PageLayoutResources"/>
	</LayoutWidgetGroup>
</Definitions>
Where
definitionName
The name of the definition for the widget display group object definition.
displayName
The name of the widget display group that displays in the Add Widgets to
Slots window within the Commerce Composer tool. The value for this attribute is in
defined within the PageLayoutLOB.properties text properties file. This file is
in the LOBTools\src\com\ibm\commerce\pagelayout\client\lobtools\properties
directory.
identifier
The identifying name for the widget display group.
package
The name of the package for widget display groups within the workspace.
parentDefinitionName
The name of the parent object definition.
Update the values for the object definition to define your new widget group
Save and close the file.
Create or update a properties file to include the text for your widget display group.
Go to the
LOBTools\src\com\ibm\commerce\pagelayout\client\lobtools\properties
directory.
Optional: If a properties file does not exist for your custom assets, create a properties file. Name the
file PageLayoutLOB.properties.
Open the PageLayoutLOB.properties file for editing.
Add the following code to define the display name for your widget display group:
Where
WidgetGroupIdentifier is the value of the identifier for your new widget display
group. For example,
widgetGroupDisplayName_MyCompanyCustomPage=Custom widgets for any page
Save and close the file.
Register the text property for your widget display group within a resource bundle.
If you created a resource bundle file to register your widget display group text properties,
include the new resource bundle wherever it is used.
Include any appropriate widget within your new widget display group. For each widget that you
want to include within the group, update the object definition for the widget.
Go to the directory that includes the object definitions for your store widgets.
If you want to include a widget that is available by default, go to the following directory:
Verify that your widget display group is available within the Add Widgets to
Slots window in the Commerce Composer tool. Create a layout.
When you select to add a widget to a template slot, ensure that you can filter by your new widget
display group. Ensure that only the widgets that you included within this group display when you
select your widget display group.