HCL Commerce Enterprise

Uploading requisition lists

You can create a requisition list in a text or spreadsheet editor and upload the requisition list to the store. A requisition list is a reusable list of items (SKUs) that you can use to create orders. Requisition lists are supported when the Aurora starter store is published as a B2B store.

About this task

The file that you upload:
  • Must be a plain text file that contains data in a specific format.
  • Must have the file extension .csv. A CSV (comma-separated values) file is a text file that stores tabular data that is separated by commas.
Note: You might not be able to use iOS mobile devices to upload requisition lists. IBM tested the upload on mobile devices with the iOS 7 and iOS 8.0.2 operating systems and was unable to browse to and upload the CSV-format file.

Procedure

  1. Copy the following sample data for a requisition list into a spreadsheet editor like Microsoft Excel, or into a text editor like Notepad:
    shared: N
    FSC039_3907012,1
    FSC039_3906025,3
    FSC039_390503,10
    FNU040_4010012,25

    The result looks like one of these examples:

    Figure 1. Sample requisition list format in a spreadsheet editor

    Requisition list data in a spreadsheet editor
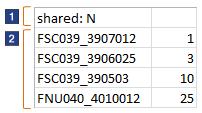
    Figure 2. Sample requisition list format in a text editor

    Requisition list data in a text file

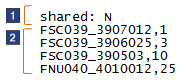
  2. Update your file with data for your own requisition list:
    1. In the row that is labeled 1, specify whether the requisition list is shared or private. A shared requisition list can be viewed and used by other people in the same organization, but only the person who created the list can change or delete it. A private requisition list can be viewed, used, edited, and deleted only by the person who created it.
      • For a shared list, type shared: Y
      • For a private list, type shared: N

      If you do not include the row that is labeled 1, your list is private.

    2. In the rows that are labeled 2, type the SKU (product code) and then the quantity of each item to include in the requisition list.
      • If you are using a spreadsheet editor, put the SKU and quantity in separate columns.
      • If you are using a text editor, separate the SKU and quantity with a comma.
  3. Save the sample file as a .csv file by using a file name that makes sense for your requisition list. Example: ProjectARequisitionList.csv
    • If you are using a spreadsheet editor, click the Save As option, and then select .csv as the file type.
    • If you are using a text editor, you can manually change the file extension from .txt to .csv after you save the file.

    If your file has another extension, such as .xls or .txt, you cannot upload it.

  4. Open the Aurora starter store and sign in as a registered buyer.
  5. In the store header, click the My Account link.
  6. In the left pane of the My Account Summary page, click Requisition Lists.
  7. In the Requisition Lists page, upload your file:
    1. Click the Upload List tab.
    2. Click Browse, and then browse to the file that you created.
    3. Click Upload.
      Uploading might take a few minutes or longer, especially if the file has many SKUs. The status shows Uploading while the upload is in progress. When the upload is complete, the store page is refreshed. The upload status is displayed at the top of the Requisition Lists page. There are three possible statuses:

      Requisition list upload statuses

      Status What it means What to do
      Uploaded The requisition list is created and the list contains all the SKUs in the CSV file. To view the uploaded list, click the list name, which is displayed in the first row of the requisition list table. The list name is the name of the CSV file that you uploaded.
      Partially uploaded The requisition list is created but certain SKUs in the CSV file are not included in the requisition list. The reason might be that the SKU does not exist in the catalog, the SKU was entered incorrectly in the file, or the quantity is not valid.
      1. In the Requisition Lists window, click View Log beside the CSV file name.
      2. Review the list of SKUs that are not included in the requisition list.
      3. If you want to try uploading the list again, delete the partially uploaded list. Then, correct your CSV file and try uploading the entire file again.
      Upload failed The requisition list is not created. The reasons might be that the file is not a CSV-format file or the data in the file is not formatted correctly. Check your file to ensure that the file has a .csv file extension and that the data is formatted correctly. Then, try uploading the entire file again.