Creating and configuring your custom store
You can create and configure your custom store in your Externalized Customization workspace through the configuration and execution of a Gradle script. You can then configure your store assets, sample data, and use your Externalized Customization workspace to customize that store.
Store assets
- Static resource files, such as JSP, JavaScript, and image files in the
crs-web archive.The following screen capture shows the structure of the crs-web archive:
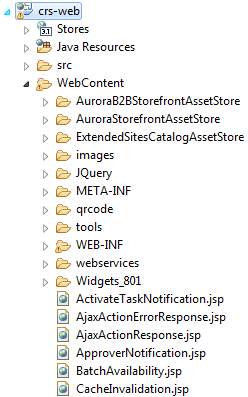
Where the WebContent directory contains the static resource files for the AuroraB2BStorefrontAssetStore, AuroraStorefrontAssetStore, and ExtendedSitesCatalogAssetStore sample stores.The crs-web project in your Externalized Customization workspace acts as your customized store web project and as your storefront asset store template. Therefore, it contains all the required files for your store, and also copies them to your target folder when you run the addStore Gradle script. For more information about where the store assets are located and how they are used in the store, see Store assets.
- Bootstrap and sample data are in the
WCDE_installdir/starterstores/DataTemplate.zip file.The following screen capture shows the structure of the DataTemplate.zip file:
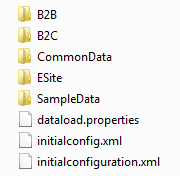
Where bootstrap and sample data files exist for the sample stores and business models.The DataTemplate.zip file is then used by the RemoteDataload scheduler job to populate your store's bootstrap data and optionally your store's sample data. For more information about what the sample data looks like when browsing the storefront, see Aurora starter store.
To use your own custom data template file, create the ZIP file in the WCDE_installdir/starterstores directory, and then specify the file name as the dataTemplate parameter value when you run the Gradle script.
When you create your custom store, you can publish stores that are based on the preceding assets, with your choice of store names, inventory models, and sample data.
Differences between HCL Commerce store versions (local vs remote store)
There are several differences to be aware of between HCL Commerce store versions.
| Local store | Remote store | |
|---|---|---|
| Deployment | WebSphere Application Server Network Deployment-based deployment. | Docker container-based deployment architecture. |
| MVC framework | Struts. | Spring. |
| Database access | Direct access to database by using EJB and data beans. | No direct access to database. REST calls are made to the Transaction server. |
| Tag library | Local store tag library. | Tag library reimplemented. Tag names remain the same, but Java package library names are different. Important: Some tags, including
GetDataTag,
ContextDataTag, and StoreConfTag are not supported in the HCL Commerce version 9 (and later) remote store. These tags are only available and used by the
local store. If you need to access the configurations in the version 9 (and later) STORECONF table,
you can use the OnlineStore services. For more information, refer to
JSPExtToInclude.jspf. |
| Store publish | Store publish wizard and SAR files deployed locally. | Gradle script and data load deployed remotely on the store server. |
| JavaScript library | Dojo and jQuery. | jQuery only. |
| Cache invalidation | Database records exist for all changed data. A scheduler job is used to invalidate the cache registry. | Apache Kafka is used to pass the invalidated cache ID from the Transaction server to the store server. |
Before you begin
If you want to use the Aurora starter store as a development base, load the WebSphere Commerce Developer database schema and indicate withSample=sampleData to include the Aurora sample data.
Or, if you want to use your own data, after you create your custom store and populate its bootstrap data, you can use the Catalog Upload feature in the Catalogs tool to upload sales catalogs, categories, catalog entries (products, SKUs, bundles, and kits), attributes, asset references, and more into Management Center.
What to do next
After you have published a store, you can begin to customize and configure your store to meet your business needs. For more information, see First steps after creating a custom store.