
Testing a custom layout template in Management Center
Test your custom layout templates before you deploy your custom assets to your
staging or production environment for Management Center users to use. You can test your new layout
templates in your development environment by composing a page layout within the Commerce Composer
tool and previewing the layout in your store.
Procedure
- Start or restart the HCL Commerce Developer Test Server.
- Open the Commerce Composer tool..
- In the explorer view (left pane), click Content Pages.
- In the work area (right pane), right-click the page, and then click New Layout
-
Start a layout that is based on your new custom layout template. In the New Layout
Template Selection window, ensure that your template name, description, and wireframe
display correctly.
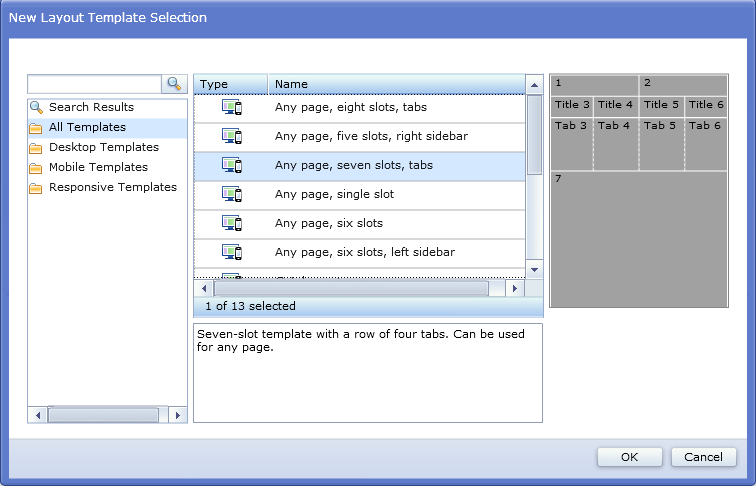
Select your new custom layout template, and click OK.
-
Complete the following fields:
Option Description Layout name Type a name for this layout, for example, HalloweenLandingPageLayout. Folder Specify one or more folders in which to include this layout. From the explorer view, drag a subfolder of the Layouts folder into this table. If you do not specify a folder, this layout is included only in the Layouts folder. Priority Assign a priority by entering a number between zero (lowest priority) and one thousand (highest priority). If more than one layout is assigned to or inherited by a page for a given time period, the layout with the highest priority is applied on the storefront. For example, the page might have an existing layout assigned indefinitely with a priority of 1. If you want this new layout to override the existing layout temporarily for a week, give this layout a priority of 2 and set the start date and end date for the target week. During the target week, this new layout will be displayed to customers instead of the existing layout.
Start date Specify a start date and time for this layout assignment. If you do not specify a start date, the layout is assigned immediately. End date Specify an end date and time for this layout assignment. If you do not specify an end date, the layout is assigned indefinitely. - Click the Design Layout tab so that you can see the wireframe that represents your layout template. Ensure that your template wireframe displays correctly.
-
Add widgets to the slots within the layout template to test that your layout template can be
edited.
The wireframe shows the layout template that you selected. To add content to the layout, you must add widgets to one or more slots in the layout template. You can add more than one widget to a slot, and you can leave slots empty.
-
Add a title to the tabbed layout template slots.
- When you are finished with the layout, click Save.
- Click Open Store Preview Dialog. Review your layout to ensure that your custom layout template arranges the widgets correctly in your store.