Bulk enrollment - Windows
Read this section to understand the step-by-step procedure of Windows bulk enrollment.
- Ensure the Windows devices that you target for bulk enrollment have BigFix agent installed.
- From the BigFix Console, enable Analysis 15 -
Modern Client Management
                        Root Server Analysis
. - In the BES root server, at C:\Program Files (x86)\BigFix
Enterprise\BES Server\Mirror Server\Config, in the
DownloadWhitelist.txt file, add the
following:
http://localhost.*
- Designate Provisioning Package Generation Point: WebUI Master operator designates one or more Windows 10 and Windows 11 devices to generate Windows provisioning package (.ppkg) file. This configuration task sets the client setting on the designated Windows endpoint to designate it as the device that creates the .ppkg file that is later used to enroll Windows devices to MCM.
- Create Windows PPKG artifact: Master operator generates.ppkg file using the endpoint designated in Step-1. After this step, the .ppkg file becomes available in the MDM server to facilitate bulk enrollment on deployment.
- Bulk enroll: After triggering the MDM enroll action, the targeted Windows devices that have the BigFix agent installed are enrolled to MCM automatically with the pre-configured .ppkg artifact without user intervention.
- Assign primary user: The primary user names for the Windows devices enrolled with .ppkg file must be overwritten with appropriate primary user names using the User Assignment action. Otherwise, all the enrolled Windows devices report in with the default primary user information as hard coded in the .ppkg file and cannot use user and group management through Smart Groups.
Designate Provisioning Package Generation Point
To designate a Windows device as the Windows provisioning package generation point, do the following:
- Log in to BigFix WebUI as a Master operator.
- On the WebUI main page, click
- On the Modern Client Management page, click .
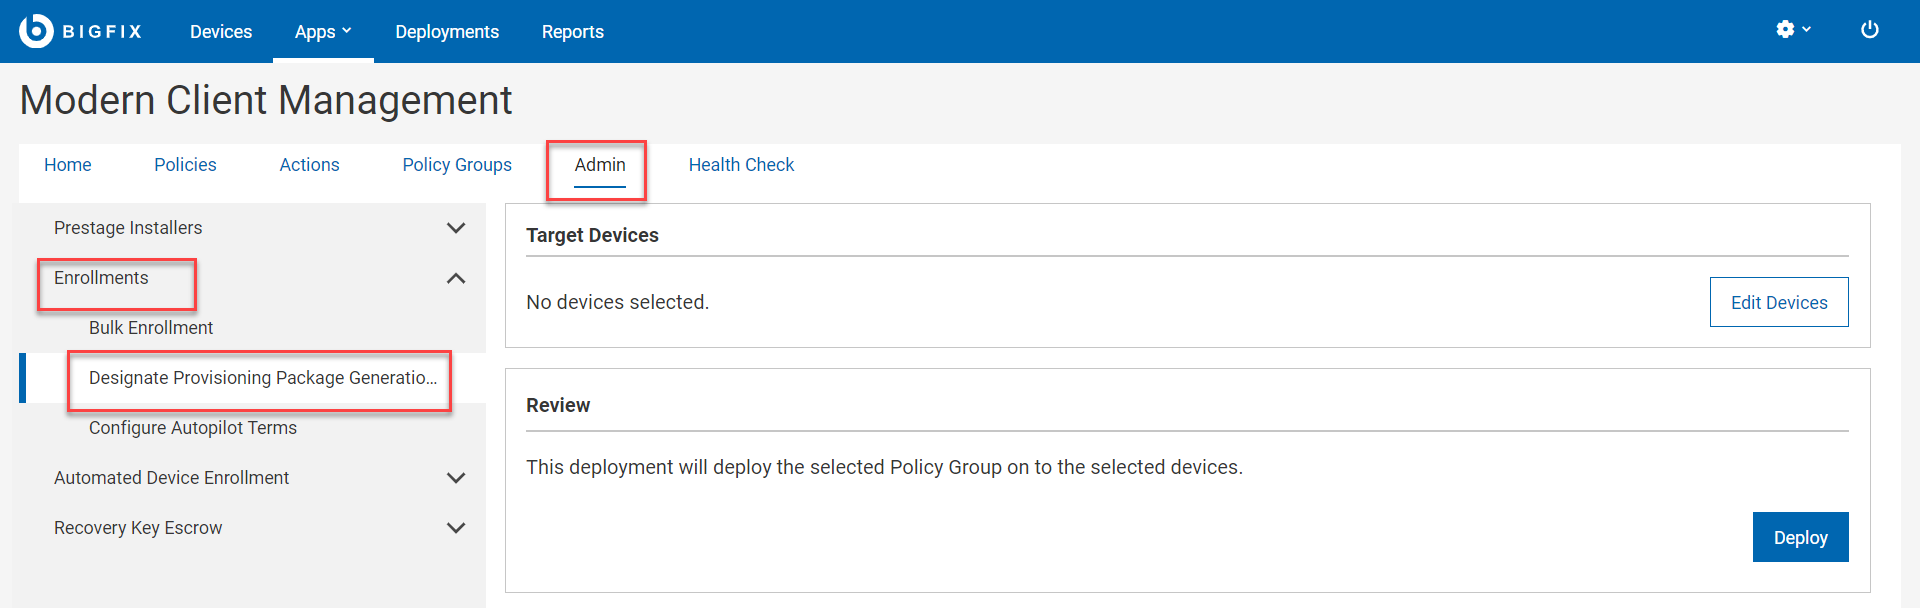
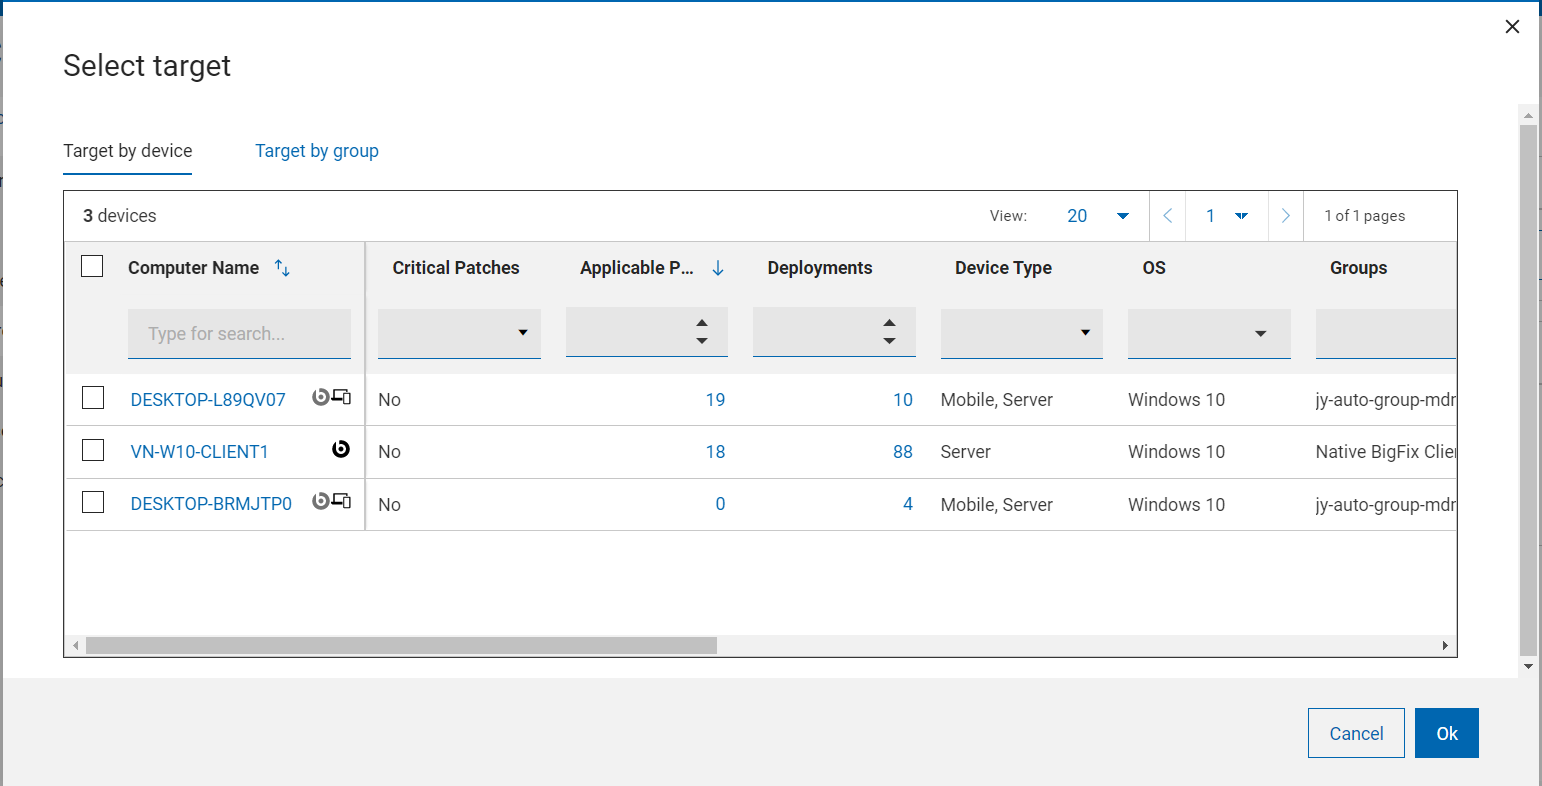
- On the Designate Provisioning Package Generation Point page, in the Target Device section, click Edit Devices.
- On the Target By Device page, select one or more Windows devices in one of which you want to generate the
.ppkg file, and click OK.
- Verify the information in the Target Device and click Deploy.
Result: The selected devices become .ppkg generation
point in one of which you can create .ppkg file. The client
setting MCM_WIN10_BULK_ENROLLMENT_ENDPOINT = 1 is set on the
targeted devices.
Create Windows Provisioning Package
To create a Windows provisioning package (.ppkg) and make it available for bulk enrollment in the MDM server, do the following:
- Login to the WebUI as a Master operator.
- Click
- On the Modern Client Management page, click Admin.
- On the Admin page, click .
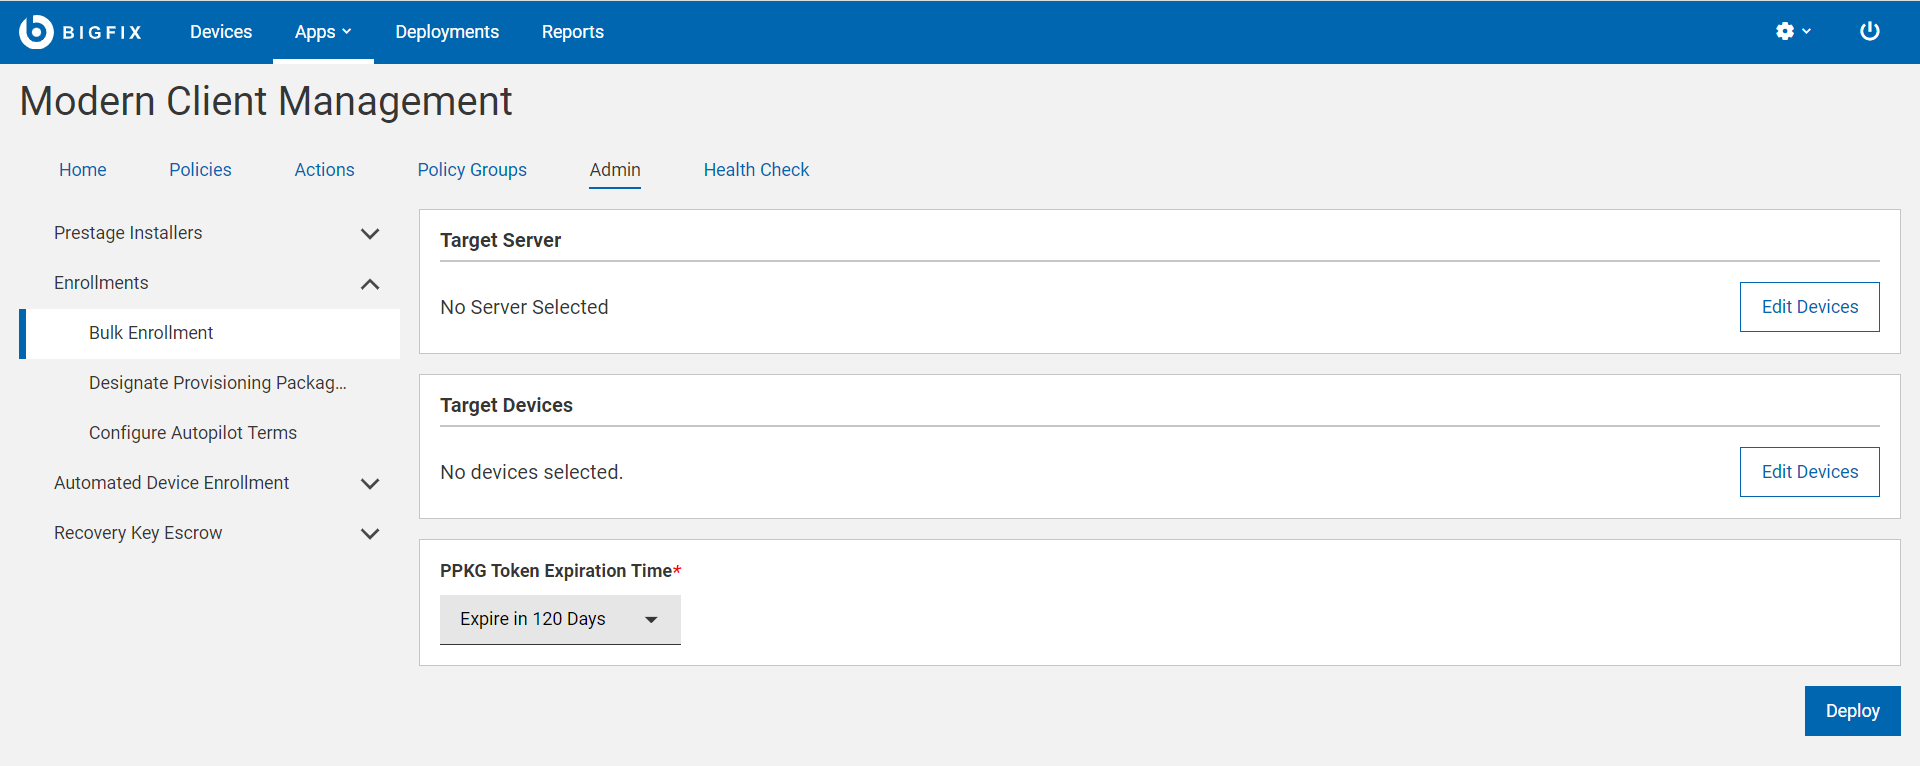
- The Target Server section displays the MDM server in which the .ppkg file is deployed on successful completion of this task. To make any changes, click Edit Devices.
- The Target Device section displays the number of
Windows devices as designated in Designate Provisioning Package Generation Point). To
make any changes, click Edit Devices.Note: Windows device that you select here uses ArchiveNow to upload ppkg content on to the root MDM server. If you have any specific workflow around the selected Windows endpoint and ArchiveNow, that is overwritten after this action.
- PPKG Token Expiration
Time: This field is mandatory. Select an option from the drop
down menu to set the validity period for your ppkg. After
expiry, you cannot use that ppkg to enroll Windows devices.
The default expiration time is 120 days. The available options are:
- Expire in 120 Days
- Expire in 1 Year
- Never Expire: If this option is selected, the ppkg does not have any expiration time.
Tip: WebUI internally creates a unique token for every PPKG. With this, you can prevent any unauthorized use of PPKG by creating and deploying a new one when you feel it is necessary. If the PPKG token on the MDM server and the enrolling device do not match, then the enrollment cannot be completed.Important:- If you want to deploy timestamped PPKG on to an MDM server, ensure the MDM server is upgraded to v2.1.1 or later.
- PPKG files created without expiration time (created through older version of BigFix MCM) do not work as expected in MDM server v2.1.1 or later. Therefore, you need to create PPKG again and deploy.
- Click Deploy.Note: It takes several minutes to complete the process. To speed up the process, restart the ppkg generating Windows device a few times.
Results: After this action is completed, Windows ppkg file is created in the targeted Windows device at C:\MCMPPKG.
Bulk enroll
To enroll Windows devices through bulk enrollment using the .ppkg artifacts that was created in the previous steps, do the following:- Log in to BigFix WebUI.
- On the Devices page filter Windows devices with native BigFix agent installed. To do that, in the OS column, select Windows and in the Agent column, select Yes.
- From the devices list select all or a subset of devices for bulk enrollment.
- Click .
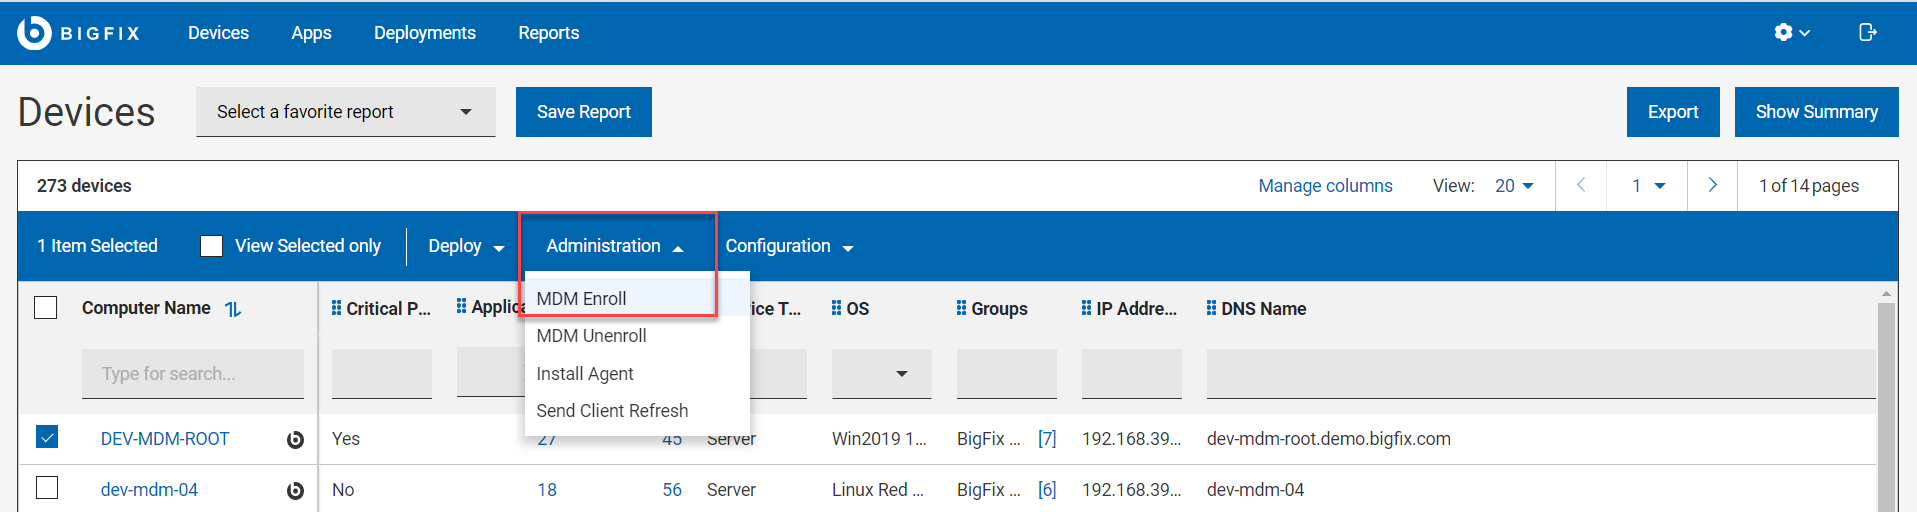 The
Windows Enrollment page
appears.
The
Windows Enrollment page
appears.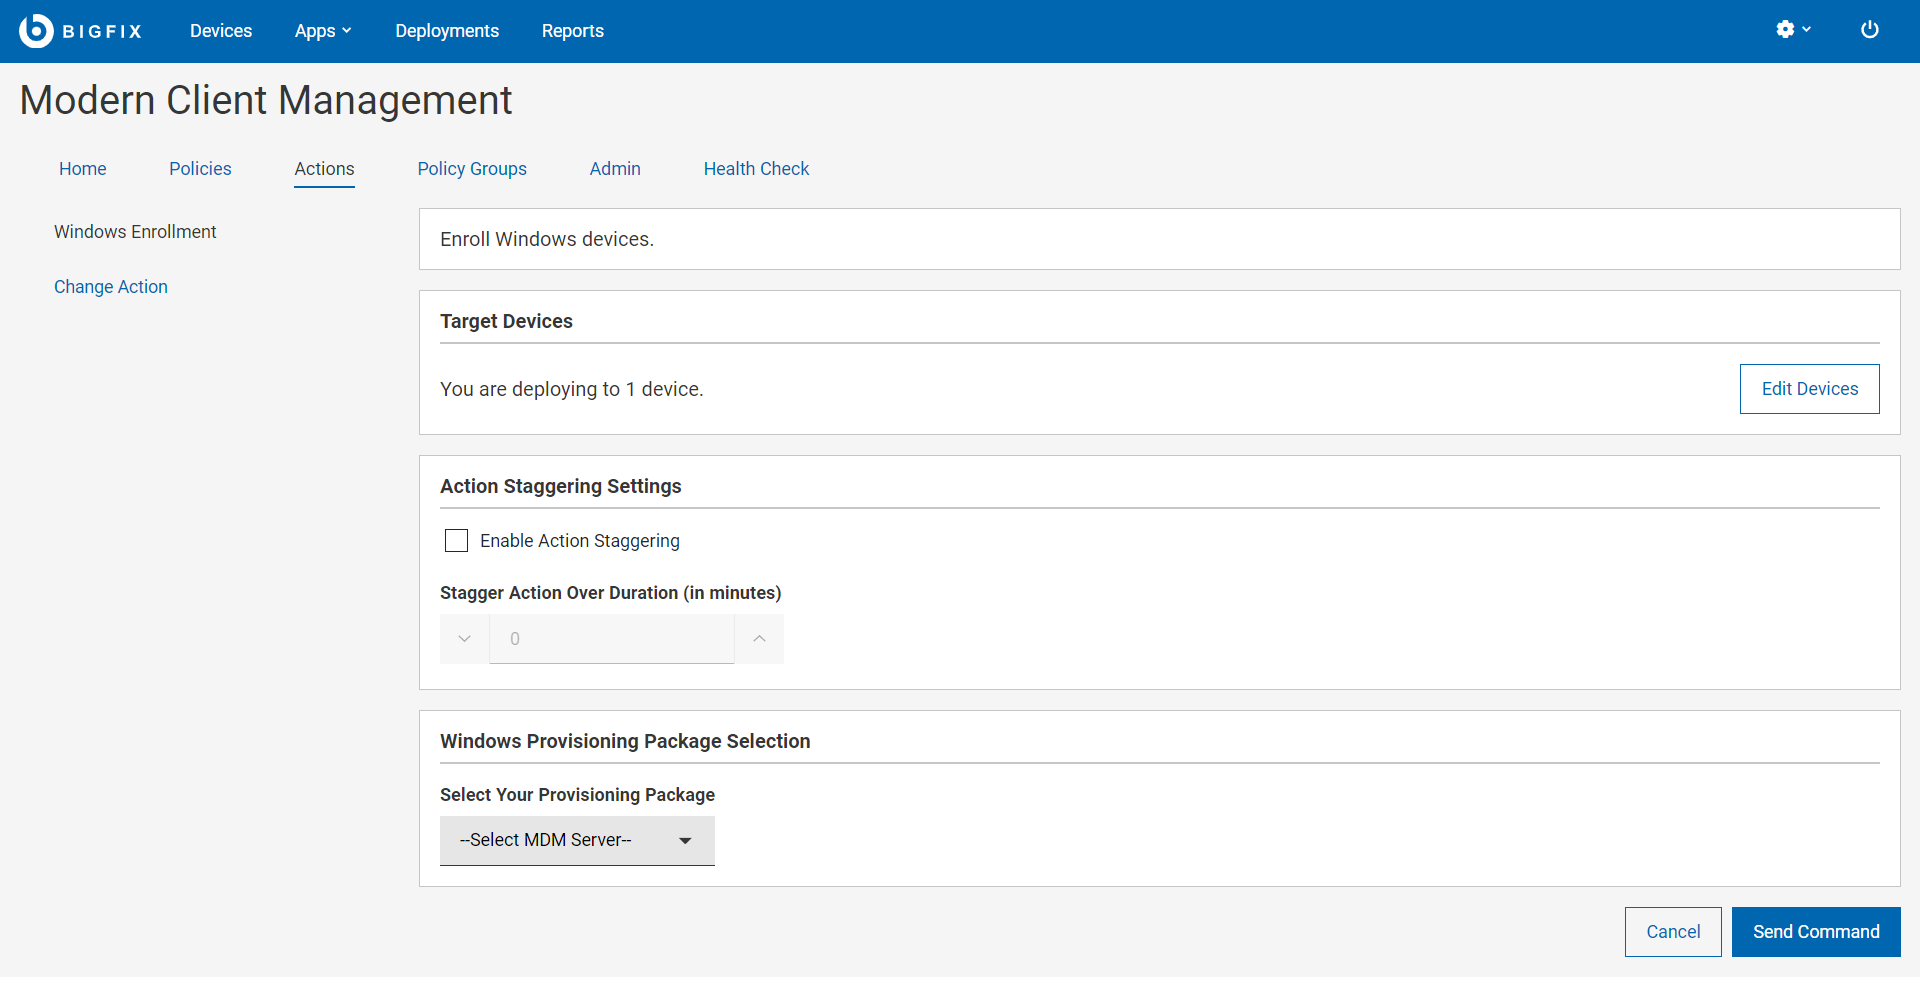
- In the Target Devices section, the number of targeted devices is displayed. If you want to change the targeted devices, click Edit Devices.
- Action Staggering Settings: Select Enable Action Staggering and enter Stagger Action Over Duration in minutes. Use this setting to spread out the load on the MDM server and network to prevent all the targeted endpoints attempting to enroll at the same time. Staggering enrolling endpoints normalizes the amount of traffic generated by newly enrolled devices over a broader more manageable period of time. When this is set, each endpoint selects a random time within the specified time interval to enroll.
- For Select Your Provisioning Package, select
the MDM server to which you want to enroll the selected devices.Note: This dropdown lists the MDM servers in which the PPKG is deployed as per Create Windows Provisioning Package.
- Click Send Command.
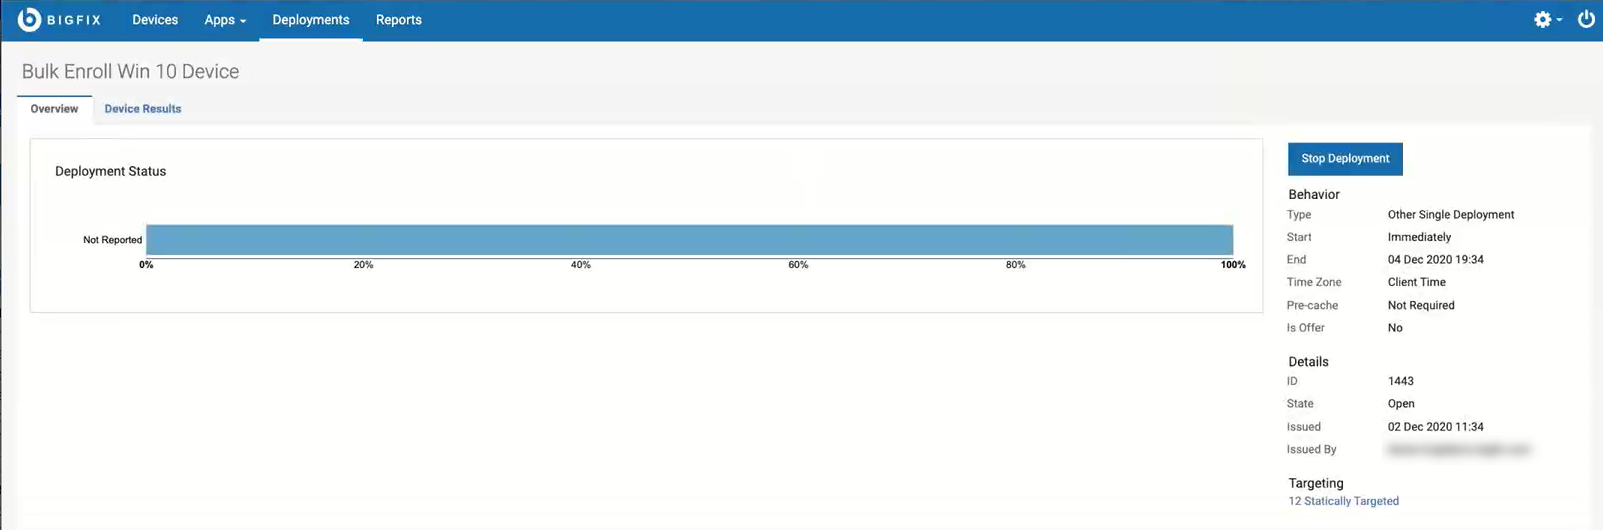
- A BigFix deployment is generated that initiates MDM enrollment on the selected devices.
- The deployment document with information on devices targeted and device results is displayed.
- The targeted devices start the enrollment processes.
- At any point, to stop the deployment, click Stop Deployment.
- After running the action, the targeted Windows devices get enrolled to the selected MDM server.
- The enrolled devices report with MDM icon
 in The Device List.
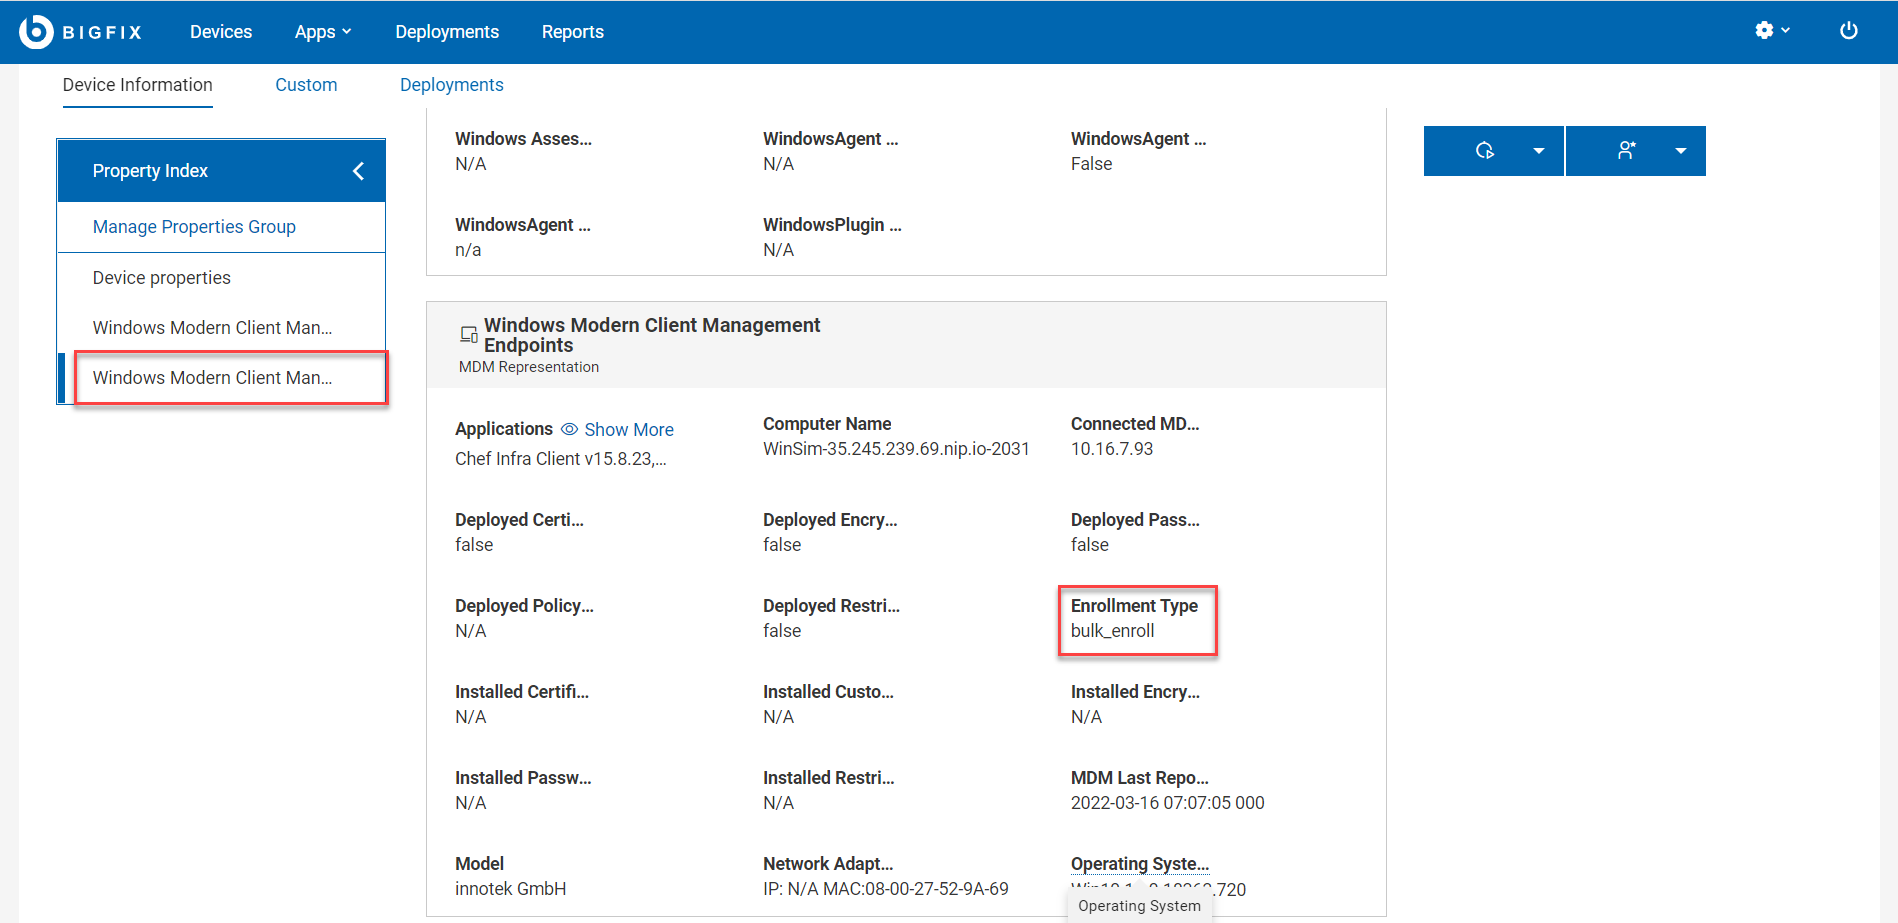
 - When you click on a bulk enrolled device from the Device List, the Device
Information page shows Enrollment Type as bulk_enroll under the section Windows
Modern Client Management Endpoints.
-
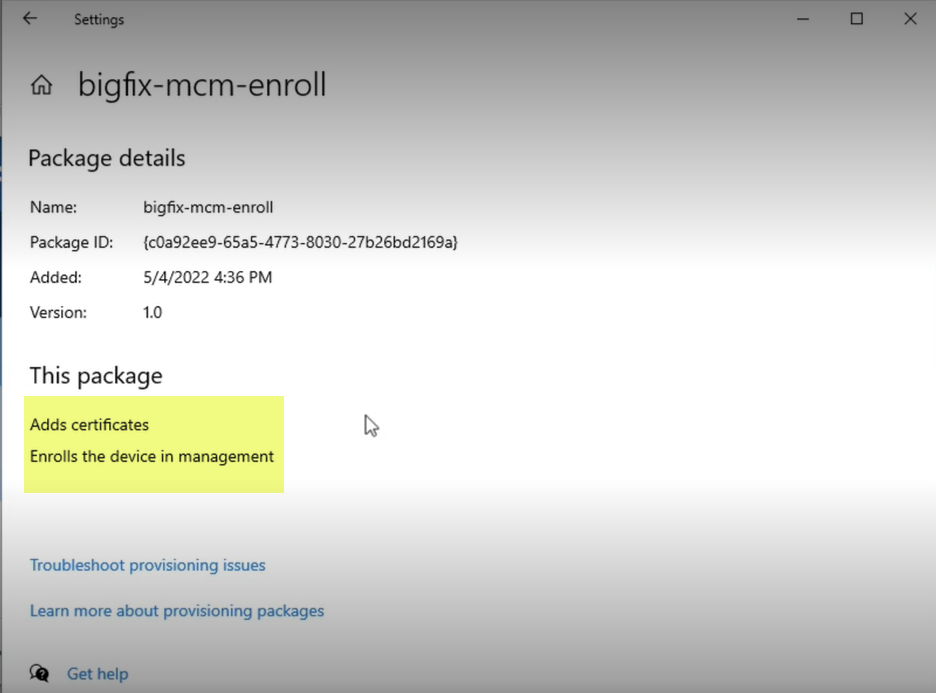
As a Device User, to view the configured provisional package details in the enrolled device, navigate to Settings > Accounts > Access work or school > Add or remove a provisioning package.
For some reason, if you want to enroll this device again through bulk enrollment, do the following:- Delete the provisioning package in the device.
- Disconnect the MDM profile under Settings > Accounts > Access work or school.
- From the WebUI, initiate Windows Enrollment.
Troubleshooting
You can use the .ppkg file for bulk enrollment, Over-The-Air enrollment, or Enrollment via E-mail or link to download PPKG file.
In all these scenarios, after successful enrollment, Device User can view the configured provisional package details in the enrolled device. To do that:
- On the Windows device, navigate to
- To view the details, click on the provisioning package and click
Details.

The .ppkg details as per the configuration is displayed as shown in the following image, for example:
In case of failure, it displays the failure message as shown the following image.
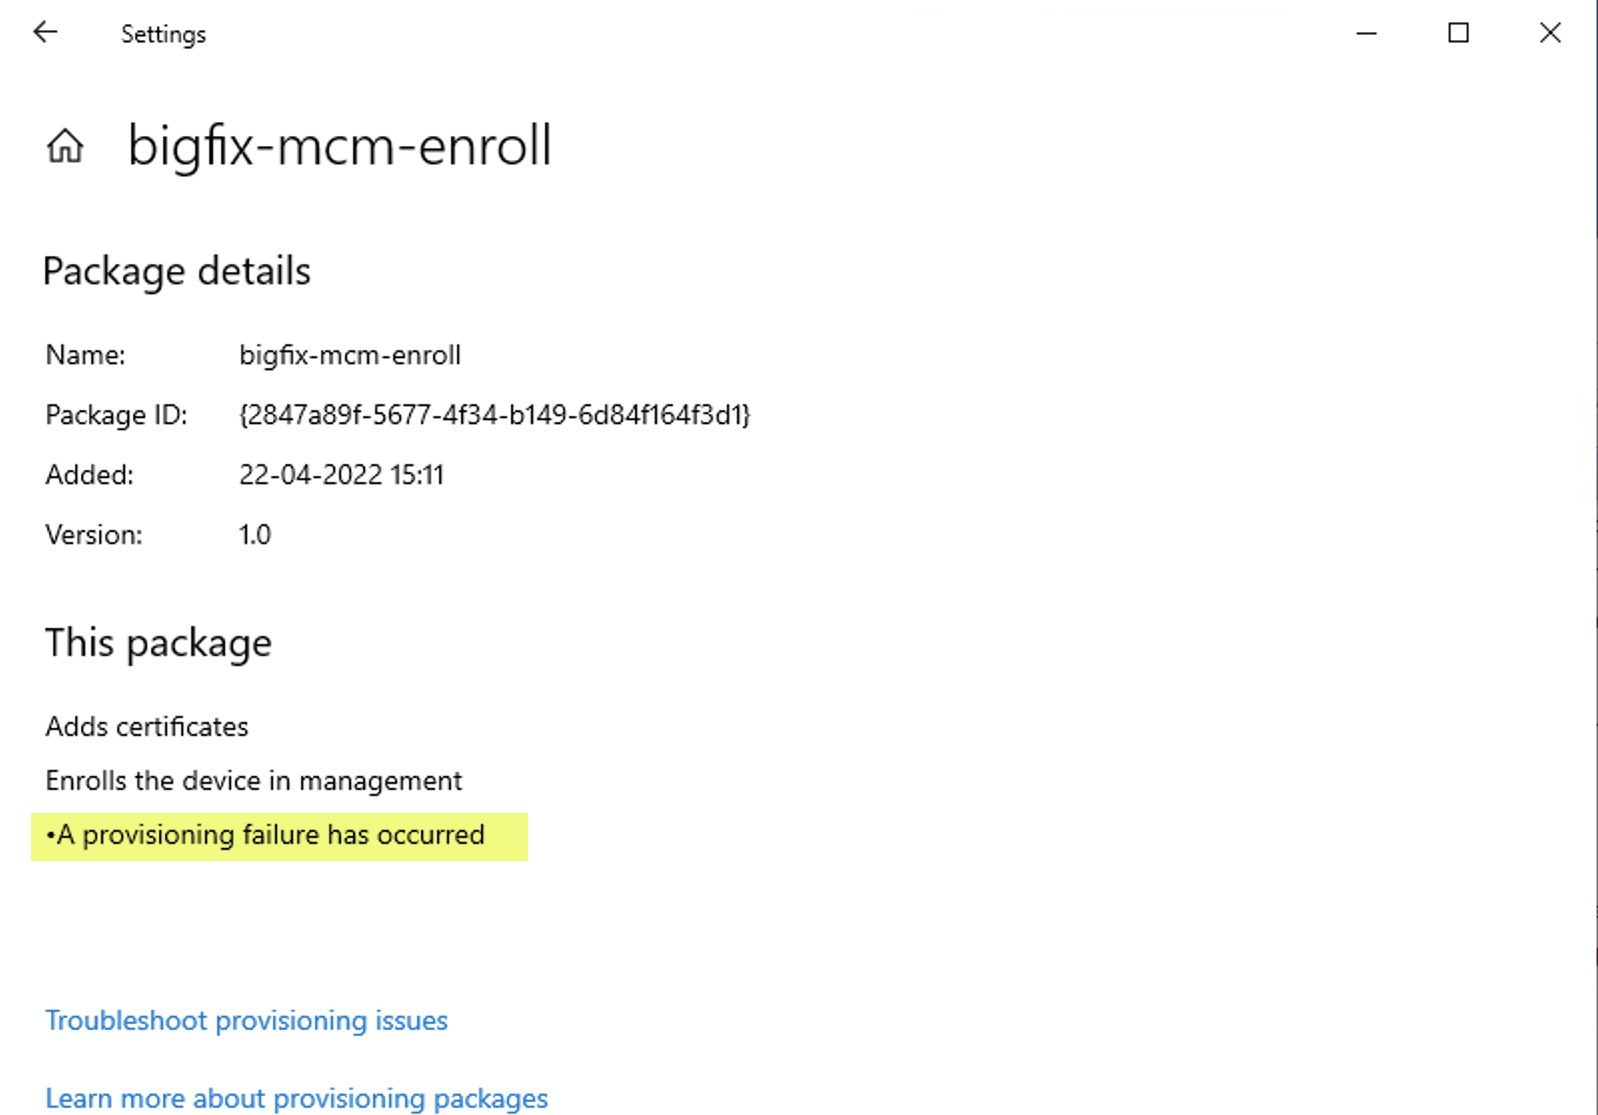
It means that the enrollment through the .ppkg is not successful.
There can be many reasons for .ppkg enrollment failure, including but not limited to the following:
- The .ppkg is expired. If the set PPKG Token Expiration Time is expired, enrollment through the respective .ppkg fails.
- The .ppkg on the MDM server and the one on the device are different.