

ICXT PDFExport installation
- Administrative users
- WebSEAL
- WebSphere cell
- FileSystem
- Database
- WebSphere Configuration
- Understanding the release archive
- Prepare Deployment Manager for installation
- Install the release archive
- Post-installation tasks
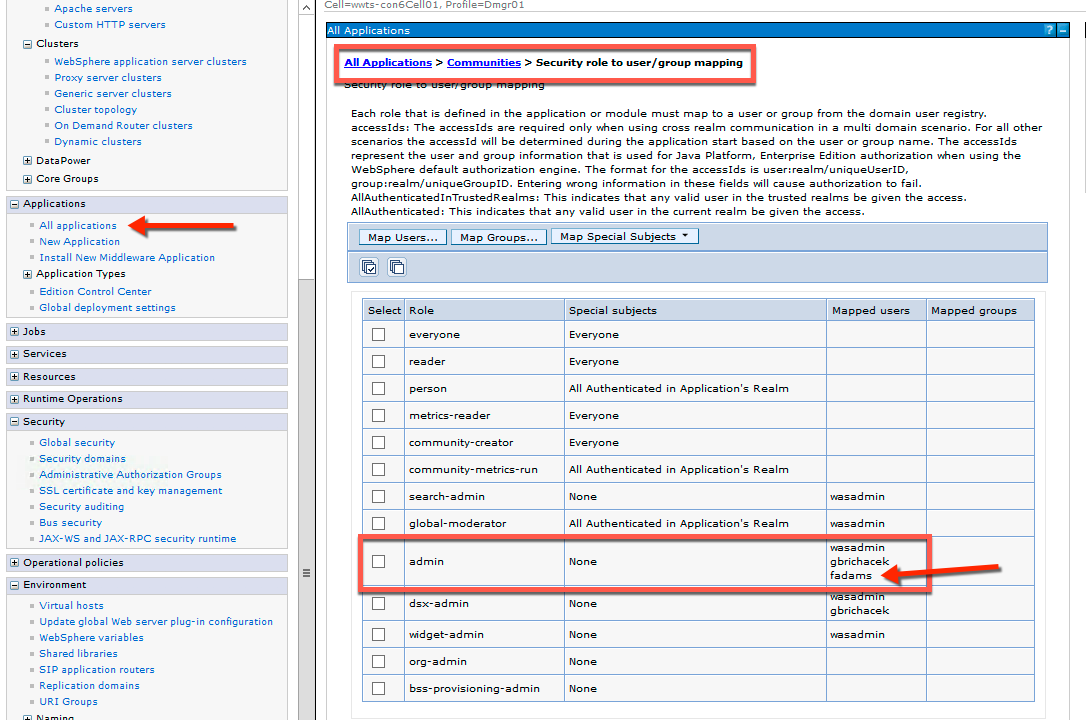
Administrative users
ICXT needs administrative access to both, HCL Connections features (Communities, Activities, Blogs, Wikis, Forums) and the WebSphere cell.
-
Ensure that the user that is referenced as Connections admin (see: http.auth.admin.user) has got a valid Connections Profile and is assigned to the admin role throughout all Connections applications
-
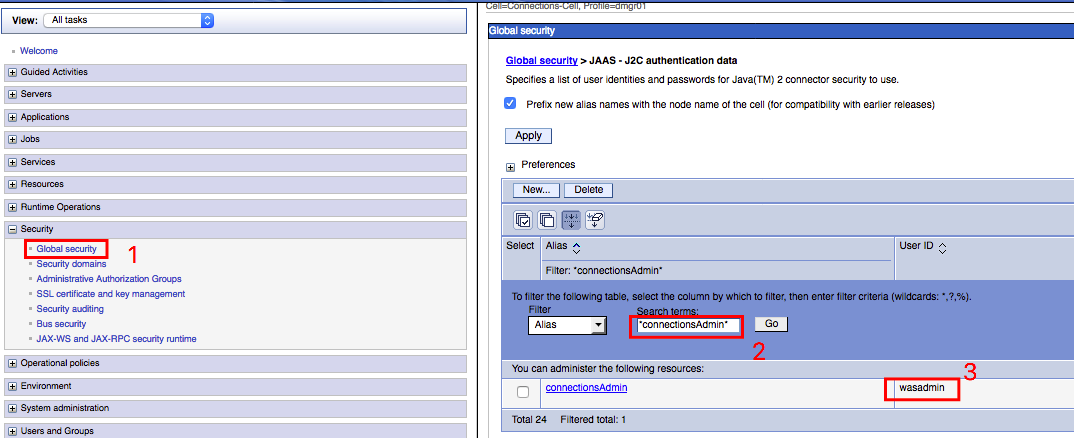
Ensure that the user that is referenced as WebSphere cell admin has got administrative rights in terms of the WebSphere cell. Typically, the Connections installation references a WAS administrator within the J2C authentication data list
WebSEAL
If a WebSEAL is in place, following junction must be configured:
GET|POST|PUT|DELETE|HEAD /ic360/
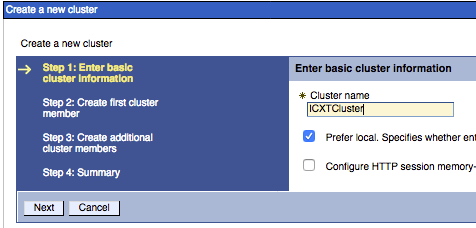
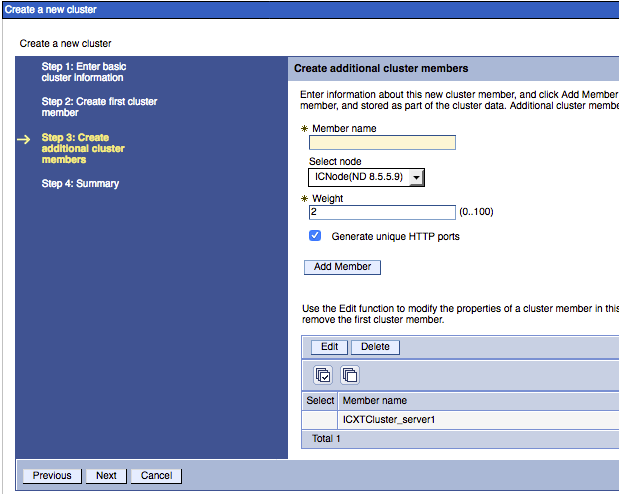
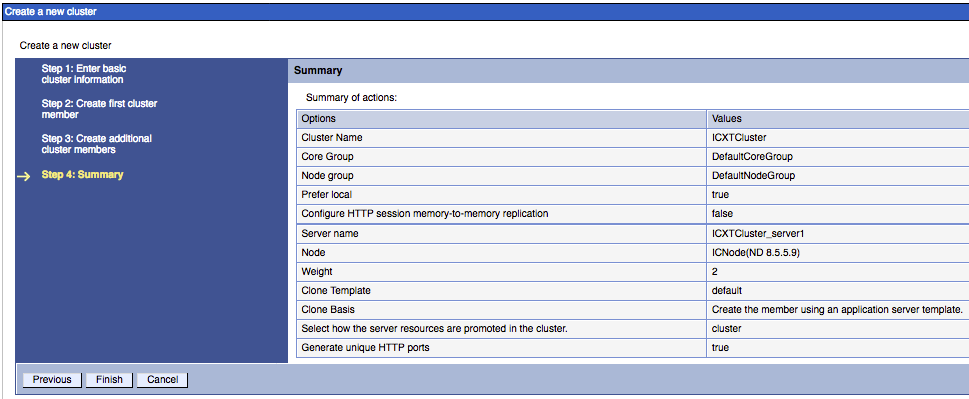
WebSphere cell
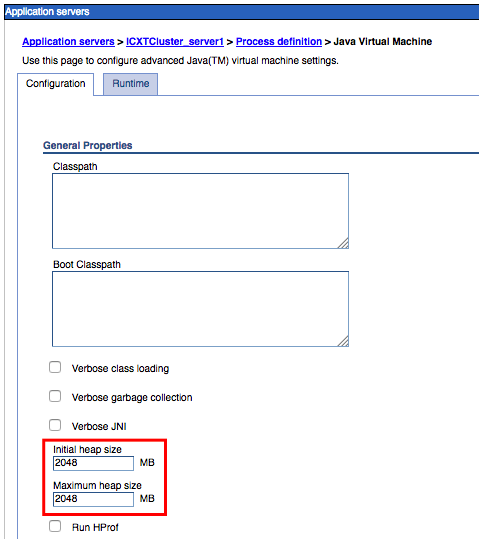
Add an additional Cluster including a Server JVM that operates the ICXT application 
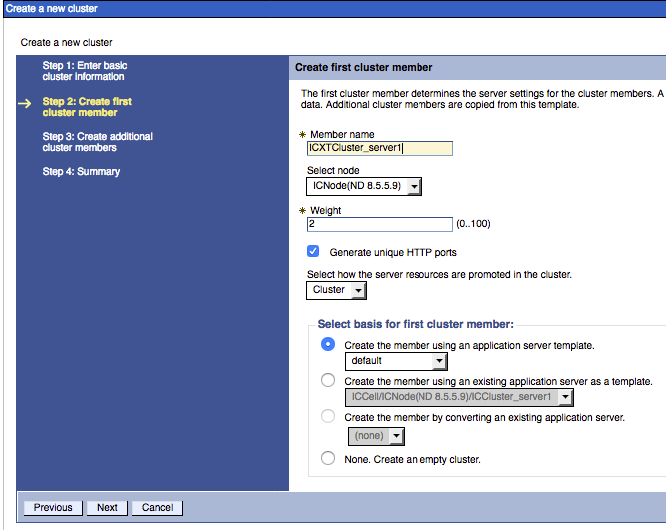
Each ICXT JVM should have at least 2GB of maximum heap. You can verify this by navigating to Server
Types > WebSphere application server. Then select your created server (do this step for all
server, if you created multiple in your cluster),and navigate to Server Infrastructure > Java and
Process Management > Process definition > Additional Properties > Java Virtual Machine.
When accessing the application for the first time thru a browser you may encounter a webgroup not defined error. In that case check that the virtual host mapping was done for the newly created cluster’s ports (default and secure). As per default it’s not the case.
If the web servers (IHS) used by the ICXT cluster are in a DMZ, don’t forget to check that the secured and non secured ports used by the cluster are open in the firewall rules.
FileSystem
ICXT stores configurations (e.g. ACLs and exported Connections data) in the servers file system. In order to allow a clustered infrastructure, this directory must be located on a shared file system. Our recommendation is to choose a sibling next to the Connections shared data folder.
sudo su - wasuser
cd /mnt/my_shared_fs
mkdir icxt
mkdir icxt/config
Note: The shared file system path of your installation can be determined by using the parent
folder of the customizations directory 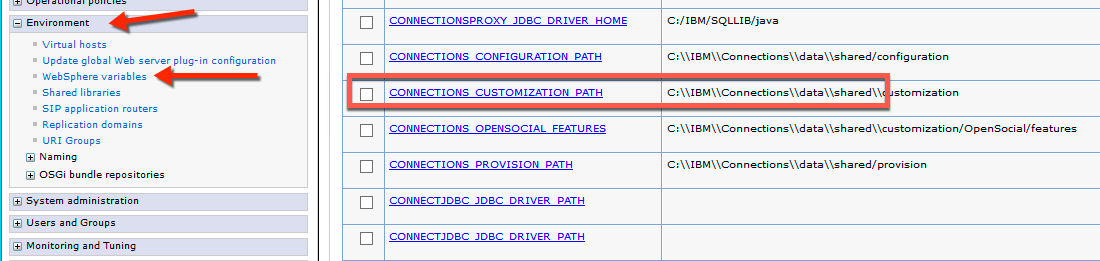
Database
ICXT stores runtime information (e.g. for task progress) in a database.
Note: All database scripts assume that Connections is setup using the user LCUSER to access all databases. If there is another user in your environment, search and replace the LCUSER in all DDL scripts that you need to execute.
-
Copy the release archive to the server where the DeploymentManager is installed on.
- Linux: use WINSCP or the scp command: scp /some/local/path/ic360.deployment-8.0.0-pdfexport.zip some-valid-user@your.dmgr.host:/opt/HCL/installs
-
Open a Remote Desktop Session and navigate to the release package
- Windows
- Linux: cd /opt/IBM/installs
- Windows
-
Extract the archive and navigate into the extracted folder
- Windows
- Linux:
- unzip -d ic360.deployment-8.0.0-pdfexport ic360.deployment-8.0.0-pdfexport.zip
- chmod +x ic360.deployment-8.0.0-pdfexport/*.sh
- Windows
Database Setup DB2
- Login on the database server
ssh user@dbserver
- Change user to the DB2 instance user
[sudo] su - db2inst1
- Verify if DB2CODEPAGE property is set to 1208
db2set
- If not, set it
db2set DB2CODEPAGE=1208
- Copy all files that ends with _DB2.ddl to the home directory of the local DB2 user (e.g. /home/db2inst1/icxt-prepare)
mkdir ~/icxt-prepare

# copy the scripts from the DMGR to the database server
scp some-valid-user@your.dmgr.host:/opt/IBM/installs/ic360.deployment-8.0.0-pdfexport/db-setup/*_DB2.ddl ~/icxt-prepare/

# or use this line, if the DB and the DMGR are on the same box
cp /opt/IBM/installs/ic360.deployment-8.0.0-pdfexport/db-setup/*_DB2.ddl ~/icxt-prepare/
- Import the SQL file essapps-createDatabase_DB2.ddl
db2 -td@ -vf ~/icxt-prepare/essapps-createDatabase_DB2.ddl
- Import the SQL file icxt-createTables_DB2.ddl
db2 -td@ -vf ~/icxt-prepare/icxt-createTables_DB2.ddl
Database Setup ORACLE
- Login on the database server
ssh oracle@dbserver
- Copy all files that ends with _Oracle.ddl to the home directory of the local Oracle user (e.g. /home/oracle/icxt-prepare)
mkdir ~/icxt-prepare

# copy the scripts from the DMGR to the database server
scp some-valid-user@your.dmgr.host:/opt/IBM/installs/ic360.deployment-8.0.0-pdfexport/db-setup/*_Oracle.ddl ~/icxt-prepare/

# or use this line, if the DB and the DMGR are on the same box
cp /opt/IBM/installs/ic360.deployment-8.0.0-pdfexport/db-setup/*_Oracle.ddl ~/icxt-prepare/
- Import the DDL (as a user that has at least the SYSDBA role) by issuing following command:
sqlplus sysdba/password @essapps-createDatabase_Oracle.ddl
NOTE: The above command will create a user named ESSAPPS and will prompt for a password. If you prefer to specify the password right when calling the command, use the following syntax:
sqlplus sysdba/password @essapps-createDatabase_Oracle.ddl password
- Import the SQL file icxt-createTables_Oracle.ddl and use the ESSAPPS user that was created in the previous step:
sqlplus essapps/password @icxt-createTables_Oracle.ddl
WebSphere Configuration
The ICXT release archive provides scripts, binaries and configuration items to deploy all necessary components and configuration to the WebSphere Deployment Manager.
Understanding the release archive
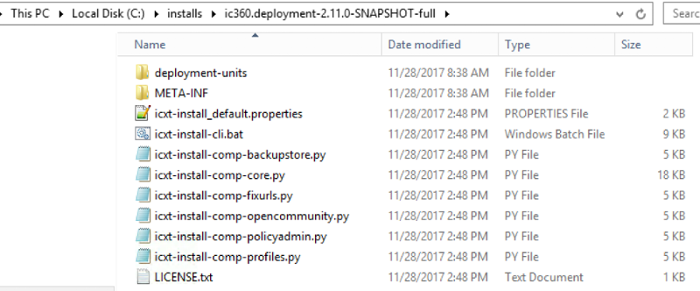
After unzipping the archive you’ll find following folder structure:
ic360.deployment-VERSION-PACKAGE_TYPE.zip
 |- db-setup
 |- deployment-units
 |- META-INF
 |- icxt-install_default.properties
 |- icxt-install-cli.bat
 |- icxt-install-cli.sh
 |- icxt-install-comp-<module>.py
 |- icxt-install-comp-...
 |- icxt-prepare.bat
 |- icxt-prepare.py
 |- icxt-prepare.sh
 `-LICENSE.txt
Within the folder deployment-units you’ll find all application binaries and XML descriptions of all installable units.
Following files are going to be used during the scripted installation:
- icxt-install_default.properties: provides default property values (e.g. Cell name, WAS installation path, …)
- icxt-prepare.bat: The executable script that to prepare the ICXT installation (Windows) - includes finalizing DB adjustments, preparing config folders
- icxt-prepare.sh: The executable script that to prepare the ICXT installation (Linux) - includes finalizing DB adjustments, preparing config folders
- icxt-install-cli.bat: The executable script that installs ICXT (Windows)
- icxt-install-cli.sh: The executable script that installs ICXT (Linux)
- icxt-install-comp-<module>.py (e.g: icxt-install-comp-core.py): Jython scripts that are invoked by the root script, for installing WAS components (ObjectCaches, ResourceEnvironmentEntries, …)
Note: the file icxt-install_default.properties should be copied and adjusted. Please enter customer specific values and preserve this file for upcoming update installations of ICXT
Prepare Deployment Manager for installation
PDF Export executable
PDF Export requires the wkhtmltox binary package in order to render PDF documents. This is a binary dependency that needs to be deployed on your HCL Connections server. The necessary installation steps are outlined below.
1). Download and install the wkhtmltopdf binary package.
The binary package is available to download here: https://wkhtmltopdf.org/downloads.html. Please use the latest stable version 0.12.6 for installation.
Ensure to download the package according to your server operating system. Common examples are listed below, all distributions can be found via above link.
| OS | Type |
|---|---|
| Windows | 64-bit 32-bit |
| RHEL 7 / CentOS 7 | x86_64 i686 aarch64 ppc64le |
| RHEL 8 / CentOS 8 | x86_64 aarch64 ppc64le |
Once downloaded, install the package according to your system’s requirements.
RHEL/CentOS:
rpm -Uvh wkhtmltox-0.12.6-<version>.rpm
Windows:
- Download wkhtmltox-0.12.6-<version>.exe
- Execute binary file to run installer
- Install tool at appropriate location
2). Configure the PDF Export feature on WebSphere to leverage wkhtmltopdf binary In order for the PDF Export feature to use the wkhtmltopdf library, it needs to be able to invoke the tool via the system’s command line. There are two ways to ensure this is the case.
2.1). Configure path variables and add the wkhtmltopdf binary to it PDF Export tries to execute the command
wkhtmltopdf [args]
On the system’s command line (cmd on Windows, shell/bash on Linux). This can be enabled by adding the wkhtmltopdf to the system’s path variable. To test this, try to execute above command on the system’s command line. If the command is unrecognized, this is not configured correctly. Otherwise PDF Export is now ready and can be used.
2.2). Configure PDF Export to invoke wkhtmltopdf in the correct install location If wkhtmltopdf is not available by invoking the command listed in 2.1, you can instead make the PDF Export aware of what execution command is necessary to invoke it instead. E.g. if you have installed the feature at location
/opt/HCL/Connections/wkhtmltox/bin/wkhtmltopdf
You can add this via WebSphere configured. To do this, follow below steps:
- Resources > Resource Environment > Resource Environment entries.
- Then you can see “ic360”, click on it.
- There is “Custome properties” in the “Additional Properties”, select it then select “New” option.
- Add name as “wkhtmltopdf.command.exec” and value as wkhtmltox\bin directory like: “…\wkhtmltopdf\bin\wkhtmltopdf”
- Apply and Ok.
- Save the changes.
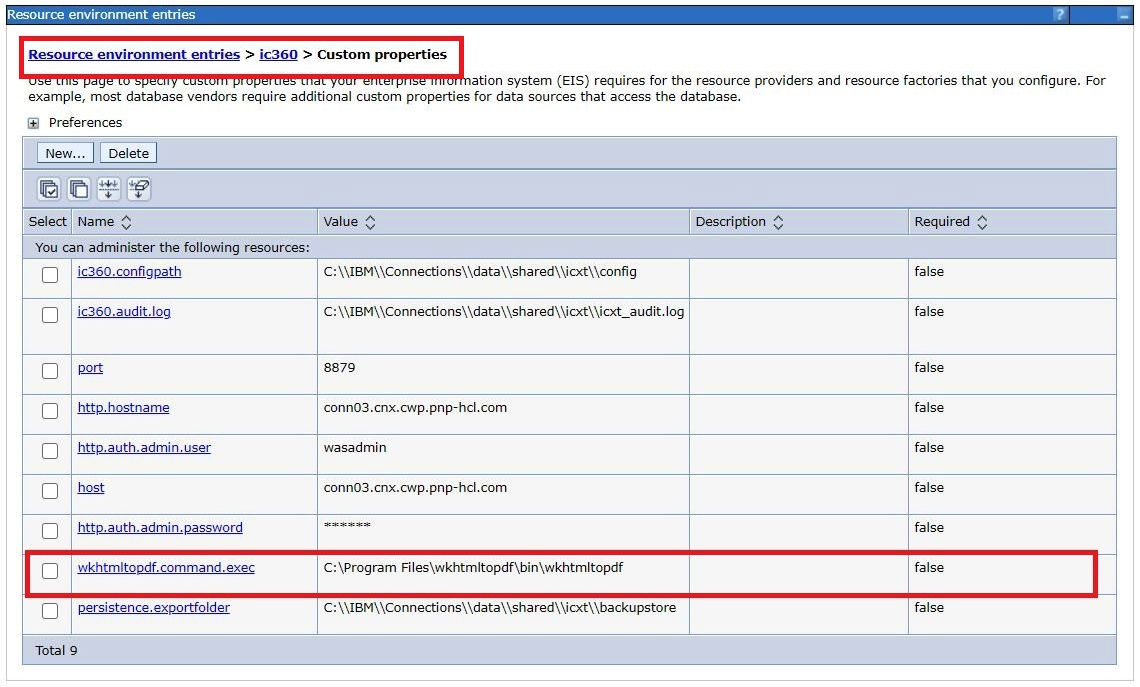
- Restart ICXT server.
Note: In case of a clustered environment, this library needs to be installed the same way on all nodes of the cluster.
[OPTIONAL] Server side fonts
Without installed fonts, the PDF rendering may result in unsatisfactory result. If there are no font sets installed, we recommend to install DejaVu fonts (https://dejavu-fonts.github.io/).
Note for CentOS or RHEL, the library wqy-microhei-fonts should additionally be installed to support Chinese and Japanese.
- RHEL or CentOS:
sudo yum install dejavu-sans-fonts
sudo yum install wqy-microhei-fonts
To list Dejavu fonts, is installed or not, run the following command: fc-list | grep "DejaVu Sans"
Sample output:
/usr/share/fonts/TTF/DejaVuSansCondensed.ttf: DejaVu Sans,DejaVu Sans Condensed:style=Condensed,Book
/usr/share/fonts/TTF/DejaVuSans-BoldOblique.ttf: DejaVu Sans:style=Bold Oblique
/usr/share/fonts/TTF/DejaVuSansMono.ttf: DejaVu Sans Mono:style=Book
/usr/share/fonts/TTF/DejaVuSansCondensed-Oblique.ttf: DejaVu Sans,DejaVu Sans Condensed:style=Condensed Oblique,Oblique
/usr/share/fonts/TTF/DejaVuSansMono-Oblique.ttf: DejaVu Sans Mono:style=Oblique
/usr/share/fonts/TTF/DejaVuSansCondensed-BoldOblique.ttf: DejaVu Sans,DejaVu Sans Condensed:style=Condensed Bold Oblique,Bold Oblique
/usr/share/fonts/TTF/DejaVuSans-ExtraLight.ttf: DejaVu Sans,DejaVu Sans Light:style=ExtraLight
/usr/share/fonts/TTF/DejaVuSans-Oblique.ttf: DejaVu Sans:style=Oblique
/usr/share/fonts/TTF/DejaVuSansMono-Bold.ttf: DejaVu Sans Mono:style=Bold
/usr/share/fonts/TTF/DejaVuSansCondensed-Bold.ttf: DejaVu Sans,DejaVu Sans Condensed:style=Condensed Bold,Bold
/usr/share/fonts/TTF/DejaVuSansMono-BoldOblique.ttf: DejaVu Sans Mono:style=Bold Oblique
/usr/share/fonts/TTF/DejaVuSans.ttf: DejaVu Sans:style=Book
/usr/share/fonts/TTF/DejaVuSans-Bold.ttf: DejaVu Sans:style=Bold
- AIX: http://www.perzl.org/aix/index.php%3Fn%3DMain.Dejavu-fonts
- Windows: https://dejavu-fonts.github.io/Download.html
- Fonts can be installed using following documentation: https://support.microsoft.com/en-us/help/314960/how-to-install-or-remove-a-font-in-windows
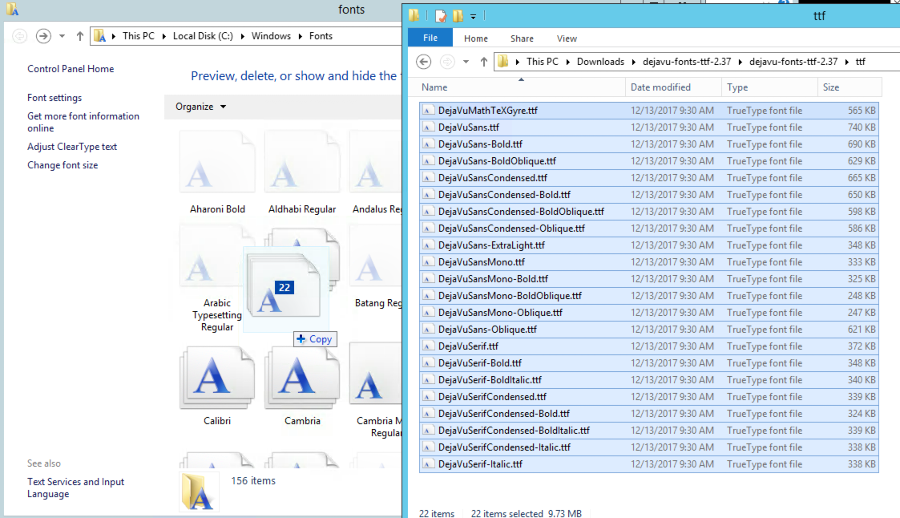
- Download and unzip the latest DejaVu fonts ZIP archive
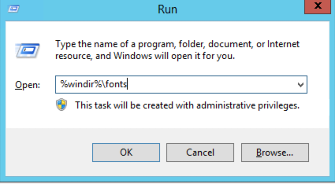
- Login as Administrator and Click “Start”
- Search for “run”
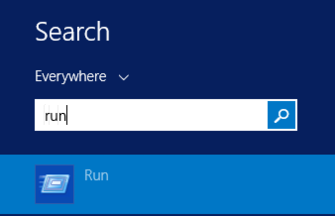
- Enter %windir%\fonts
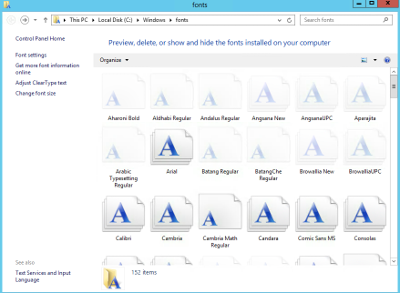
- Drag and drop the extracted fonts from the ttf folder to the Fonts config window
Release configuration
-
Open a Remote Desktop or SSH Session on the Deployment Manager and navigate to the release package
- Windows
- Linux: cd /opt/IBM/installs
- Windows
-
Create a copy of icxt-install_default.properties in the parent folder, or re-use a file from a previous installation
- Windows

- Linux: cp ic360.deployment-8.0.0-pdfexport/icxt-install_default.properties icxt-install.properties
- Windows
-
Open the file and adjust all values that are listed in the table below
- Windows
- Windows
- Linux: vi icxt-install.properties
WebSphere config:
| Name | Description | Default |
|---|---|---|
| DMGR_PROFILE | Specify the path to the DMGR profile | C:\IBM\WebSphere\AppServer\profiles\Dmgr01 |
| DMGR_SOAP_PORT | Specify the SOAP port that is used to access the MBeans of the DMGR process | 8879 |
| ICXT_CLUSTER_NAME | Specify the cluster name of the ICXT cluster. This value can be retrieved by looking into the config directory dir %DMGR_PROFILE%\config\cells\%CELL_NAME%\clusters | ICXTCluster |
| WASADMIN_USER | Specify the username of the wasadmin user (e.g.: wasadmin) | NO VALUE SET PER DEFAULT |
| WASADMIN_PASSWORD | Specify the password of the wasadmin user | NO VALUE SET PER DEFAULT |
| ICXT_BASE_PATH | Specify the base path of ICXT. this path will be used to store all configuration items. Use double-backslashes instead of backslashes here | NO VALUE SET PER DEFAULT |
| IC_CUSTOMIZATION_DIR | Specify the base path of IC share folder. this path will be used to copy provision and customization file. Use double-baskslashes instead of backslashes here | NO VALUE SET PER DEFAULT |
Database config:
| Name | Description | Default |
|---|---|---|
| ESSAPPS_DB_TYPE | Specify the database type that is used. Allowed values are DB2, ORACLE, MSSQL | DB2 |
| ESSAPPS_DB_SERVER_OR_URL | Specify the DB server name (DB2, MSSQL) or the Connection URL (ORACLE) | localhost |
| ESSAPPS_DB_PORT | Specify the DB server port (only necessary for DB2 and MSSQL) | 50000 |
ICXT config:
| Name | Description | Default |
|---|---|---|
| ree.http.hostname | Set the Connections hostname | NO VALUE SET PER DEFAULT |
| ree.http.auth.admin.password | Set the password of the Connections administrative user | NO VALUE SET PER DEFAULT |
| ree.http.auth.admin.password | Set the password of the Connections administrative user | NO VALUE SET PER DEFAULT |
| ree.wkhtmltopdf.command.exec | Specifies binary executable that should be invoked for pdf exports (e.g.: /mnt/my_shared_fs/icxt/pdf/wkhtmltox/bin/wkhtmltopdf) | wkhtmltopdf |
Note: All properties that are starting with ree. will be created as Resource Environment Entry properties. Therefore, this property file can be used to setup the ICXT behavior.
Install the release archive
-
Open a Windows Command Shell and navigate to the install folder and invoke the install command
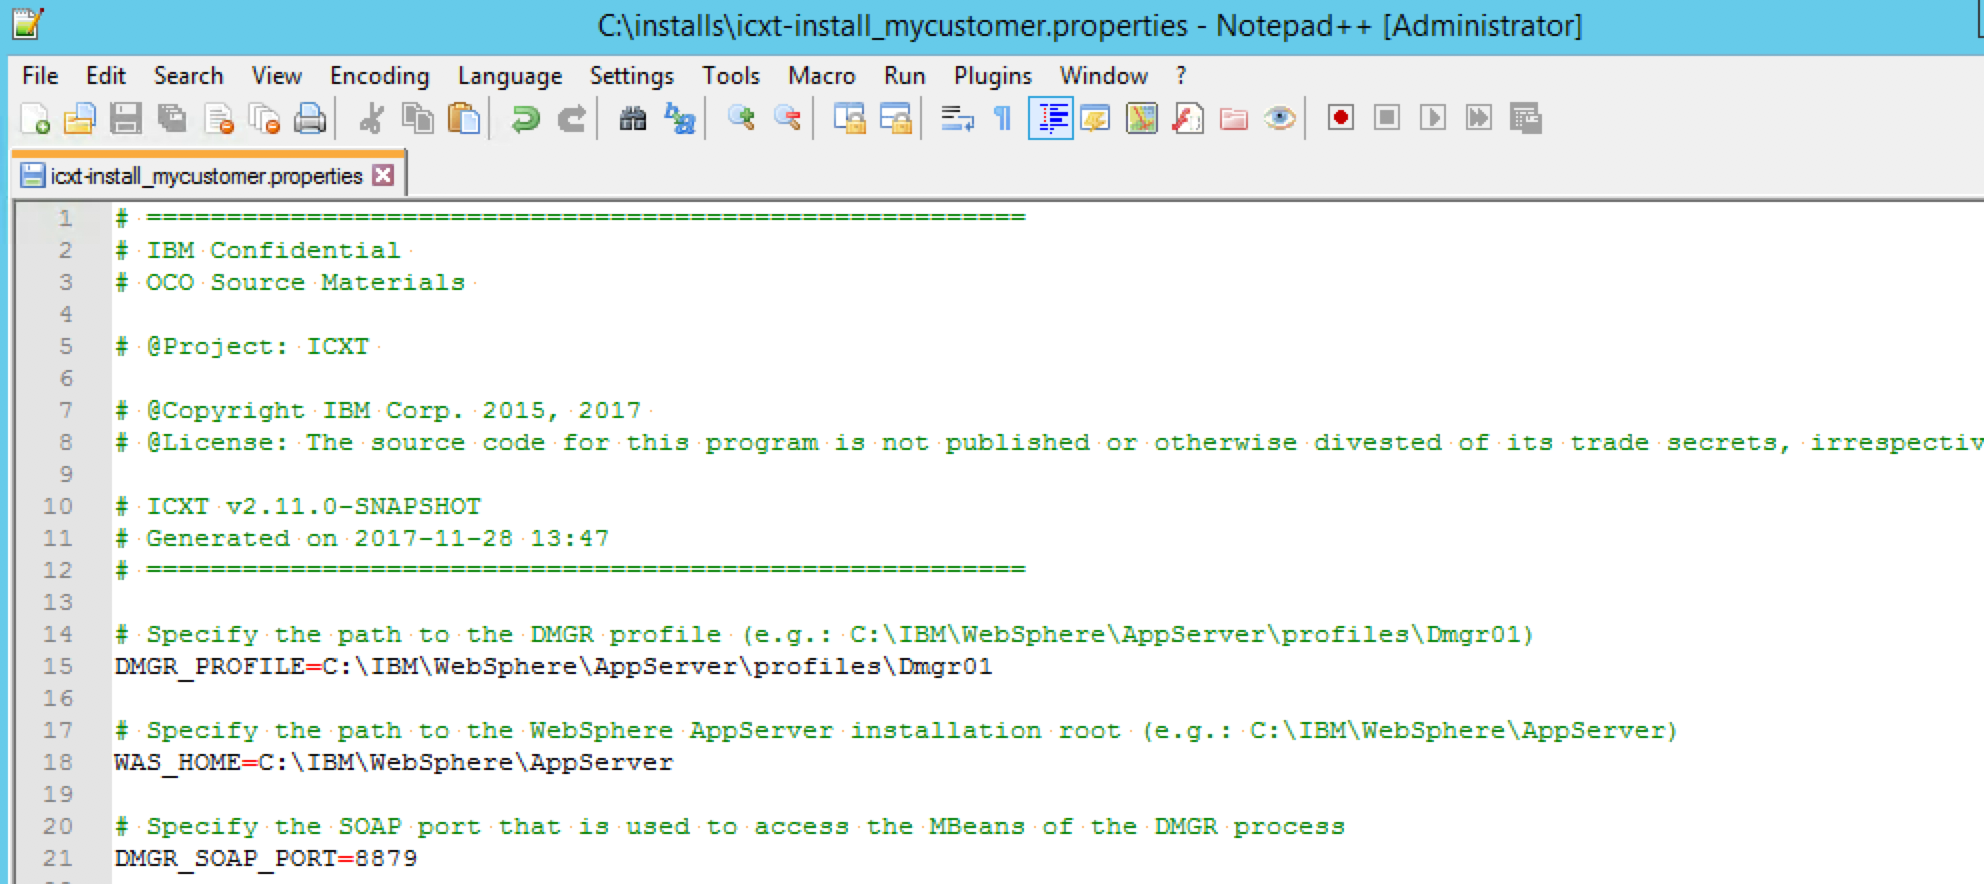
- Windows ic360.deployment-8.0.0-pdfexport\icxt-install-cli.bat
icxt-install_mycustomer.properties

- Linux: ic360.deployment-8.0.0-pdfexport/icxt-install-cli.sh icxt-install_mycustomer.properties
- Windows ic360.deployment-8.0.0-pdfexport\icxt-install-cli.bat
icxt-install_mycustomer.properties
-
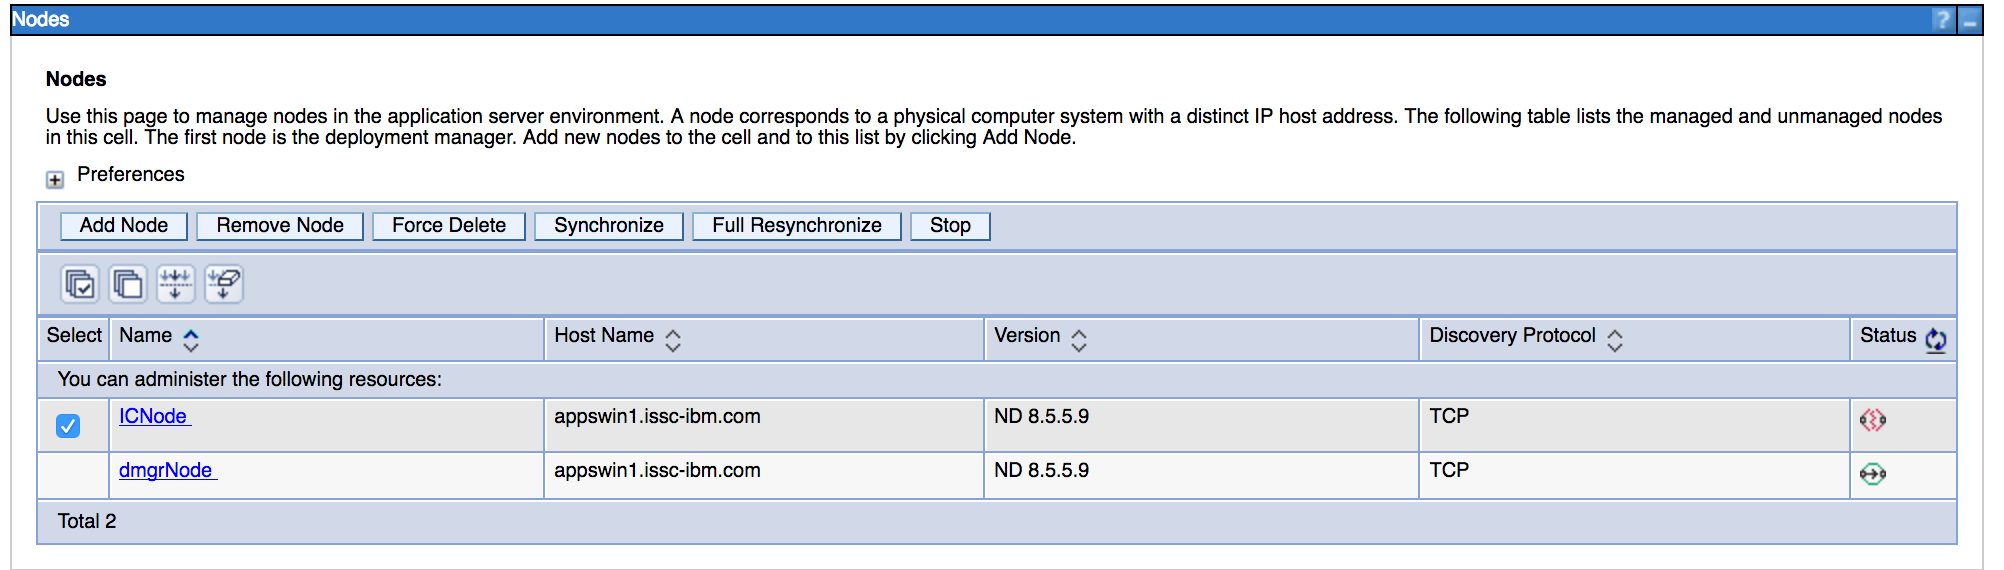
Enter the WebSphere administrative console (e.g.: https://your.dmgr.host:9043/ibm/console) and navigate to System administration > Nodes, select all nodes and click Full Resynchronize
Post-installation tasks
-
Enter the WebSphere administrative console (e.g.: https://your.dmgr.host:9043/ibm/console) and navigate to System administration > Nodes, select all nodes and click Full Resynchronize
-
Restart all ICXT servers
Ensure that all Post-installation Tasks steps are executed or verified. Refer to this document for first steps as well. If you encounter any issues or unexpected behavior, please check the Known Issues or reach out to your HCL/ICXT contact.