In this lesson, you learn how to annotate your custom REST handler (created in the
previous lesson) to expose the API documentation through the Swagger user interface
(UI).
WebSphere Commerce uses the Swagger UI to provide an interactive representation of your REST
API.
By default, the WebSphere Commerce REST services are annotated to use the REST Discovery API.
This API generates resource listings and API declarations for all the REST services that are
registered in your environment. These listings and declarations conform to Swagger specification
1.2. You can view an interactive version of the REST API in a web browser by using the Swagger user
interface. For more information about the Swagger user interface, see Swagger home page.
Annotate your custom REST services to use WebSphere Commerce REST Discovery API. This
annotation infrastructure documents all of the details of your custom REST API. When you are using
this infrastructure, you can discover the available REST resources and methods, and test the API
from inside the Swagger user interface. For more information about REST annotations and the Swagger
UI, see REST service annotations.
Next, you learn how to annotate your custom rest resource handler
(MyResourceHandler) and display its corresponding API documentation through the
Swagger tool.
Procedure
-
From your WebSphere Commerce Developer environment, open your custom resource
handler.
-
In the Enterprise Explorer view, browse to
-
Open the MyResourceHandler.java file to adjust your code to use the new
documentation annotations.
-
At the beginning of the code section, define the strings for each method’s description.
-
Locate the following line of code:
private static final String BEAN_CLASS_NAME_PARAMETER = "com.mycompany.commerce.mycomponent.beans.MyResourceDataBean";
-
Add the following code beneath the line of code you located:
private static final String FIND_BY_MY_RESOURCE_ID_DESCRIPTION = "Finds my resource by its ID.";
private static final String FIND_BY_MY_RESOURCE_LIST_DESCRIPTION = "Finds my resource by My resource list.";
private static final String FIND_MY_RESOURCE_BY_QUERY_DESCRIPTION =
    "Finds my resources by a query. See each query for details on input and output.";
private static final String CREATE_ACTION_DESCRIPTION = "Creates my resource.";
-
Annotate the resource to contain a description.
Doing so ensures that a description is displayed for your resource on the Swagger
UI landing page that lists of all the available classes and their descriptions.
-
Find the following snippet:
@Path("store/{storeId}/my_resource")
-
Add the following line:
@Description("My resource.")
-
Annotate the
findByMyResourceId method. For more information about the
available annotations types, see WebSphere Commerce REST.
-
Locate the following line of code:
@Produces({ MediaType.APPLICATION_JSON, MediaType.APPLICATION_XML,
        MediaType.APPLICATION_XHTML_XML, MediaType.APPLICATION_ATOM_XML })
-
Add the
@Description and @ResponseSchema annotations beneath
the code you located:
1@Description(FIND_BY_MY_RESOURCE_ID_DESCRIPTION)
@ResponseSchema(valueClass = MyResourceListDataBean.class, valueClassType = ClassType.Bean,
  profile = PROFILE_NAME_MY_COMPANY_DATABEAN_SUMMARY, responseCodes = {
    2@ResponseCode(code = 200, reason = RESPONSE_200_DESCRIPTION),
    @ResponseCode(code = 400, reason = RESPONSE_400_DESCRIPTION),
    @ResponseCode(code = 401, reason = RESPONSE_401_DESCRIPTION),
    @ResponseCode(code = 403, reason = RESPONSE_403_DESCRIPTION),
    @ResponseCode(code = 500, reason = RESPONSE_500_DESCRIPTION) })
- 1@Description documents the short description of a REST API
method.
- 2@ResponseSchema documents the response schema of a REST API.
-
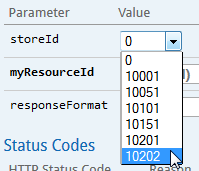
Modify the first
GET method so you can select your store ID from a drop-down
list in Swagger.
-
Within the same method as step 3, locate the following line of code:
@PathParam(PARAMETER_STORE_ID) String storeId,
-
Add the
@ParameterDescription code to the line you located.
When the annotations are added, the code appears as follows:
@PathParam(PARAMETER_STORE_ID) 1@ParameterDescription(description = PARAMETER_STORE_ID_DESCRIPTION,
  valueProviderClass = StoreIdProvider.class, required = true) String storeId,
- 1
@ParameterDescription describes a parameter that
is used in a REST API.
After you make this code change, you will be able to select your store ID for the
GET method from a drop-down list in Swagger, as seen in the following screen
capture:
-
Import prerequisite classes so that your code can be compiled.
-
Find the following imports:
import com.ibm.commerce.rest.javadoc.InternalHttpMethod;
import com.ibm.commerce.rest.javadoc.InternalProduces;
-
Replace them with the following imports, which imports all REST Javadoc classes and your
resource list data bean:
import com.ibm.commerce.rest.javadoc.*;
import com.mycompany.commerce.mycomponent.beans.MyResourceListDataBean;
-
Annotate the remaining
GET methods by using the same convention that is used
in the preceding steps that annotated the findByMyResourceId method.
-
Find the following method:
public Response findMyResourceList
-
Add the following description annotation string:
@Description(FIND_BY_MY_RESOURCE_LIST_DESCRIPTION)
-
Find the following method:
public Response findByQuery
-
Add the following description annotation string:
@Description(FIND_MY_RESOURCE_BY_QUERY_DESCRIPTION)
-
Find the following method:
-
Add the following description annotation string:
@Description(SELF_QUERY_DESCRIPTION)
-
Annotate the
CREATE method.
-
Within the
POST method, locate the following line of code:
@InternalProduces({ MediaType.APPLICATION_JSON, MediaType.APPLICATION_XML,
 MediaType.APPLICATION_XHTML_XML, MediaType.APPLICATION_ATOM_XML })
-
Add the following code beneath line of code you located.
When the annotations are added, the code appears as follows:
@InternalProduces({ MediaType.APPLICATION_JSON, MediaType.APPLICATION_XML,
 MediaType.APPLICATION_XHTML_XML, MediaType.APPLICATION_ATOM_XML })
@Description(CREATE_ACTION_DESCRIPTION)
1@AdditionalParameterList({
        @ParameterDescription(name = ParameterDescription.BODY_NAME, paramType = ParameterDescription.BODY_TYPE,
          description = ParameterDescription.BODY_DESCRIPTION, typeClass = ResourceCreateRequest.class) })
    @ResponseSchema(valueClass = MyResourceCreateCmd.class, valueClassType = ClassType.Command,
      profile =  PROFILE_NAME_MY_COMMAND_SUMMARY,responseCodes = {
    @ResponseCode(code = 200, reason = RESPONSE_200_DESCRIPTION),
    @ResponseCode(code = 201, reason = RESPONSE_200_DESCRIPTION),
    @ResponseCode(code = 400, reason = RESPONSE_400_DESCRIPTION),
    @ResponseCode(code = 401, reason = RESPONSE_401_DESCRIPTION),
    @ResponseCode(code = 403, reason = RESPONSE_403_DESCRIPTION),
    @ResponseCode(code = 500, reason = RESPONSE_500_DESCRIPTION) })
- 1
@AdditionalParameterList adds parameters to a
REST API method without adding them to the Java method signature. This
@AdditionalParameterList contains a @ParameterDescription
annotation for the REST request body. When you view this API from the Swagger UI, this parameter
adds a text-box in which you can input request body content for testing purposes.
-
Import the prerequisite class so that your code can be compiled.
-
Add the following class to the list of imports:
import com.mycompany.commerce.mycomponent.commands.MyResourceCreateCmd;
-
Near the top of the file, define the
ResourceCreateRequest class and
MyresourceCreateResponse class you just introduced in step 6.
-
Locate the following line of code:
private static final String CREATE_ACTION_DESCRIPTION = "Creates my resource.";
-
Add the following code beneath line of code you located.
When the code is added, it appears as
follows:
private static class ResourceCreateRequest {
    @ParameterDescription(description = "The content of field 1 for my resource .")
    private String field1;
    @ParameterDescription(description = "The content of field 2 for my resource.")
    private Timestamp field2;
}
private static class MyresourceCreateResponse {
    @ParameterDescription(description = "The ID of my resource.")
    private long myResourceId;
}
-
Add the following class to the list of imports so that the time stamp type can be
resolved:
import java.sql.Timestamp;
-
Similar to step 4, modify the first
POST method so you can select your store
ID from a drop-down list in Swagger.
-
Within the
create method, locate the following code:
@PathParam(PARAMETER_STORE_ID) String storeId
-
Add the
@ParameterDescription code to the line you located.
When the annotations are added, the code appears as
follows:
@PathParam(PARAMETER_STORE_ID) @ParameterDescription(description = PARAMETER_STORE_ID_DESCRIPTION,
valueProviderClass = StoreIdProvider.class, required = true) String storeId,
-
After
@POST, add the action description line:
@Description(CREATE_ACTION_DESCRIPTION).
As a reference, you can download the following file to compare your completed customized code
with: wv_MyResourceHandler.zip
-
Restart the toolkit server.
Next, verify your customer REST service API through the Swagger user interface.