Preparing the sample data bean and controller command
In this lesson, you create a sample table, database, and controller command. These samples act a placeholder for your own data beans and controller commands, and serve as an illustration of the REST mapping method.
Procedure
- Start WebSphere Commerce Developer.
- Start the WebSphere Commerce test server
- In a web browser, go to http://localhost/webapp/wcs/admin/servlet/db.jsp.
-
Run the following SQL statement to create an XMYRES table.
The XMYRES table gives access to the sample data bean.
CREATE TABLE XMYRES ( XMYRES_ID BIGINT NOT NULL, STOREENT_ID INTEGER NOT NULL, MEMBER_ID BIGINT NOT NULL, FIELD1 VARCHAR(254) , FIELD2 TIMESTAMP , OPTCOUNTER SMALLINT, PRIMARY KEY (XMYRES_ID)); -
Update the KEYS table to use the WebSphere Commerce Key Manager to generate the tracking
numbers for the new table that you created in Step
3.
INSERT INTO KEYS (KEYS_ID, TABLENAME, COLUMNNAME, COUNTER, PREFETCHSIZE, LOWERBOUND, UPPERBOUND) VALUES (10001, 'XMYRES', 'XMYRES_ID', 10000, 500, 0, 9223372036849999872); -
Import the sample Java code that is provided in the wv_restconfig_source.zip file into your
workspace.
-
Ensure that your sample code is imported properly, as shown in the following sample code
list:
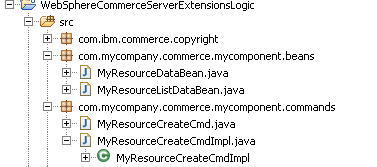
No compilation errors occur when you import the sample Java code into your workspace.
-
Ensure that your sample code is imported properly, as shown in the following sample code
list:
-
Register the new MyResourceCreateCmd in the CMDREG table by entering the following SQL
statement:
insert into CMDREG (STOREENT_ID, INTERFACENAME, DESCRIPTION, CLASSNAME, TARGET) values(10202,'com.mycompany.commerce.mycomponent.commands.MyResourceCreateCmd', 'This is a new controller command for the REST tutorial.', 'com.mycompany.commerce.mycomponent.commands.MyResourceCreateCmdImpl','Local');Note:- The sample MyResourcedataBean is used to retrieve the data for field1 and field2 from the XMYRES table, that you created in the database. The MyResourceListDataBean is the object that contains a list of beans.
- The sample controller command MyResourceCreateCmd is used to run actions against the custom table, such as create the data in the custom table XMYRES.
- The following access control behavior exists when you work with REST services:
- When you use local binding through JSP files, data beans are not protected by default. That is, you can freely access data beans.
- When you use remote binding through REST service calls, data beans are protected by default by using the Delegator interface. If you want data beans to be accessed by any user, you must implement the Delegator interface and return a null value for the getDelegate() method. You can also specify the object and have it returned by the method.
Next, you learn how to create your own REST services by using the configuration-based controller command and data bean mapping framework to start your custom controller command's create operation. You learn how to activate your custom data beans to retrieve data from your custom table.