Generating the configuration-based mapping files by using the REST mapping command
In this lesson, you use a utility to generate the XML mapping files for your sample data bean and controller command.
WebSphere Commerce uses mapping configuration files to make REST calls to beans and commands. These mapping files are divided into profiles, which use different types of calls for the same bean or command. For example, to specify different output values per profile.
Each configuration file defines the mappings for a single bean or command. The file describes mapping of REST input names to the corresponding bean or command setter methods. For each profile in the file, output mappings are also supplied to describe how the getter-methods from the bean or command must be mapped back to a REST entity output.
For more information about the configuration-based command, bean mapping framework, and the utility command's usage, see Creating REST services using the configuration-based controller command and data bean mapping framework.
Procedure
- In a command prompt, browse to the WCDE_installdir\bin directory.
-
Run the following commands:
Where:RESTClassicSampleGen.bat location=com.mycompany.commerce.mycomponent.beans.MyResourceListDataBean outputDir=C:\RESTconfig additionalClassPath="C:\IBM\WCDE_INT80\workspace\WebSphereCommerceServerExtensionsLogic\bin" RESTClassicSampleGen.bat location=com.mycompany.commerce.mycomponent.beans.MyResourceDataBean outputDir=C:\RESTconfig additionalClassPath="C:\IBM\WCDE_INT80\workspace\WebSphereCommerceServerExtensionsLogic\bin" RESTClassicSampleGen.bat location=com.mycompany.commerce.mycomponent.commands.MyResourceCreateCmd outputDir=C:\RESTconfig additionalClassPath="C:\IBM\WCDE_INT80\workspace\WebSphereCommerceServerExtensionsLogic\bin"- location
- The fully qualified Java class name of the data bean or controller command, such as com.mycompany.commerce.mycomponent.beans.MyResourceDataBean.
- outputDir
- The output directory. If you do not have an existing one, the output directory is automatically created. Subdirectories are created for each class type generated.
- additionalClassPath
- additionalClassPath specifies extra JAR files and directories to locate classes (and their dependencies). Separate extra JAR files and directories with a semicolon.
Ensure that the command is run successfully by checking the WCDE_installdir\logs\RESTclassic.log file.
If you encounter issues by using the commands exactly as shown in the preceding snippet, remove the line breaks to ensure that you enter and submit each command as one line.
The utility generates a set of directories and files for creating your REST service. It contains the following three folders under your outputDir folder:- controllerCommandSamples
- dataBeanSamples
- handlerSamples
- In the Enterprise Explorer view, go to .
-
Create the beanMapping-ext and commandMapping-ext
mapping folders.
-
Copy the sample configuration to the REST configuration folder that you created in Step 4.
- Copy both com.mycompany.commerce.mycomponent.beans.MyResourceDataBean.xml and com.mycompany.commerce.mycomponent.beans.MyResourceListDataBean.xml from working_dir\dataBeanSamples to the new folder: beanMapping-ext.
- Copy com.mycompany.commerce.mycomponent.commands.MyResourceCreateCmd.xml from working_dir\controllerCommandSamples to the new folder commandMapping-ext.
Your file structure resembles the following image: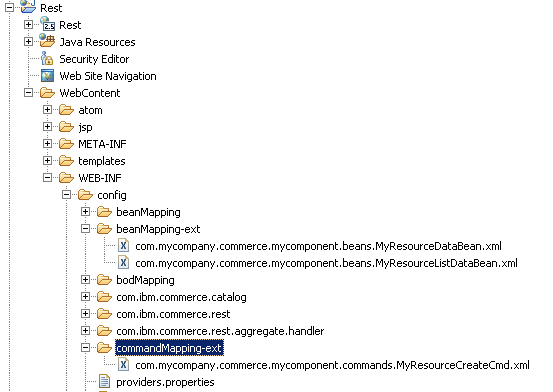
-
Review the sample mapping configuration files:
The mapping configuration files for your custom data bean and controller command are created.
Next, you must create your own REST resource handler.