Verifying your new REST service call by using the Poster browser plug-in
In this lesson, you verify the new REST calls to the sample data beans and controller commands with the Poster browser plug-in.
Note: This
lesson verifies REST calls by using the Poster browser plug-in for
Firefox. You can use your preferred method to verify REST calls. If
you use a different method for verifying REST calls, ensure that you
can verify all of the calls that are outlined in this lesson.
Procedure
- Restart the WebSphere Commerce Test Server.
- Open the Aurora B2B starter store in a web browser, go to https://localhost/webapp/wcs/stores/servlet/en/aurorab2besite.
- Click Sign In/Register. Log in to
the store as a Site Administrator. For example, wcsadmin.
- Sign out the administrator from the store.
- Launch poster for Firefox.
-
Enter the following values, which signs in to the store as the Site Administrator
(wcsadmin).
Parameter Value URL https://localhost/wcs/resources/store/10202/loginidentity Content Type application/json Content Body
Where{ "logonId" : "wcsadmin","logonPassword" : "wcsadmin_pwd" }wcsadminis the user ID of the Site Administrator andwcsadmin_pwdis the password of the Site Administrator.Use the following screen capture as a guide: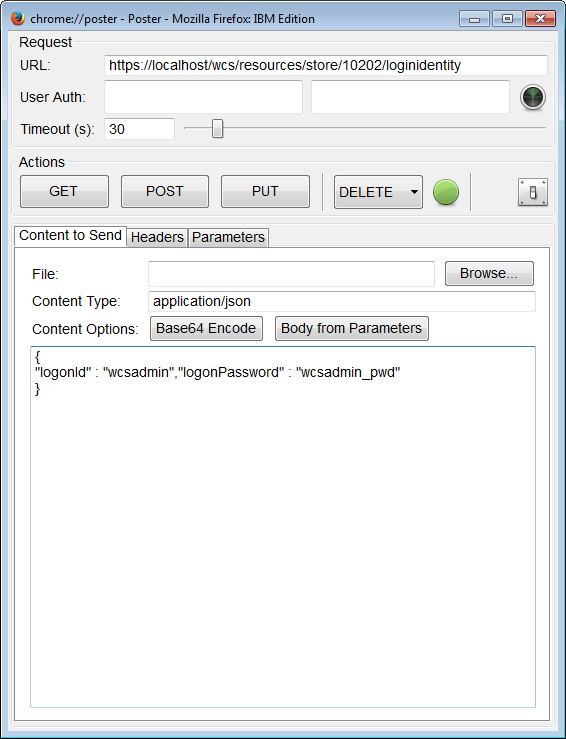
-
Click POST.
A response window displays. Make note of the values for WCToken and WCTrustedToken for later use.
-
Create data to post into the XMYRES table. In the URL field, enter
https://localhost/wcs/resources/store/10202/my_resource. Then, specify values
for field1 and field2 in the body of the
Content to Send pane.
For example,
{ "field1": "Timestamp", "field2": "2016-03-30 06:09:12.0000"
}
If you have problems with this step, such as invalid cookie errors, log in and out of the store multiple times. If necessary, log in to the store, authenticate by using Poster, and interact with the storefront to error out the browser user login. Then, try posting the content again.
- Click the Headers tab within the pane. Add the WCToken and WCTrustedToken values you noted in Step 7.
-
Click POST to create the resource data in the table.
If the new data is created successfully, the corresponding myResourceId is displayed in the response window.For example:
POST on https://localhost/wcs/resources/store/10202/my_resource Status: 200 OK {"myResourceId":10005} -
Create more entries in the XMYRES table to test. Post the following field data by using
Poster:
{ "field1": "Timestamp", "field2": "2016-03-30 08:53:19.0000" } { "field1": "Timestamp", "field2": "2016-03-30 11:54:22.0000" } { "field1": "Timestamp", "field2": "2016-03-30 12:18:02.0000" } -
Test the
findByMyResourceIdmethod. In the URL field, change the URL to: https://localhost/wcs/resources/store/10202/my_resource/10005. - Within the Content to Send pane, remove the values that you specified for field1 and field2.
- Keep the WCToken and WCTrustedToken values you previously added into the Headers pane.
-
Click GET.
Using the REST service, the resource data is retrieved through the resource ID number 10005. The response window with the corresponding information displays.For example:
GET on https://localhost/wcs/resources/store/10202/my_resource/10005 Status: 200 OK {"myResourceId":10005,"field1":"Timestamp","field2":"2016-03-30T06:09:12.000000000Z"} -
Test the
findMyResourceListmethod. In the URL field, change the URL to:https://localhost/wcs/resources/store/10202/my_resource/myResourceListDataBean. -
Click GET.
The list of resource data is retrieved by using the REST service. The response window with the corresponding information is shown.For example:
GET on https://localhost/wcs/resources/store/10202/my_resource/myResourceListDataBean Status: 200 OK {"myResourceDataBeans": [{"myResourceId":10005,"field1":"Timestamp","field2":"2016-03-30T06:09:12.000000000Z"}, [{"myResourceId":10006,"field1":"Timestamp","field2":"2016-03-30T08:53:19.000000000Z"}, [{"myResourceId":10007,"field1":"Timestamp","field2":"2016-03-30T11:54:22.000000000Z"}, [{"myResourceId":10008,"field1":"Timestamp","field2":"2016-03-30T12:18:02.000000000Z"}]} -
Test the
findSelfquery method. In the URL field, change the URL to: https://localhost/wcs/resources/store/10202/my_resource?q=self. -
Click GET.
The list of resource data is retrieved by using the REST service. The response window with the corresponding information is shown.For example:
GET on https://localhost/wcs/resources/store/10202/my_resource?q=self Status: 200 OK {"myResourceDataBeans": [{"myResourceId":10005,"field1":"Timestamp","field2":"2016-03-30T06:09:12.000000000Z"}, [{"myResourceId":10006,"field1":"Timestamp","field2":"2016-03-30T08:53:19.000000000Z"}, [{"myResourceId":10007,"field1":"Timestamp","field2":"2016-03-30T11:54:22.000000000Z"}, [{"myResourceId":10008,"field1":"Timestamp","field2":"2016-03-30T12:18:02.000000000Z"}]} - Open a connection to your database and run SQL statements against your database. Go to: http://localhost/webapp/wcs/admin/servlet/db.jsp.
-
Run the following SQL query:
select * from xmyres; -
Review the SQL results.
The list of resource data is created into the table and shown.For example:
Select * from XMYRES
XMYRES_ID STOREENT_ID MEMBER_ID FIELD1 FIELD2 OPTCOUNTER 10005 10202 -1000 'Timestamp' 2016-03-30 06:09:12.0 NULL 10006 10202 -1000 'Timestamp' 2016-03-30 08:53:19.0 NULL 10007 10202 -1000 'Timestamp' 2016-03-30 11:54:22.0 NULL 10008 10202 -1000 'Timestamp' 2016-03-30 12:18:02.0 NULL Note:- If no Coordinated Universal Time relation information is given with a time representation, the time is in local time. It is ambiguous in communicating across different time zones. The Timestamp value you input through Poster is processed by the configuration-based command and data bean mapping framework. All formats are ISO 8601 compliant and everything ends in 'Z' except an SQL Date. A pure date value has no time zone.
- The REST APIs inherit the access control of the underlying commands and data beans. Since the tutorial does not cover setting up sample access control policies for the sample command and data beans, you must to sign in as wcsadmin first. After you sign in, verify the REST service call. For more information about implementing access control in customized code, see REST authentication and access control. For more information about implementing access control in REST services, see Implementing access control.
By verifying by using Poster, you successfully make REST calls to your sample data beans and command. Next, you learn how to customize an existing configuration-based data bean mapping to return more data.