
Ingesting unstructured file and web site content
You can customize the Ingest service to enable it to crawl website data and ingest selected content into Elasticsearch. This capability can be added in the HCL Commerce Search V9.1 NiFi container.
About this task
You may need to crawl and ingest unstructured content data from the Internet. Unstructured site content includes documents that do not adhere to a specific data model, such as product attachments contained in various formats. For example, content such as user manuals and warranty information are considered unstructured content. Its elements, construction, and organization are typically unknown and can vary depending on its file type. Unstructured content can include HTML, .docx, PDF, and .txt files. You can ingest such data by creating a NiFi processes group and associating its output with an existing product index, or by creating a new custom index and ingestint the data into a new schema.
Procedure
-
Enable file attachment in the Elasticsearch container
(docker.elastic.co/elasticsearch/elasticsearch:7.x.0).
Note: You can add the attachment command inside the dockerfile. If you do, you must build a new Elasticearch image from the base image.
-
Create a directory inside the NiFi container
(commerce/search-nifi-app:9.1.x.0). This directory will
be used to save crawled content for ingestion in ES.
To create the directory, issue the following commands.
docker exec -it -u 0 commerce_nifi_1 bash mkdir /opt/NiFi/extDocs/ chown nifi:nifi /opt/NiFi/extDocs chmod 755 /opt/NiFi/extDocs -
Import the following connectors into your Runtime registry
(commerce/search-registry-app:9.1.x.0).
docker cp custom-crawl-StaticContentIndexSchemaUpdate.json commerce_registry_1:/opt/nifi-registry/flows/
docker cp custom-crawl-StaticContentIndexSchemaUpdateConnector-attachment.json commerce_registry_1:/opt/nifi-registry/flows/
docker cp custom-crawl-StaticContentIndexDatabaseConnectorPipe-Attachment.json commerce_registry_1:/opt/nifi-registry/flows/
Open the NiFi registry container and run the following command.docker exec -it -u 0 commerce_registry_1 bashRun the following commands from the registry terminal./opt/nifi-registry/scripts/import_flow.sh custom-crawl-StaticContentIndexSchemaUpdate /opt/nifi-registry/flows/custom-crawl-StaticContentIndexSchemaUpdate.json /opt/nifi-registry/scripts/import_flow.sh custom-crawl-StaticContentIndexSchemaUpdateConnector-attachment /opt/nifi-registry/flows/custom-crawl-StaticContentIndexSchemaUpdateConnector-attachment.json /opt/nifi-registry/scripts/import_flow.sh custom-crawl-StaticContentIndexDatabaseConnectorPipe-Attachment /opt/nifi-registry/flows/custom-crawl-StaticContentIndexDatabaseConnectorPipe-Attachment.json -
Create a connector using the Ingest Swagger interface. POST to the following
URL with Json data in the body.
http://localhost:30800/connectors { "name": "auth.staticcontent", "description": "This is the connector for the staticcontent processing", "pipes": [ { "name": "custom-crawl-StaticContentIndexSchemaUpdate" }, { "name": "custom-crawl-StaticContentIndexSchemaUpdateConnector-attachment" }, { "name": "custom-crawl-StaticContentIndexDatabaseConnectorPipe-Attachment", "properties": [ { "name": "Database Driver Location(s)", "value": "${AUTH_JDBC_DRIVER_LOCATION}", "scope": { "name": "Database Connection Pool", "type": "CONTROLLER_SERVICE" } }, { "name": "Database Connection URL", "value": "${AUTH_JDBC_URL}", "scope": { "name": "Database Connection Pool", "type": "CONTROLLER_SERVICE" } }, { "name": "Database User", "value": "${AUTH_JDBC_USER_NAME}", "scope": { "name": "Database Connection Pool", "type": "CONTROLLER_SERVICE" } }, { "name": "Password", "value": "${AUTH_JDBC_USER_PASSWORD}", "scope": { "name": "Database Connection Pool", "type": "CONTROLLER_SERVICE" } } ] }, { "name": "Terminal" } ] } -
After running the connector, the following four process group pipes will be
available in NiFi, Add the process group in NiFi dashboard and connect
input/output ports as shown in the following image.
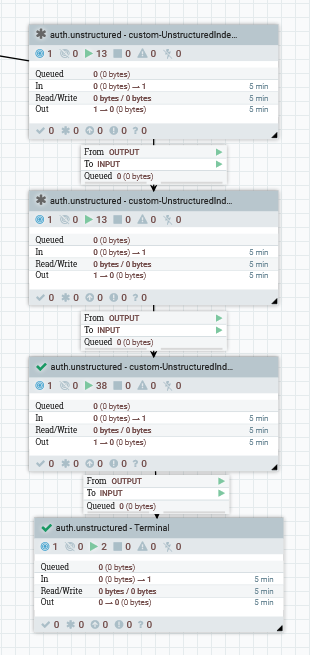
Configure the four process groups as follows.
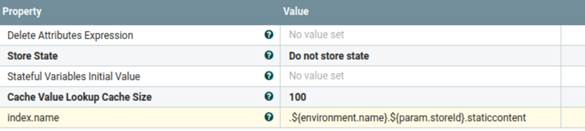
- custom-UnstructuredIndexSchemaUpdate
- This process group will be used to set new schema. It will be
skipped if the schema is already available in Elasticsearch. You
can use an existing schema, and merely update the index name in
the following properties file for the processor to set an
unstructured schema name.
- custom-UnstructuredIndexSchemaUpdateConnector-attachment
- This process group will used for enabling the attachment setting
in Elasticsearch. It will be skipped if the attachment setting
will already be available.
The following setting has been used by default.
The param.attach parameter is available in the
Set staticcontent
                                            attachment
processor.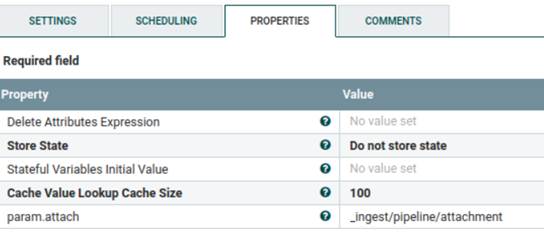
The following json is available in ‘Populate StaticContent Index schema’ processor.
Here we can add/update keyword, this keyword will be used for ingesting/searching unstructured/staticcontent data.{ "description" : "Extract attachment information", "processors" : [ { "attachment" : { "field" : "data", "indexed_chars_field" : "max_size", "properties": [ "content", "title", "keywords", "content_type", "content_length" ] } } ] } - custom-UnstructuredIndexDatabaseConnectorPipe-Attachment
- This process group are being used for fetching file location
from a database. It reads file contents from a directory
mentioned in the database, encodes it into base64 and ingests
the file content into Elasticsearch.
This process groups has multiple processors to ingest the files into Elasticsearch.
The
Set
                            Attribute
processor sets the parameter which will be used for processing thfile. You can update it as needed.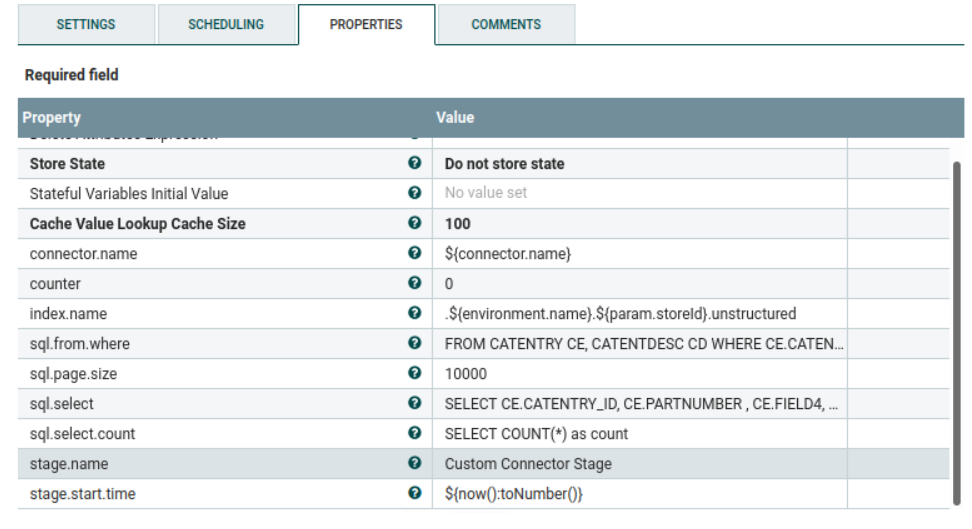
- Terminal
- This process group finishes the process flow and is required to terminate the output of the previous process.
-
Run the following queries for setting the file location in
Catentry.field4. You can modify the queries and add multiple transaction as needed to set the file location for catalog entries.UPDATE catentry SET FIELD4 = '/opt/nifi/extDocs/SampleDocs-travel-laptop.docx' WHERE PARTNUMBER = 'CLA022_2203' UPDATE catentry SET FIELD4 = '/opt/nifi/extDocs/SampleDocs-office-laptop.ppt' WHERE PARTNUMBER = 'CLA022_2205'Note: If you want to set the file location in a different table, modify the following properties in theSet Attributeprocessor under custom-UnstructuredIndexDatabaseConnectorPipe-Attachment. You can update the queries as needed.SELECT COUNT(*) as count FROM CATENTRY CE, CATENTDESC CD WHERE CE.CATENTRY_ID = CD.CATENTRY_ID AND CD.LANGUAGE_ID =-1 AND CE.MARKFORDELETE =0 AND CE.BUYABLE =1 AND CD.PUBLISHED =1 AND ce.FIELD4 IS not NULL AND CE.CATENTRY_ID IN (SELECT C.CATENTRY_ID FROM CATGPENREL R, CATENTRY C WHERE R.CATALOG_ID IN (SELECT CATALOG_ID FROM STORECAT WHERE STOREENT_ID IN (SELECT RELATEDSTORE_ID FROM STOREREL WHERE STATE = 1 AND STRELTYP_ID = -4 AND STORE_ID = ${param.storeId})) AND R.CATENTRY_ID = C.CATENTRY_ID AND C.MARKFORDELETE = 0 AND C.CATENTTYPE_ID <> 'ItemBean') SELECT CE.CATENTRY_ID, CE.PARTNUMBER , CE.FIELD4, CD.NAME, CD.SHORTDESCRIPTION , CD.PUBLISHED FROM CATENTRY CE, CATENTDESC CD WHERE CE.CATENTRY_ID = CD.CATENTRY_ID AND CD.LANGUAGE_ID =-1 AND CE.MARKFORDELETE =0 AND CE.BUYABLE =1 AND CD.PUBLISHED =1 AND ce.FIELD4 IS not NULL AND CE.CATENTRY_ID IN (SELECT C.CATENTRY_ID FROM CATGPENREL R, CATENTRY C WHERE R.CATALOG_ID IN (SELECT CATALOG_ID FROM STORECAT WHERE STOREENT_ID IN (SELECT RELATEDSTORE_ID FROM STOREREL WHERE STATE = 1 AND STRELTYP_ID = -4 AND STORE_ID = ${param.storeId})) AND R.CATENTRY_ID = C.CATENTRY_ID AND C.MARKFORDELETE = 0 AND C.CATENTTYPE_ID <> 'ItemBean')Note: If you want to update the schema name where the file attachment will be ingested, modify the following properties inSet Attributeprocessor under custom-UnstructuredIndexDatabaseConnectorPipe-Attachment.
-
Connect the auth.unstructured -
custom-UnstructuredIndexSchemaUpdate process group with the
Routing Serviceprocess group withINPUT auth.unstructured.Note: This process should already be connected to the routing service if the connector process is followed. Verify that the auth.unstructured route is available. -
Navigate to the process group.
Select the
Execute SQLprocessor, right click and select View Configuration then select the arrow button to the right of the Database Connection Pooling Service property.Ensure that the
Database Connectionpool service is enabled. -
Start all four process groups, then navigate to inside each process group.
Right-click on the NiFi Flow, then select
Enable Transmission.
Note: Transmissions may already be enabled.
-
After starting the process groups, POST to the following URL.
To check the status, issue a GET against the following URL:https://localhost:5443/wcs/resources/admin/index/dataImport/build?connectorId=auth.unstructured&storeId=1https://localhost:5443/wcs/resources/admin/index/dataImport/status?jobStatusId=1036
Results
What to do next
localhost:30200/.auth.1.unstructured/_search{ "query": { "bool": {
"must": [
{
"query_string": {
"query": "lightweight"
}
}
]
} } }{ "query": { "bool": {
"must": [
{
"query_string": {
"query": "CLA022_2205"
}
}
]
} } }{ "query": { "bool": {
"must": [
{
"query_string": {
"query": "docx"
}
}
]
} } }