Defining the event and parameters for a storefront event trigger via a custom marketing event URL or the marketing event REST API
The Wait for Event trigger can detect a storefront event that occurs when a
custom URL you create is called. To detect the event, the marketing services match the event name
and parameters you define in the URL. For this scenario, you can make up your own event and build a
URL that notifies the marketing services of the event with a service call. Marketing managers need
the event name and parameters you define to set up the Wait for Event trigger in the Management
Center Marketing tool.
Procedure
-
Define the Event name for the Wait for Event trigger.
The Event name represents the event that starts or continues a Dialog activity that contains this trigger. Make up any name you want.
For example, you might want to start a Dialog activity when a customer clicks a link on a store page to subscribe to promotional offers for a category. You could define an event name of SubscribeToCategory. -
Define the Parameter name for the Wait for Event trigger. Make up any
name you want.
The Parameter name is the name of a parameter in the custom URL that you want to match. The Wait for Event trigger can match one or two parameters.
For example, if the event is a customer clicking a link on a store page to subscribe to promotional offers for a category, you could define a parameter name of Category. -
For each Parameter name, define the Parameter
value. If necessary, you can define more than one Parameter value
for each parameter. Make up any name you want.
For example, for the parameter Category, the parameter value might be the name of a specific category from the store catalog, such as
Furniture.Note: The Parameter value is an optional field when you set up the Wait for Event trigger in the Management Center Marketing tool. If you want the Wait for Event trigger to match only the Event name and the Parameter name, do not provide parameter values to the marketing manager. -
Follow the steps given below for Aurora and REST based stores:
- For Aurora store, define a URL to pass the marketing services
the event name and the event parameters to match when the event occurs. Use these
guidelines when you define the URL:
- Call either the MarketingTriggerProcessServiceEvaluate URL or the AjaxMarketingTriggerProcessServiceEvaluate URL, depending on whether the URL is Ajax enabled.
- The URL must contain the DM_ReqCmd parameter with a value that is the Event name you defined in step 1.
- The URL must include name-value pairs for each Parameter name and Parameter value you defined in steps 2 and 3.
- Here is an example of a custom URL that follows the previous guidelines. This
URL is for an Ajax link that a customer can click a store page to subscribe to
promotional offers for a category, in this case, the Furniture category. The event
and parameters that are defined are:
- Event name: SubscribeToCategory
- Parameter name: Category
- Parameter value: Furniture
AjaxMarketingTriggerProcessServiceEvaluate? DM_ReqCmd=SubscribeToCategory&Category=Furniture - Implement the URL on a store page so that customers can click the URL to trigger
a Dialog activity.Note: Here are some suggestions:
- You can give customers access to your custom URL by using marketing
content that is displayed in an e-Marketing Spot. A marketing manager can
expose the custom URL on the storefront by performing these two tasks in the
Management Center Marketing tool:
- Create marketing content that has a custom URL for its click action. Specify the custom URL defined in step 4.
- Create a Web activity to display the marketing content in an e-Marketing Spot on a store page.
- Alternatively, you can implement the custom URL directly on a store page to give customers access to the URL.
- You can give customers access to your custom URL by using marketing
content that is displayed in an e-Marketing Spot. A marketing manager can
expose the custom URL on the storefront by performing these two tasks in the
Management Center Marketing tool:
- For Emerald, Sapphire, Ruby and other REST based stores
- Call the
EventREST API:POST: https://<host>/wcs/resources/store/<storeId>/event Request Body: { DM_ReqCmd: "SubscribeToCategory", Category: "Furniture" } - In the example of registering a marketing event where shoppers enter the promo
code
BLACKFRIDAY, call the REST API as follows:POST: https://<host>/wcs/resources/store/<storeId>/event Request Body: { DM_ReqCmd: "PromoCodeMarketingEvent", PromoCode: "BLACKFRIDAY" } - The name value pairs used in the
EventAPI should be specified in theWait for Eventtrigger in the marketing dialog activity created in the Management Center. As shown in the following example from the Management Center,PromoCodeMarketingEventis specified in theEvent Namefield. ThePromoCodeis entered in theParameter namefield andBLACKFRIDAYis entered in theParameter valuefield.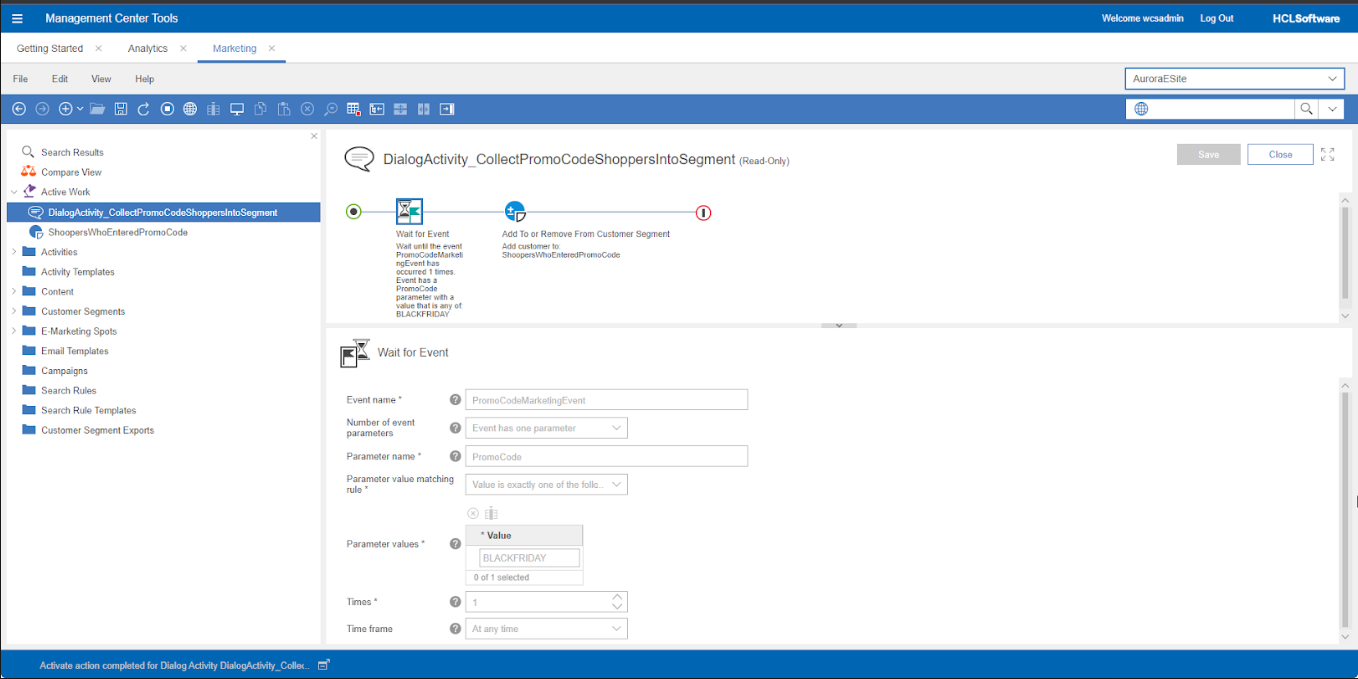
- Call the
-
For more information about the marketing event REST API, see ../../restapi/code91/marketing_transaction.html.
- For Aurora store, define a URL to pass the marketing services
the event name and the event parameters to match when the event occurs. Use these
guidelines when you define the URL: