Uploading catalog data
Use the Catalog Upload feature to upload catalog data in your CSV file or compressed file (.zip) into the database.
You can also load this data in XML format. If you choose to create and use an XML formatted file, ensure that your file uses the CSV column names as the XML element names.
Before you begin
Ensure that you complete the steps in one of the following
topics:
About this task
 If you are working in an extended
site store, you cannot use Catalog Upload to load data for creating,
updating, or deleting catalog objects that belong to your catalog
asset store. To load data for catalog objects that belong to your
catalog asset store, you must switch the store that you are working
in to be your catalog asset store.
If you are working in an extended
site store, you cannot use Catalog Upload to load data for creating,
updating, or deleting catalog objects that belong to your catalog
asset store. To load data for catalog objects that belong to your
catalog asset store, you must switch the store that you are working
in to be your catalog asset store.
Procedure
- Open the Catalogs tool.
- From the toolbar,
click the

 Create New icon; then select Catalog
Upload.
Create New icon; then select Catalog
Upload. - In the New Catalog
Upload page:
- Browse for the file or compressed file (.zip) that you want to upload.
- Select the file encoding that applies to your catalog data:
- UTF-8
- This encoding is the default encoding. English uses this encoding, and some other languages can also use this encoding.
- UTF-16
- This encoding is large enough to cover all languages.
- GB2312
- This encoding is for simplified Chinese used in People's Republic of China.
- Big5
- This encoding is for traditional Chinese encoding that is used in Taiwan, Hong Kong, and Macau.
- Windows Latin-1
- This encoding supports more characters than the English language,
such as the copyright symbol,
 .
. - ISO 8859-1
- This encoding is used for languages in the Americas, Western Europe, Oceania, and much of Africa.
- ISO 8859-15
- This encoding is used for some European languages, and also contains the euro sign €.
- KS C 5601 (KS X 1001)
- This encoding is used for Korean.
- Shift-JIS
- This encoding is used for Japanese.
- Select the target master catalog or sales catalog you want to upload to. The first catalog in the target catalog list is the master catalog.
- Click Save and Close.
After you upload the file, the server uploads the data into the catalog. The total time for the upload to complete depends on how much data you are uploading.
- From the explorer
tree, click Catalog Uploads to check your uploads.
The Catalog Uploads list is displayed.
Option Description File name The name of the uploaded file or compressed file. Size The size of the uploaded file in kilobytes. User name The identifier of the user who uploaded the file. Target catalog The target master catalog or sales catalog your catalog data is uploaded to. Start time The time the catalog upload process begins. End time The time the catalog upload process ends. Status The status of the catalog upload. - Idle
- The initial status when the catalog upload is waiting to be started.
 Processing
- The file or the compressed file is uploaded to the server and is submitted for publishing.
 Successful
- The file is published without any errors or exception messages.
 Failed
- The file was submitted for publishing, but publishing did not complete. There are errors or exception messages.
Server path The server file path of the uploaded file. This column is not shown by default. Upload time The time the uploaded file is uploaded to the server. This column is not shown by default. Unique ID The internal unique identifier of the catalog upload. This column is not shown by default. - Select your catalog upload from the Catalog Uploads list
view.The properties page for the selected upload is displayed. An extra section Status is shown on the properties page when the upload completes or fails. This section contains a more detailed status of the selected catalog upload. Check your summary report for more details. The summary report contains the following information for your upload operation:
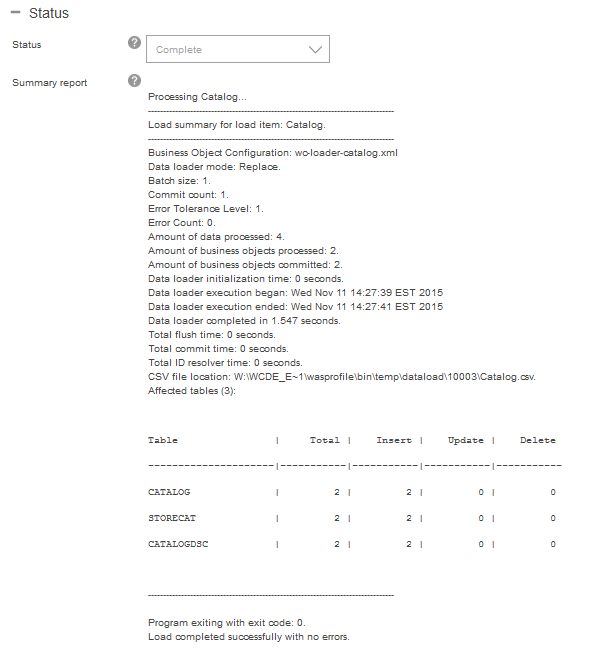
Catalog Upload summary information Description Business Object Configuration The name of the business object configuration file that is used to load your data. Data loader mode The mode that is specified for the upload. This value can be Insert, Replace, or Delete. Batch size The batch size value that is specified in your configuration file. Commit count The commit count value that is specified in your configuration file. Error Tolerance Level The error tolerance level that is specified in your configuration file. If your upload process reaches this level, the upload operation fails. Error Count The number of errors generated. Amount of data processed If you are using the default CSV reader, this number indicates the number of lines that are processed in the CSV source file. Amount of business objects processed The number of objects that are returned from the data reader. One data object returned might be constructed into multiple business objects. But in most cases, one data object returned is constructed into one business object. Amount of business objects committed The number of constructed business objects that are saved in the database or in the files. This value depends on how the data writer is configured. Data loader initialization time The initialization time of the data loader. Data loader execution began The start time of the data load operation in seconds. Data loader execution ended The end time of the data load operation in seconds. Data loader completed in The total running time of the data load in seconds. Total flush time The total time that it takes to call the Java Database Connectivity (JDBC) batch execution. This information is only useful if the JDBC batch is enabled (that is, the batch size is greater than 1.) If the JDBC batch is enabled, then it is the total time spent to run all the SQL statements that are required to upload your information. Total commit time The total time that it takes to call the database commit. The time is typically small. CSV file location The location of the file that your are loading. Affected tables, including Table name, and Affected umber of rows The names of the database tables that are updated, and the number of rows that are updated for each table. A sample summary report:
- Optional: If your catalog upload fails or your
catalog upload is successfully uploaded, you might want to remove
the entry from the Catalog Uploads list view:
- In the Catalog Upload list view, right-click the catalog upload entry that you want to remove; then select Delete. The catalog upload entry is removed from the list view, but the catalog upload action is not affected.