In this step, you learn how to create a data bean that
passes information to the JSP page. You add code to determine if the
view was called directly, or if it was called by the controller command.
In the latter case, the JSP page should also display the name of the
command that called it.
About this task
In order to pass this information to the view, you create
a data bean called MyNewDataBean. The MyNewJSPTemplate is also modified
so that it can display the new information.
MyNewDataBean is
used strictly for making information available from the controller
command to the JSP page. In contrast, later in the tutorial you learn
how to create a data bean to make information from the database available
to the JSP page.
You might wonder why this tutorial is using
a data bean just to make information available from the controller
command. There are two reasons for creating this bean:
- It is good programming practice that allows a logical grouping
of attributes. The data bean holds two attribute values: callingCommand
and calledByControllerCommand. These two values can be stored in a
TypedProperty object. However, a TypedProperty object contains additional
data that is not related to this command and JSP page. Instead, store
the values into a bean and use that bean on the JSP page.
- The advantage of using a bean is that Web developers can use JSTL
and tooling to retrieve the information from the bean. If you used
a TypedProperty dump, Java code would have to be written to retrieve
the attributes from the Typed Property.
In this section of the tutorial, you learn the following tasks:
- How to create a new data bean
- How to modify the controller command to instantiate a data bean
- How to set attributes in a data bean, using the controller command
- How to pass the instantiated data bean to the JSP template
- How to modify the JSP template to retrieve information from the
data bean
- See an example of using the <if> tag in the JSP template
Creating MyNewDataBean
The MyNewDataBean
data bean is used to pass information to the MyNewJSPTemplate.jsp
page. As with other sections of the tutorial, a base for the data
bean is provided in the sample code. The code is split into sections
that are commented out. As you progress through the tutorial, you
uncomment various sections of the code.
To create MyNewDataBean:
Procedure
- In the Enterprise Explorer view,
navigate to the:
- Open MyNewDataBean.java to view its
source code.
- In source code for the main class, uncomment Section 1
to introduce the following code into the class:
 /// Section 1 /////////////////////////////////////////////
/// create fields and accessors (setter/getter methods)

  private java.lang.String callingCommandName = null;
  private boolean calledByControllerCmd = false;


  public java.lang.String getCallingCommandName() {
    return callingCommandName;
  }

  public void setCallingCommandName(java.lang.String newCallingCommandName)
  {
    callingCommandName = newCallingCommandName;
  }

  public boolean getCalledByControllerCmd() {
    return calledByControllerCmd;
  }

  public void setCalledByControllerCmd(boolean newCalledByControllerCmd)
  {
    calledByControllerCmd = newCalledByControllerCmd;
  }

/// End of Section 1 ////////////////////////////////////
The preceding code introduces two variables that display
information when the view is returned by a controller command, rather
than being called directly by the URL for the view.
- Save your changes.
- Instantiating MyNewDataBean and setting its attributes
using MyNewControllerCmd
In this section, you modify
MyNewControllerCmdImpl to instantiate MyNewDataBean and set the attributes
of this bean.
To modify MyNewControllerCmdImpl:
- In the Enterprise Explorer view,
navigate to: WebSphereCommerceServerExtensionsLogic> src
> com.ibm.commerce.sample.commands.
- Open MyNewControllerCmdImpl.java to view
its source code.
- In the code for the main class, uncomment Import Section 1 to
make the new data bean code available in this class:
/// Import Section 1 ///////////////////////////////
import com.ibm.commerce.sample.databeans.MyNewDataBean;
/// End of Import Section 1 ////////////////////////
If you do not see this section, in the Source view,
expand the + that is to the left of the line //*-------------------------------------------------------------------
//* Licensed Materials - Property of IBM.
- In the Outline view, select its performExecute method.
- In the source code for the performExecute method, uncomment Sections
3A and 3B to introduce the following code into the method:
/// Section 3A/////////////////////////////////////////

  /// instantiate the MyNewDataBean databean and set the properties,
  ///  then add the instance to resProp for response

  MyNewDataBean mndb = new MyNewDataBean();
  mndb.setCallingCommandName(this.getClass().getName());
  mndb.setCalledByControllerCmd(true);

/// end of section 3A/////////////////////////////////////////

/// Section 3B/////////////////////////////////////////
  rspProp.put("mndbInstance", mndb);

/// end of section 3B/////////////////////////////////////////
The preceding code snippet instantiates the MyNewDataBean
object and sets two parameters in the object. The two parameters indicate
that it was called by a controller command and which command called
it. The code also puts the data bean object into the response properties
so that it can be made available to the JSP template.
- Save your changes.
- Using MyNewDataBean in MyNewJSPTemplate
In
this section, you modify MyNewJSPTemplate to indicate whether the
view was returned by a controller command. If it was returned by a
controller command, it should also display the name of that controller
command. The JSP template uses JSTL tags for the conditional logic
to determine this, based upon values from MyNewDataBean.
To
modify the JSP template:
- If the JSP template files are not already open:
- In the Project Navigator view, navigate to the directory.
- Highlight both the MyNewJSPTemplate_All.jsp and MyNewJSPTemplate.jsp files,
right-click and select Open.
- Copy Section 5 from the MyNewJSPTemplate_All.jsp file into the
MyNewJSPTemplate.jsp file. This section introduces the following text
into the JSP template:
<!-- SECTION 5 -->

<c:if test="${mndbInstance.calledByControllerCmd}">
   <fmt:message key="Example" bundle="${tutorial}" /> <br />
   <fmt:message key="CalledByControllerCmd" bundle="${tutorial}" />
      <br />
   <fmt:message key="CalledByWhichControllerCmd" bundle="${tutorial}" />
   <b><c:out value="${mndbInstance.callingCommandName}" /></b> <br />
      <br />
</c:if>

<!-- END OF SECTION 5 -->
This section of code uses the JSTL <if> tag to determine
whether to display information about the calling controller command.
We use the tag to retrieve translatable text from the resource bundle
for the tutorial.
- Save your changes.
- Testing the modified JSP template
- Restart
the test environment.
- Navigate to the directory.
- Select the index.jsp file and from its
pop-up menu select . The store home page displays in
the web browser.
- In the web browser, enter the following URL:
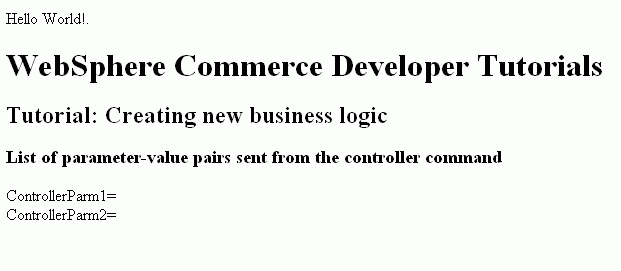
http://localhost/webapp/wcs/stores/servlet/MyNewControllerCmd
The JSP template displays, as shown in the following
screen capture:

- Enter the URL to call the view directly, and notice the difference
in the information that displays:
http://localhost/webapp/wcs/stores/servlet/MyNewView
The JSP template displays, as shown in the following
screen capture: