Creating a controller command

In this lesson, you create a controller command called MyNewControllerCmd. This command returns the MyNewView view. To create a controller command you must register the command in the command registry, create an interface, implementation class, and access control policies for the command.

About this task

In this lesson, you learn how to perform the following tasks:

  • Create a controller command interface and implementation class.
  • Configure a controller command to return a view.
  • Register a controller command in the command registry.
  • Set up access control for a controller command.

Procedure

  1. Register the MyNewControllerCmd in the command registry. The association between the interface and the implementation class is registered in the CMDREG table.
    1. Start the WebSphere Commerce Test Server.
    2. In a web browser, navigate to the following URL: http://localhost/webapp/wcs/admin/servlet/db.jsp
    3. Register the MyNewControllerCmd in the CMDREG table by entering the following SQL statement, where storeent_id is the unique identifier for your store:
      insert into CMDREG (STOREENT_ID, INTERFACENAME, DESCRIPTION, CLASSNAME, TARGET)
      values (storeent_ID,'com.ibm.commerce.sample.commands.MyNewControllerCmd', 
      'This is a new controller command for the business logic tutorial.', 
      'com.ibm.commerce.sample.commands.MyNewControllerCmdImpl','Local');
    4. Click Submit Query to run the SQL statement and register the command.
  2. Register the interface for the command in the struts-config-ext.xml file:
    1. In the Enterprise Explorer view, expand Stores > WebContent > WEB-INF.
    2. Right-click the struts-config-ext.xml file; click Open With > Struts Configuration File Editor.
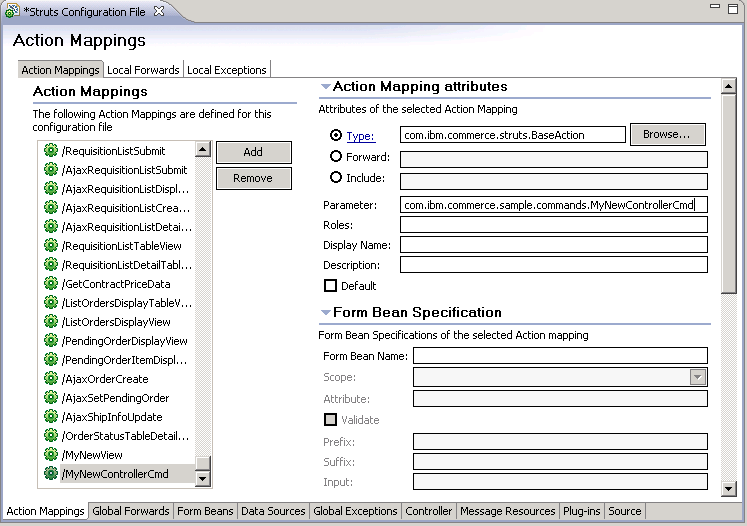
    3. Set the mapping settings in the Action Mappings tab:
      1. In the Actions Mappings section, click Add. Delete the default path value /action1 and enter /MyNewControllerCmd for the path value.
      2. In the Action Mapping attributes section, enter com.ibm.commerce.struts.BaseAction in the Type field.
      3. In the Action Mapping attributes section, enter com.ibm.commerce.sample.commands.MyNewControllerCmd in the Parameter field. The parameter field contains the interface name of the business logic to execute.

      The mapping settings in the Struts Configuration File Editor should resemble the following:

      A screen capture of the Action Mappings tab of the Struts Configuration File editor.

    4. Save your changes and close the file.
  3. Update the struts configuration registry component. The registry component is used by the server to detect your changes to the struts configuration files:
    1. Open the Administration Console and select Site on the Administration Console Site/Store Selection page.
    2. Click Configuration > Registry. A list of registry components for the site display.
    3. Select the check box for the Struts Configuration registry component; click Update.
    4. Click Refresh to reload the Registry window. When the update is complete, the status column reads Updated.
  4. Create the MyNew ControllerCmd interface. All controller commands have an interface and an implementation class. For this tutorial, a base for the interface is provided in the sample code. The base is split into sections that are commented out. As you progress through the tutorial, you uncomment various sections of the code.
    1. In the Enterprise Explorer view, expand WebSphereCommerceServerExtensionsLogic > src > com.ibm.commerce.sample.commands.
    2. Open the MyNewControllerCmd.java file for editing.
    3. Locate and uncomment section 1 by deleting the '/*' before the section and '*/' after the section. This code adds the following code into the interface, which specifies that the interface uses the MyNewControllerCmdImpl implementation class by default:
      /// Section 1 //////////////////////////////////////////////
      
      // set default command implement class
      
        static final String defaultCommandClassName = 
           "com.ibm.commerce.sample.commands.MyNewControllerCmdImpl";
          
      
      /// End of section 1////////////////////////////////////////
      
    4. Save your changes.
  5. Create the MyNewControllerCmdImpl implementation class:
    1. In the Enterprise Explorer view, expand WebSphereCommerceServerExtensionsLogic > src > com.ibm.commerce.sample.commands.
    2. Open the MyNewControllerCmdImpl.java file for editing.
    3. In the Outline view, select the performExecute method to view its source code.
    4. Locate and uncomment section 1 to introduce the code to create a TypedProperties object that holds the' response properties of the command into performExecute method. The TypedProperties object is a hash table that holds data from the request object. Section 1 introduces the following code into the implementation class:
      /// Section 1 ////////////////////////////////////////////////
      
          /// create a new TypedProperties for output purpose.  
          
        TypedProperty rspProp = new TypedProperty();
      
      /// End of section 1 ///////////////////////////////////////// 
      
    5. Locate and uncomment section 5 to introduce the code to return a view for the command into the implementation class. This code specifies that MyNewControllerCmd returns the MyNewView view.
      /// Section 5 /////////////////////////////////////////////////
      
          /// see how controller command call a JSP
         
        rspProp.put(ECConstants.EC_VIEWTASKNAME, "MyNewView");  
        setResponseProperties(rspProp);
      
      /// End of section 5///////////////////////////////////////////
      
    6. Save your changes.
  6. Create and load the access control policies for the command. Command-level access control policies specify which users are allowed to execute the command. For this tutorial, the access control policy that you create allows all users to execute the command. The access control policy is defined by the MyNewControllerCmdACPolicy.xml file in the WCDE_installdir\xml\policies\xml directory.
    1. Stop the WebSphere Commerce test server.
    2. In a command prompt, navigate to the WCDE_installdir\bin directory
    3. Run the acpload command:
      • Apache Derby acpload MyNewControllerCmdACPolicy.xml
      • DB2Oracleacpload db_name db_user db_password inputXMLFile schema_name where
        • db_name is the name of your development database.
        • db_user is the name of the database user.
        • db_password is the password for your database user.
        • inputXMLFile is the XML file that contains the access control policy specification. In this case, specify MyNewControllerCmdACPolicy.xml.
        • schema_name is:
          • DB2 The database user who created the database and owns the schema
          • OracleThe user who owns the tables
        The following command is an example of the command, with variables specified:
        acpload db2user db2userpassword MyNewControllerCmdACPolicy.xml DB2USER
        
    4. Ensure that the policy files were successfully created:
      1. Navigate to the WCDE_installdir\logs directory. Inspect the acpload.log and messages.txt files to ensure that the access control policy loaded successfully. If the load completed successfully, the messages.txt file might not exist.
      2. Navigate to the WCDE_installdir\xml\policies\xml directory. Ensure that the MyNewControllerCmdACPolicy_idres.xml and MyNewControllerCmdACPolicy_xmltrans.xml files were created. These files are created as part of a successful idresgen utility process.
  7. Test the MyNewControllerCmd to ensure the interface, implementation class, command registration, and access control information were created successfully.
    1. Start the WebSphere Commerce test server.
    2. Expand Stores > WebContent > Madisons.
    3. Right-click the index.jsp file; click Run As > Run on Server. Your storefront page displays in the web browser.
      Note: If prompted to select a server, select Choose an existing server and click Finish.
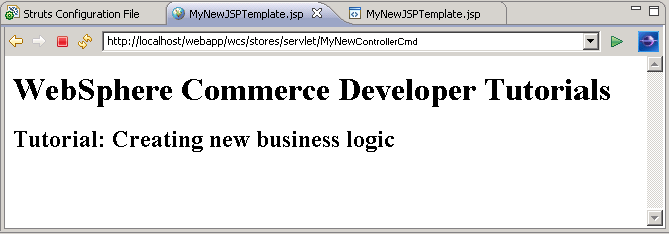
    4. In the web browser, enter the following URL: http://localhost/webapp/wcs/stores/servlet/MyNewControllerCmd
      The new JSP page displays in the web browser:
      Screen capture of MyNewView JSP page.