Creating signatures from scanned file data
You can use scanned file data to expand your custom catalog. You can add signatures for software products that are installed in your infrastructure but are not present in the HCL catalog. You identify the file name, or another item of information that can be used to identify the software and add the signature.
Before you begin
 You must have the View Endpoints and Manage Catalogs permissions
to perform this task.
You must have the View Endpoints and Manage Catalogs permissions
to perform this task.
Procedure
- Log in to BigFix Inventory.
- In the top navigation bar, click .
-
To filter the report data, hover over the Manage Report View icon
 , and click Configure View. Then, specify the appropriate filtering
options.
, and click Configure View. Then, specify the appropriate filtering
options.
- Optional:
Select the Recognized checkbox to add these two columns to
the view of scan data.
Note: To find a file or a package that can be used as a signature, filter the report to the data from the computer on which the particular software product is installed. To further narrow down the results, specify the whole or part of the path to the directory where the software is installed. Then, look at the following columns.
- Recognized - the column shows whether the package data and/or file was recognized as part of an existing signature.
- Removed since
 : Caused Detection - the column shows whether the file
contained enough information to cause detection of the related software. The Caused
Detection column is removed since BigFix Inventory version 10.0.4. You
must re-create your saved reports in case you had used the Caused Detection
column.
: Caused Detection - the column shows whether the file
contained enough information to cause detection of the related software. The Caused
Detection column is removed since BigFix Inventory version 10.0.4. You
must re-create your saved reports in case you had used the Caused Detection
column.
- Optional:
Select the Recognized checkbox to add these two columns to
the view of scan data.
- Optional: In the File Path column, look for the location where the missing software title is installed.
- Click the arrow on the right from the File Name that
you want to use as a signature, and click Create Signature.

-
In the Create Catalog Entry window, provide the publisher name,
product name, and release number. Further select the component that is found.
 Starting from application update 9.2.11, the Scanned File Data report provides
full versions of discovered files. However, best practices of creating software
signatures recommend that file version that is specified in the signature is limited to
the release number, for example, 9.0. When you specify a more detailed version of the
file such as 9.0.7, the signature does not detect all patches or mod-releases of the
software component. When you create a signature from the scanned file data, the
pre-filled version of the file is limited to the release number according to the best
practices.
Starting from application update 9.2.11, the Scanned File Data report provides
full versions of discovered files. However, best practices of creating software
signatures recommend that file version that is specified in the signature is limited to
the release number, for example, 9.0. When you specify a more detailed version of the
file such as 9.0.7, the signature does not detect all patches or mod-releases of the
software component. When you create a signature from the scanned file data, the
pre-filled version of the file is limited to the release number according to the best
practices. To create a template signature with auto-detectable version of the file, you may
choose the File Template Signature type and copy data from the Package or File
Signatures tab to the template type. For more information, see Creating signatures.
To create a template signature with auto-detectable version of the file, you may
choose the File Template Signature type and copy data from the Package or File
Signatures tab to the template type. For more information, see Creating signatures.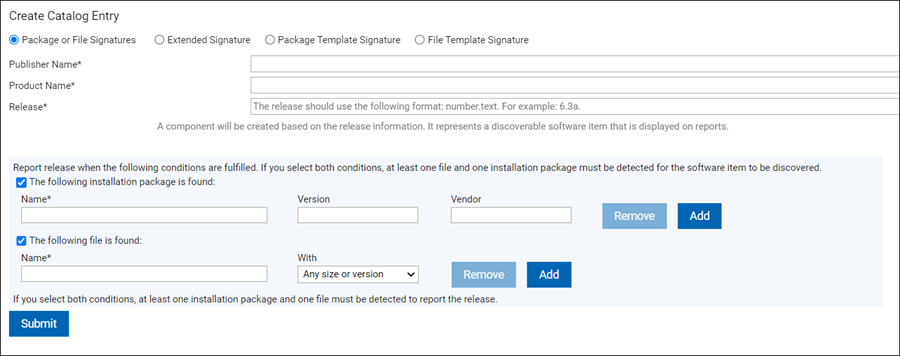
- To save the catalog entry, click Submit.
Important: If you create an entry that exists in the software catalog, an information message is displayed, and both signatures are saved in the catalog.
- To make the signatures available for software detection, click , or wait for a scheduled import.
Results
You can view the audit trail of the changes on the Catalog Audit report.
What to do next
You can edit the details of the signature and delete a custom catalog entry on the Catalog Customization panel.