Create a flow to check upcoming holidays
In this tutorial, we'll walk you through the process of building a chatbot that can provide a list of upcoming holidays based on user preferences. Whether you're developing a chatbot for a website, messaging platform, or application, this guide will help you create a seamless user experience.
As holidays approach, people often wonder about upcoming occasions and the dates they fall on. Our chatbot will be designed to address this need by allowing users to inquire about the upcoming holidays. The chatbot will provide options for selecting a region and month, enabling users to customize their search and receive a personalized list of holidays.
Using an intuitive platform that requires no coding experience, we'll guide you through the steps of designing conversational flows, implementing response logic, and integrating holiday data. By the end of this guide, you'll have a functional chatbot that can assist users in discovering the upcoming holidays for their desired region and month.
Throughout the tutorial, we'll break down the development process into easy-to-follow steps and provide explanations along the way. So, let's dive in and create your very own upcoming holidays chatbot flow! By the end of this guide, you'll have a chatbot that can engage users, gather their preferences, and provide them with a curated list of upcoming holidays. Let's get started on this exciting journey of building a helpful holiday chatbot!
In this tutorial, you'll learn how to:
- Create a project
- Upload the holiday list
- Create an intent
- Train intent with expected user phrases
- Create a flow using multiple action nodes
- Map the intent and flow
- Test your bot
Prerequisites
Run IntelliService in Chrome browser for better user experience. You might face screen resolution issues in other browsers.
Create a project
To create a project, follow the steps below:
- After logging into the application, in the homepage, click the CREATE drop-down next to the Projects label.
-
Select NEW PROJECT, and in the Add Project Details form, enter the project name as "Demo".Note: Project name field accepts only alphanumeric and avoid any space or special characters.
- In the Description field, enter "This is a demo project", and click SAVE.
-
As a result, Project created successfully message will be displayed and
navigate to the Project page as shown below.
Upload manual data into application
As a first step, the holiday list must be made available in a shared location or in a database that can be accessed through APIs. For this tutorial, we are temporarily uploading the holiday list in excel format into Ingest Data in the IntelliService. The ingest data can be consumed using elasticsearch API. Whereas, you can upload the data into your database that can be accessed through APIs.
To upload the excel data, follow the steps below:
- In the homepage, on the left pane, at the left bottom corner, below the profile pic, click three dots > Settings > Integrations > Ingest Data > ADD.
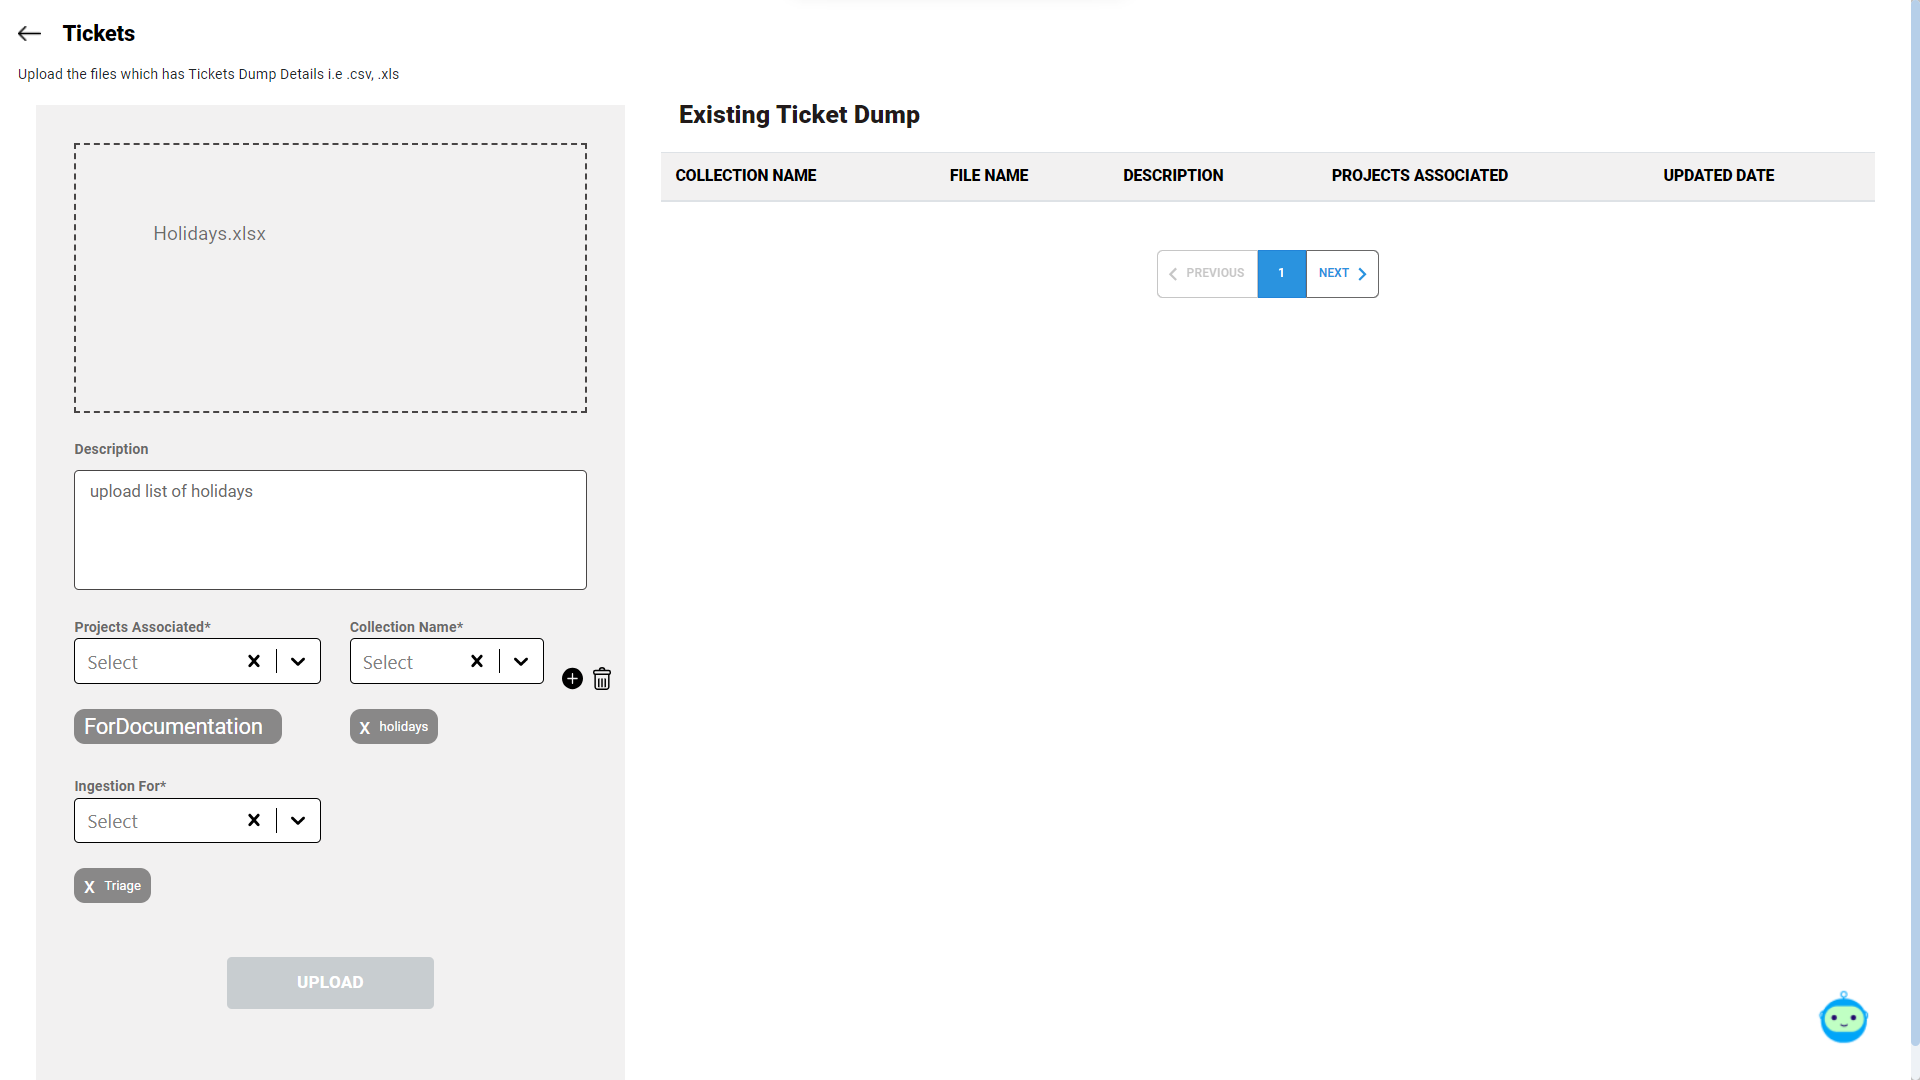
- As a result, the Tickets page will be displayed with options to upload data, project and collection selection.
- In Drag n drop some file here... box, drag and drop the excel sheet containing holiday list, and in the Description text box, enter the description for the excel sheet.
- In the Project Associated drop-down list, select the Demo project that is created for this tutorial.
- By default, the collection list is empty. Click the plus icon next to the Collection Name drop-down list to create a collection in the elasticsearch.
- In the Add Collection Details form, in the Collection Name
field, enter the collection name as "holidays".Note: Collection supports alphanumeric and don't support spaces and special characters.
- Click SAVE to create the collection in the elasticsearch. As a result, the collection name will be listed in the Collection Name drop-down list.
- Now, in the Collection Name drop-down list, select the holidays collection, which is newly created.
- In the Ingestion for drop-down field, select Triage option. Currently, the Ingestion for field is enabled with the Triage option alone.
- After selecting the file, project and collection name, click Upload to upload the excel-sheet into elasticsearch. The upcoming holiday list will be imported into the collection and the same can be consumed through API in the flow.
- On successful upload, the collection name and file name will be listed in
the Existing Data Dump list.
Create an intent
To create an intent, follow the steps below:
- In the homepage, select the project of your preference, and click ADD > NEW INTENT.
- In the Add Intent Details form, enter the following information:
- Intent Name: UpcomingHolidays
- Description: Explore upcoming holidays
- Click SAVE. You will notice an UpcomingHolidays intent has been created under the ACTIVE INTENTS tab of the Intents section.
Train intent with phrases
To trigger the UpcomingHolidays intent, the intent must be trained with user phrases.
- In the Intents page, on the ACTIVEINTENTS tab, for the UpcomingHolidays intent, click on the three dots menu > View/Edit.
- Click the plus icon next to the Phrases, and add the following sample
phrases:
- What are the upcoming holidays?
- Click Save. The underlying NLP model has been adequately trained to identify and trigger the UpcomingHolidays intent from the user query.
Create a flow
To create the flow, follow the below steps:
- After creating the intent and training the intent, click ADD > NEW FLOW.
- In the Add Flow Details form, enter the Flow Name as UpcomingHolidays.
- Click SAVE. You will notice a UpcomingHolidays flow has been created under the Flows page.
Design the flow
The flow is divided into three segments as receiving the user inputs like region and month for which the holidays to be viewed in a form, sending the user inputs to Holidays API to get list of holidays, and then processing the results to be displayed in a list.
To design the flow, follow the steps below:
- In the Flows page, on the left pane, click the UpcomingHolidays flow. You will notice multiple tabs – Designer, Trigger, Actions, and Templates.
- By default, In the Designer tab, you will see the START node.
Get user inputs
In this first segment, we request you to provide the month and region for which you would like to retrieve upcoming holidays. By entering the month and region, we can tailor the holiday information specifically to your preferences. Here, we are using Forms to get user inputs.
- In the flows page, from the Actions pane, drag and drop the INPUT CAPTURE node into the editor space of the Designer tab.
- Double-click the dropped Input capture node, and you will notice the Input Capture Details form.
- Configure node in the following way:
- Name: holidaysForm
- Drag the DROP
DOWN component in the form designer and configure it
with the following details:
- Switch the Required toggle button
- Name: country
- Label: 'Please select the country' (please include the single quotes)
- How many options you want?: 2
- Option 1 name and value: India
- Option 2 name and value: USA
- In the form designer, click SAVE to save the DROP DOWN component details.
Figure 1. Region Configuration 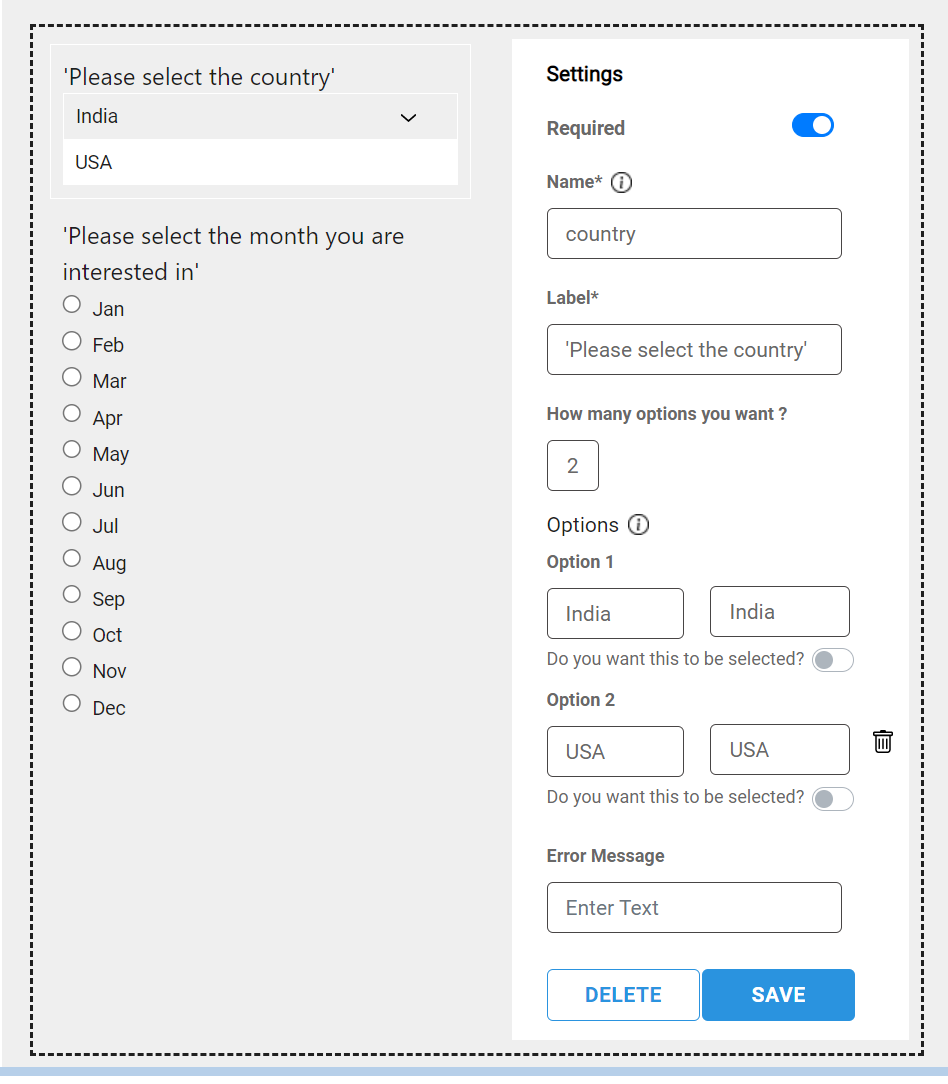
- Drag and drop the RADIO
BUTTON component and configure it with the following
details:
- Name: month
Label: 'Please select the month you are interested in'
Note: Include either single or double straight quotes, and avoid using curly quotes.
- How many radio buttons you want ?: 12
- Option 1 Name: Jan
- Option 1 Value: Jan
- similarly, for Option 2 to Option 12, enter the name and value for other months as Feb, Mar, Apr, May, Jun, Jul, Aug, Sep, Oct, Nov, Dec, respectively.
- In the form designer, click SAVE to save the Radio Button component details of the Input Capture node.
- Form Submit Button: Submit
- In the Input Capture node, click SAVE to save the Input Capture node details.
- Now, connect the holidaysForm INPUT CAPTURE node to the START node, and click SAVE in the Designer tab.
Send user inputs
Now that we have the month and region you selected, we will process this data to retrieve the upcoming holidays using our Holidays API. The API will provide us with a comprehensive list of holidays based on your chosen criteria. This ensures that you receive accurate and up-to-date details about the upcoming holidays in your desired month and region.
- In the Designer tab, drag and drop the HTTP node and
configure it the following details:
- Name: holidaysList
URL: 'http://elasticsearch-es-http:9200/holidays/_search?size=10000&pretty'
Note: In the above URL, you can replace the "holidays" with the collection name created in the ingest data page. Also, make sure to include single or double straight quotes.
- Method: Get
Body:
{ "_source": [ "Month", "Date", "Holiday Name" ], "query": { "bool": { "must": [ { "match": { "Region": "holidaysForm.country" } }, { "match": { "Month": "holidaysForm.month" } } ] } } }- In the above code, "_source": ["Month","Date","Holiday Name"] this line specifies the fields that should be included in the search results. In this case, it includes the fields "Month," "Date," and "Holiday Name."
- "query": {"bool": {"must": [{"match": {"Region": "holidaysForm.country"}}, {"match": {"Month": "holidaysForm.month"}}]}} This part defines the query for Elasticsearch to retrieve the desired data. It uses a "bool" query, which allows for combining multiple conditions. In this case, the "bool" query contains a "must" clause, which specifies that both conditions must match.
- Overall, this query is designed to retrieve documents that match specific conditions, including matching the region and month specified in the "holidaysForm" variables or parameters. The "_source" section indicates the desired fields to be included in the search results or retrieved data.
- Click SAVE to save HTTP node configurations.
Figure 2. HTTP Configuration 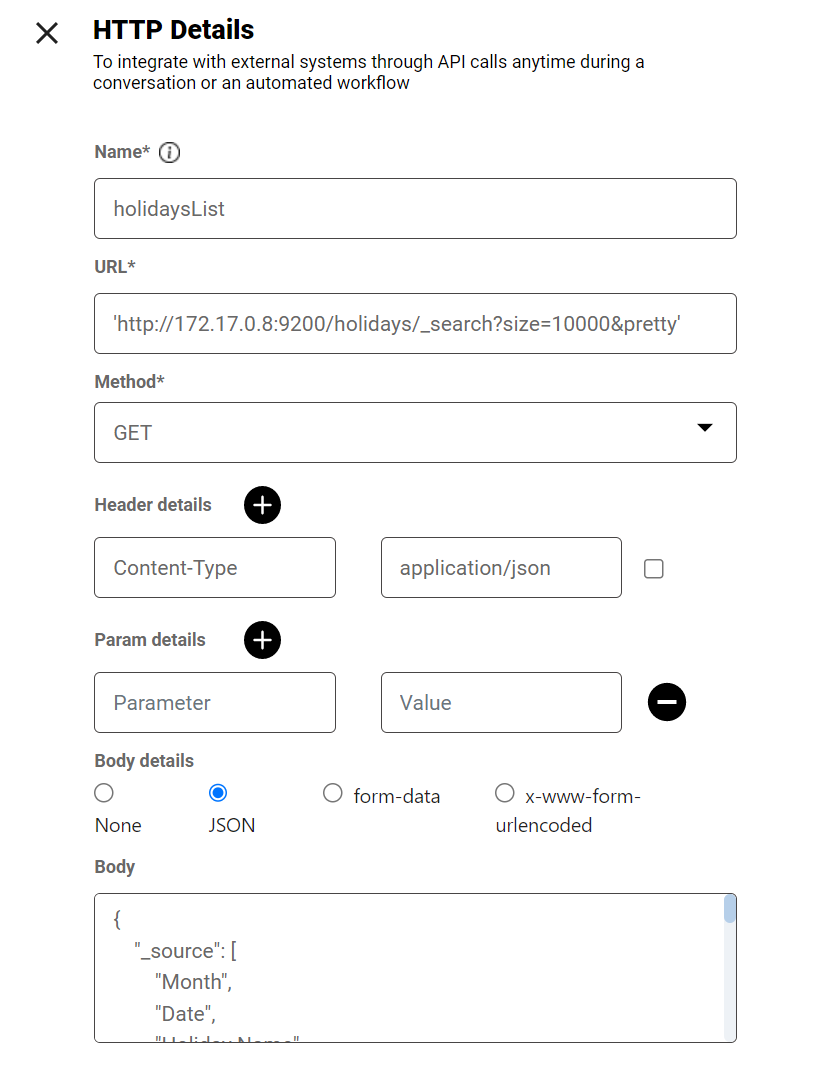
- In the Designer tab, connect the holidaysList HTTP node to the holidaysForm Input Capture node.
- Drag and drop the EXPR node, and double-click the EXPR node.
- In the Expression Details form, configure the following details:
- Name: holidaysAvailabilityCheck
- Expression: holidaysList["hits"]["total"].value == 0
- Is Branching required?: Yes
- How many branches required?: 2
- Enter branch names with comma separator?: true,false
- In the Expression Details form, click SAVE to save the EXPR node details and
navigate back to designer pane.
Figure 3. Expression node 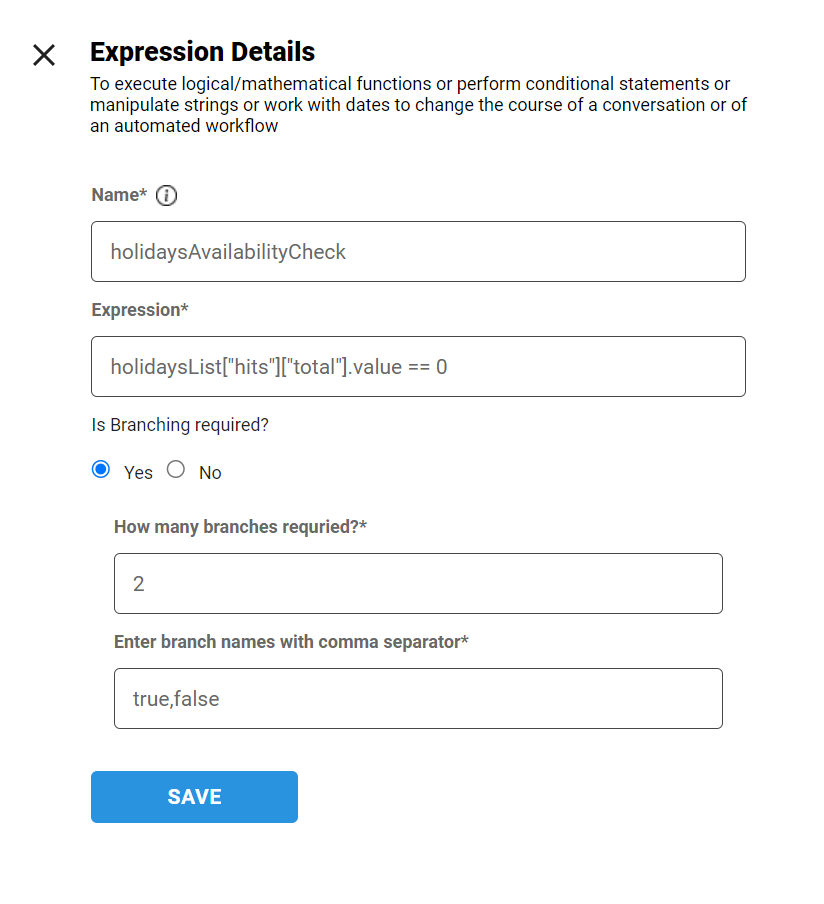
- Similarly, connect the holidaysAvailabilityCheck EXPR node to the holidaysList HTTP node, and in the designer tab, save the flow.
Validate and process API response
Once we've gathered the holiday data from the API, we will display it in the chatbot for your convenience. You'll be able to view a comprehensive list of upcoming holidays, complete with their dates. This will give you a clear overview of the holidays you can look forward to in your selected month and region. If the response contains list of holidays, then we can process the output using the Script node and display the results. Otherwise, we can display the message stating that there is no holiday for the specific month and you can restart the flow.
- In the Designer tab, drag and drop the SCRIPT node, and configure
with the following details:
- Name: holidaysListProcessing
Script:
var result = "Following holidays are available for the month of "+holidaysForm.month+" in "+holidaysForm.country+":"; var count = 1; for (var i=0;i<holidaysList["hits"]["total"].value;i++) { result = result+"\n\n"+count+") **"+holidaysList["hits"]["hits"][i]["_source"].Date+"** - "+holidaysList["hits"]["hits"][i]["_source"]["Holiday Name"]; count = count + 1; }- in the Script details form, click SAVE to save the Script node configurations.
- Connect the holidaysListProcessing Script node with the holidaysAvailabilityCheck EXPR node under false connection point.
- Now, drag and drop the TEXT node to format the output of script.
Double-click the text node and configure the following:
- Name: showHolidays
Text Message: holidaysListProcessing
Note: Here we are calling the "holidaysListProcessing" script node as value in the Text node. We can use the node name as variable to use a previous node response.
- In the Text details form, click SAVE to save the Text node details, and connect the showHolidays TEXT node to the holidaysListProcessing SCRIPT node.
- For the no holiday list, drag and drop a TEXT node and configure
with the following details:
- Name: holidaysNAMessage
Text Message: "Holidays are not available for the month of "+holidaysForm.month+" in "+holidaysForm.country+"."
Note: Include either single or double straight quotes, and avoid using curly quotes.
- In the Text Details form, click SAVE to save the Text node details.
- In the Designer tab, connect the holidaysNAMessage Text node to the holidaysAvailabilityCheck EXPR node's true connection point, and click SAVE in the designer pane to save the overall flow.
Map intent and flow
After creating the intent and flow, it is crucial to map the intent to the corresponding flow/action so that when the intent is triggered, the associated flow is executed.
Mapping the intent and flow allows for seamless communication between the user's inputs and the chatbot's responses. By establishing this connection, the chatbot can understand the user's intent and provide the appropriate actions or responses based on the predefined flow.
Follow the below steps:
- In the Flows page, click the TRIGGER tab, and click Add Trigger. As a result, the Add TriggerDetails form will be displayed.
- In the Trigger type* drop-down list,select the Intent based option, and in the Intent name* drop-down list, select the UpcomingHolidays intent as option.
- Click Submit. The flow and the intent have been successfully mapped.
Test your bot
To explore our products, simply click on the chat icon located at the bottom right corner of the page. Once the chat window opens, enter the phrase "What are the upcoming holidays?". The underlying NLP (Natural Language Processing) model will recognize your intention, triggering the "UpcomingHolidays" intent.
Once the "UpcomingHolidays" intent is triggered, it will initiate the "UpcomingHolidays" flow. This flow is specifically designed to handle requests for upcoming holidays. The chatbot will guide you through the flow, providing options to select your preferred region and month.
By selecting the region and month of your choice, the flow will retrieve the
relevant holiday information using our back-end data sources or APIs. The
chatbot will then display a curated list of upcoming holidays based on your
selected criteria.
Troubleshooting
| Issue | Solution |
| Something went wrong | Check the field value are in single or double straight quotes and not in curly quotes. |
| Sorry, I am not able to understand your query. ... | Check for intent and flow mapping in Trigger Tab. If intent and flow are mapped, then refresh the page. |
| Loading sign (three dots) | Chatbot waiting for response. Check the flow for Text node got replaced with Text Prompt node. |