Managing and securing file transfer between z-centric agents
With the File Transfer integration, you are granted a consolidated and coordinated approach to scheduling and automating transfer of files. The highlights of the integration are as follows:
- A dashboard available on Automation Hub for monitoring file transfer operations
- Completion time estimate
- Parallel file transfer
- Rerun from point of failure
- Selective re-transfer
- Improved multiple selection by using wildcards and regular expressions
- File transfer status and details on files transferred
- Post-processing of transferred files: delete, rename, move
The File Transfer process is a solution that completely integrates all of your file transfer processes within HCL Workload Automation for Z. With this method you transmit files to z-centric agents internally, without using third-party integrations. (For a detailed description about creating a file transfer job, see Automation Hub.)
- Communication between the agents and Z controller, through the File Transfer proxy.
- Users submitting the File Transfer, through the reserved User Field SUBJOBUSER that you set at operation level.
Prerequisites
- Installed and started the File Proxy. For detailed information, see Installing the File Proxy and Starting the File Proxy.
- Set the FTPROXYHOST, FTPROXYPORT in the HTTPOPTS statement.
- Enabled an SSL environment in the HTTPOPTS statement. The communication between the File Proxy and Z controller requires an SSL connection.
- The SSL key ring containing as default certificate a certificate with a private
key compatible with RSA signing algorithm (RSASSA-PKCS1-v1_5 using SHA-256). You can use
either a SAF key ring or USS key store file. The default certificate private key is used
to sign the authentication token. Key size must be greater than 2048. To generate and connect the default record key pair to your key ring:
- On SAF
- Use the RACDCERT GENCERT and RACDCERT CONNECT commands. For detailed information about RACDCERT, see the IBM z/OS Server Security RACF Command Language Reference manual.
- On USS
- Use the
gskkymanutility.
Installing the File Proxy
- Windows with hardware x86-64
- Linux with hardware x86-64
- Linux with hardware IBM z Systems
Log files produced by this command are located in
data_dir/logs/. By default
data_dir is
installation_directory/FILEPROXYDATA.
Syntax
- Windows operating systems:
-
fileproxyinst.exe -acceptlicense yes [-lang language] -inst_dir installation_directory [-data_dir data_directory] [-host hostname] [-sslport ssl_port_number] -sslfolder ssl_folder -sslpassword ssl_pwd [-java_home java_home] - Linux64 and Linux for OS/390 operating systems:
-
./fileproxyinst -acceptlicense yes [-lang language] -inst_dir installation_directory [-data_dir data_directory]
[-host hostname] [-sslport ssl_port_number] -sslfolder ssl_folder -sslpassword ssl_pwd
[-java_home java_home]
Arguments
- -acceptlicense
yes|no - Required. Specify whether to accept the License Agreement. The default is no.
- -lang language
- Optional. The language in which the messages returned by the command are
displayed. The default value is
en_us. - -inst_dir installation_directory
- Required. The directory of the File Proxy installation. The default value is the directory from which you start the command. Ensure that you have write access to this directory.
- -data_dir data_dir
- Optional. The directory where logs and configuration files are stored.
The default value is
installation_directory/FILEPROXYDATA. Ensure that you have write access to this directory. - -host hostname
- Optional. The global, public host name of the workstation where you install the File Proxy or the IP address of the workstation.
- -sslport ssl_port_number
- Optional. The port to be used for secure communication. Supported values are integers between 1 and 65535. The default is 44444.
- -sslfolder ssl_folder
- Required. The name and path of the folder containing the certificates in
.PEM format.
(For
details about how to create the certificates, see Creating a Certificate Authority). It must contain the following files and folder:
- ca.crt
- tls.crt
- tls.key
- additionalCAs folder
Note: In the z/OS environment:- When you create the certificate authority by issuing the
command
./openssl x509 -req -in tls.csr -CA ca.crt
                                            -CAkey ca.key -CAcreateserial -out tls.crt -days
                                                xxx
, ensure that you set the appropriate number of days with the -days parameter. The default is 30. - The additionalCAs folder must contain the public key certificate or public certificate chain of the Z controller SSL keyring.
- -sslpassword ssl_pwd
- Required. The password to access the certificates.
- -java_home java_home
- Optional. The default value is the path to the .jre file provided with the product image.
Securing the file transfer with SSL mutual authentication
- Import the
ca.crtfile to the SSL key ring or USS key store file of the Z controller. - Import the
ca.crtfile and the public key certificate of the Z controller into theTWSClientKeyStoreJKS.jksandTWSClientKeyStore.kdbfiles of the z-centric agents.
Starting the File Proxy
- Windows with hardware x86-64
- Linux with hardware x86-64
- Linux with hardware IBM z Systems
By default, log files produced by this command are located in data_dir/logs.
Syntax
- Windows operating systems:
-
fileproxystart.exe - Linux:
-
./fileproxystart
Stopping the File Proxy
- Windows with hardware x86-64
- Linux with hardware x86-64
- Linux with hardware IBM z Systems
Syntax
- Windows operating systems:
-
fileproxystop.exe - Linux:
-
./fileproxystop
A user scenario
- Name of the File Transfer job (in this example,
MYFILE) - Agent submitting the file transfer request (in this example,
AGT1) - Destination agent where to transfer the file (in this example,
AGT2)
MYFILE, its job definition is stored in the
Z controller
JOBLIB. On the Z controller, you define the operation related to the job MYFILE.
The occurrence is then added to the current plan and submitted as required.
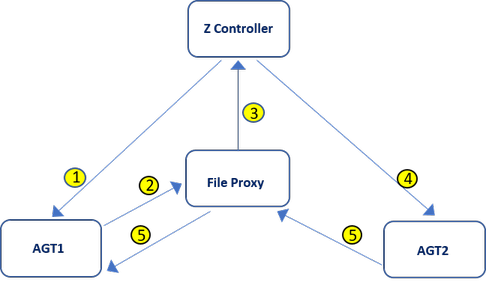
- Arrow 1
- The Z controller
schedules the job
MYFILEonAGT1. - Arrows 2 and 3
AGT1sends a command request toAGT2and asks for command verification to the Z controller through the File Proxy.- Arrow 4
- The Z controller
authorizes the command request towards
AGT2. - Arrow 5
AGT2sends the command data toAGT1through the File Proxy. Communication between the agents is always performed through the proxy.
Securing the file transfer
You control the users who can submit a File Transfer job by setting the reserved User Field SUBJOBUSER at operation level (for more detailed information, see Normal production jobs). If you set SUBJOBUSER, its value is preferred over the job-submit exit EQQUX001.
AUTHDEF CLASSNAME(IBMOPC)
SUBRESOURCES(FT.WSNAME)AGT1 and AGT2, issue the following
command:
RDEFINE IBMOPC FTW.* UACC(NONE)
PERMIT FTW.AGT1 ID(VALENTE) ACCESS(UPDATE) CLASS(IBMOPC)
PERMIT FTW.AGT2 ID(VALENTE) ACCESS(UPDATE) CLASS(IBMOPC)
If the security check detects an unauthorized user, the operation is set to Error with OSUB error code.
AUTHDEF CLASSNAME(IBMOPC)
          SUBRESOURCES(AD.UFVAL
                       CP.UFVAL)
RDEFINE IBMOPC CPU.SUBJOBUSER.* UACC(NONE)
PERMIT CPU.SUBJOBUSER.* ID(ROOT) ACCESS(UPDATE) CLASS(IBMOPC)
RDEFINE IBMOPC ADU.SUBJOBUSER.* UACC(NONE)
PERMIT ADU.SUBJOBUSER.* ID(RACFUSER) ACCESS(UPDATE) CLASS(IBMOPC)
Unistalling the File Proxy
- Windows with hardware x86-64
- Linux with hardware x86-64
- Linux with hardware IBM z Systems
By default, log files produced by this command are located in data_dir/logs.
Syntax
- Windows operating systems:
-
uninstall.exe -inst_dir installation_directory [-lang language] - Linux:
-
./uninstall -inst_dir installation_directory [-lang language]
- -inst_dir installation_directory
- is the directory where the File Proxy is installed.
- -lang language
- is the language in which the messages returned by the command are displayed.