Configuring the Nomad server when you configure SafeLinx
Complete the following steps to configure the Nomad server while configuring SafeLinx.
Before you begin
About this task
Procedure
-
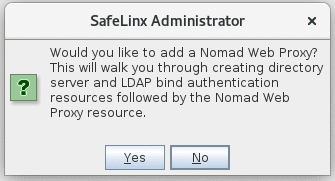
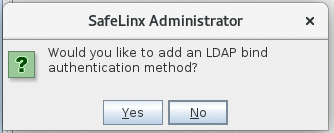
After you complete the wizard to add a SafeLinx Server, you see the following
prompt. Select Yes at the prompt to configure a Nomad
server.
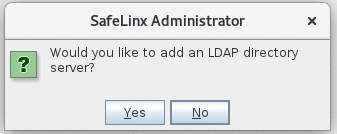
In order to set up the Nomad server, you first have to create a SafeLinx LDAP server configuration, which is used in a SafeLinx authentication profile. The authentication profile is in turn used in an SafeLinx http-service to define the authentication sources for the Nomad server.
- Follow the steps in the wizard to set up the Nomad server.
-
Select Yes at the SafeLinx Administrator prompt to
configure the connection to the Domino LDAP directory:
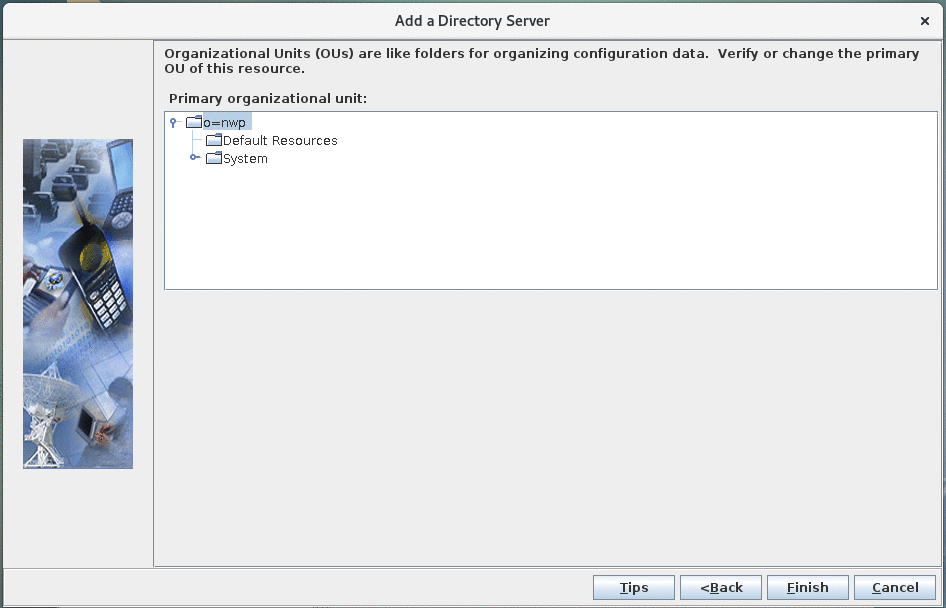
- Add a Directory Server:
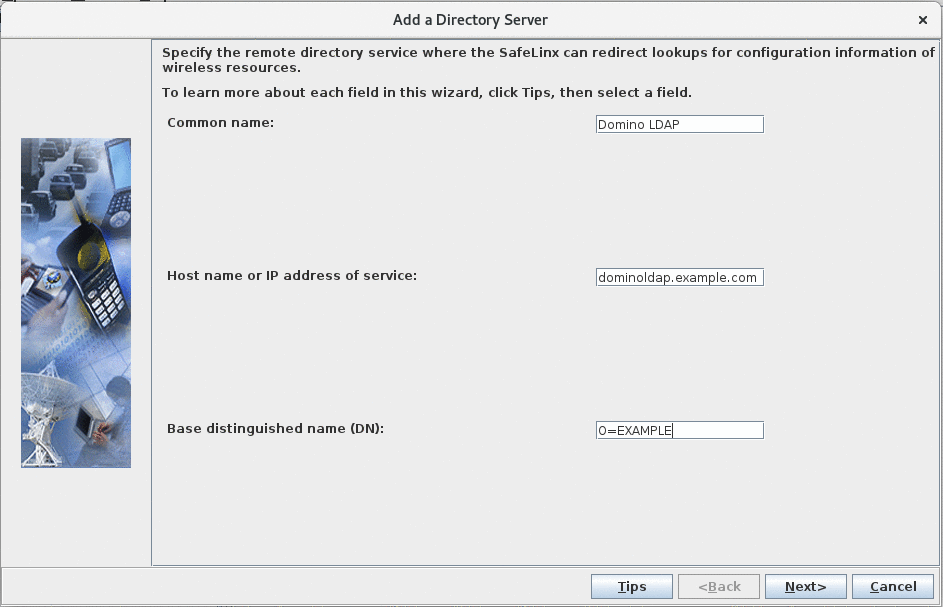
- Common name: Defines the name of the SafeLinx Directory Server configuration that you are creating here. This is a free text field.
- Host name: Should be the FQDN of the Domino LDAP server you are connecting to. In this example, it is "dominoldap.example.com".
- Base distinguished name (DN): Defines the base within the LDAP tree of the Domino server below which searches start.
Note: Make sure to specify a base DN where LDAP searches can find user AND server entries. For example, if you have users in "OU=USERS/O=DEMO" and servers in "OU=SERVERS/O-DEMO" that you have to specify "O=DEMO" as the base DN. - Configure LDAP bind user:
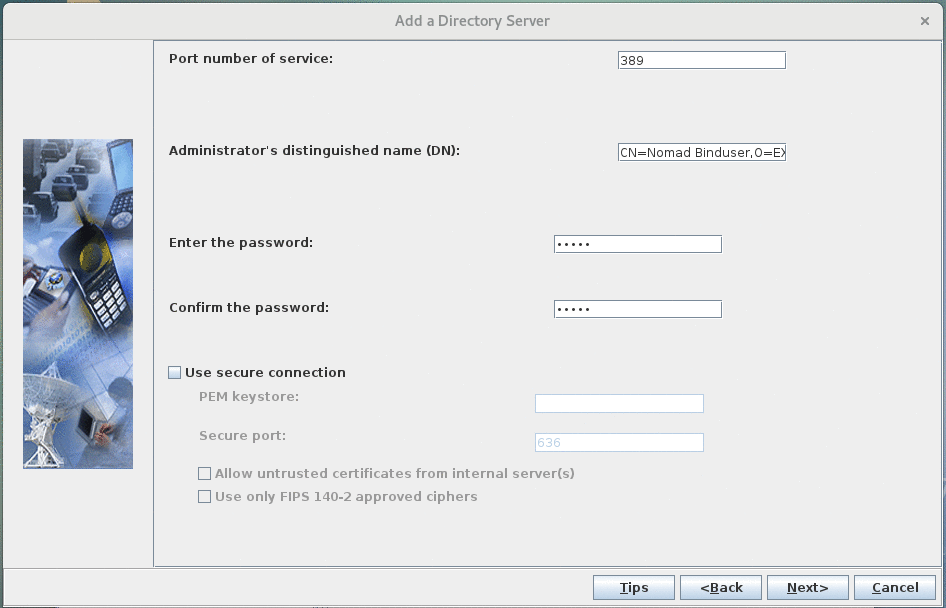
Port number of serviceis389for plan ldap. Change if you want to use secure ldap or your LDAP servers listens on another port.Administrator's distinguished name (DN)is the DN of a user in the Domino Directory, that has read access to the directory via LDAP (eg.CN=Nomad Binduser,O=EXAMPLE).- Password for above mentioned user
- (Recommended) Select
Use secure connectionand configure that section to use ldaps. See Securing communications with an LDAP server in the HCL SafeLinx documentation for more details.
Note: For security reasons, configuring the SafeLinx LDAP service to bind anonymously to search the Domino LDAP directory is not recommended. However, should you need to bind anonymously for some reason, you must allow the LDAP service to access specific attributes. See Configuring the SafeLinx LDAP service for Nomad to bind anonymously for more details. - OU verification:
- Add a Directory Server:
-
Select Yes at the SafeLinx Administrator prompt to
configure the SafeLinx Authentication Profile.
See Adding LDAP-bind authentication profiles for more details on each field in the following screens.
- Add a new Authentication Profile:

- "Request Windows credentials from GINA" has to be unchecked.
- "Common name" specifies the name of the authentication profile. Choose a descriptive name.
- "Description" can be left empty.
- Set "password policy" to "None" as we will use the LDAP server specified in the previous step to verify credentials.
- Leave "Challenge string" empty.
- Leave "Include realm in authentication request" unchecked
- Specify Directory Servers:

- Select the "Domino LDAP" entry defined in the previous step as the "Directory Server'.
- "User key field" specifies the LDAP attributes to query to
identify a user for authentication. Per default, users can
log in by specifying their email adress. If you want to
allow more fields like "uid" or "cn", you can add them as as
comma separated list. For example:
mail,uid,cn. - Leave the other fields at their default value
- LTPA configuration:
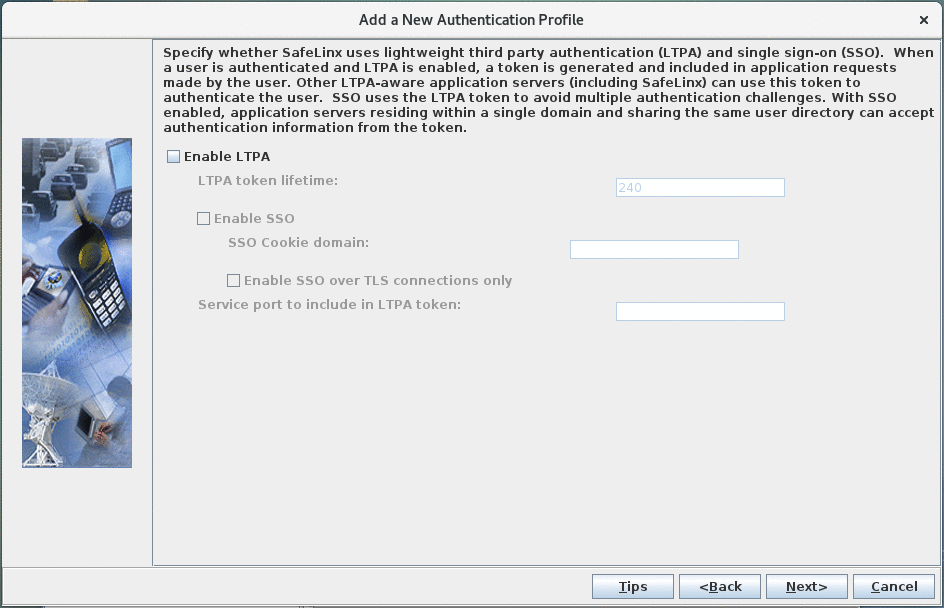
Leave the LTPA configuration disabled.
- OU verification:
- Add a new Authentication Profile:
-
Configure the Nomad server.
Define the SafeLinx http-service, that is used as the Nomad server, by completing the following screens:
- Add a Nomad server:
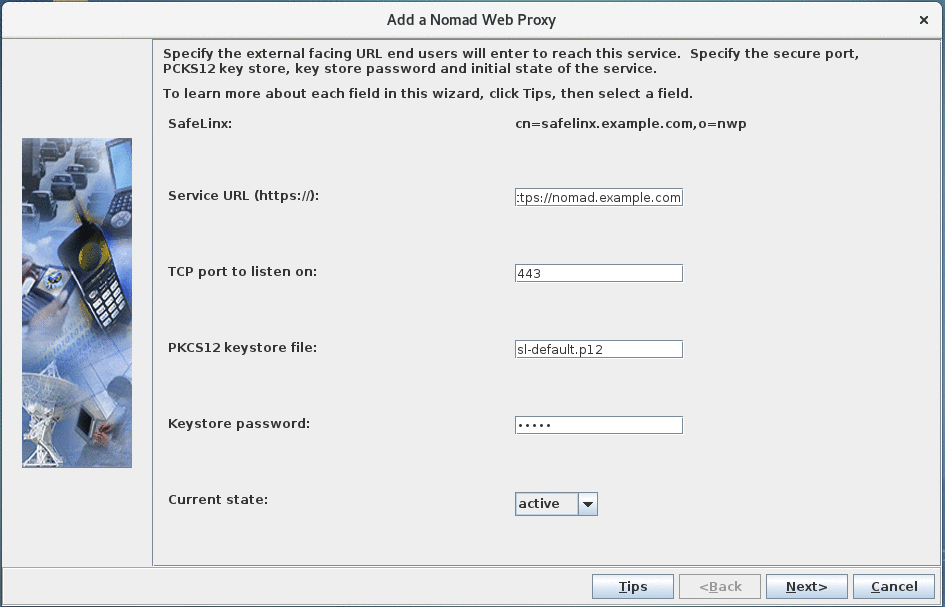
- Specify the service URL that end-users will use to access Nomad Web (eg. "https://nomad.example.com"). This name can differ from the hostname of the SafeLinx server.
- As Nomad server requires https, the "TCP port to listen on" is 443.
- Specify the prepared keystore in the "PKCS12 keystore file" field. Relative paths start in the SafeLinx binary directory.
- Enter the password for the private key stored in the pkcs12 file in the "Keystore password" field
- Leave "Current state" on "active" to automatically start the Nomad server
- Add Application Server URLs:
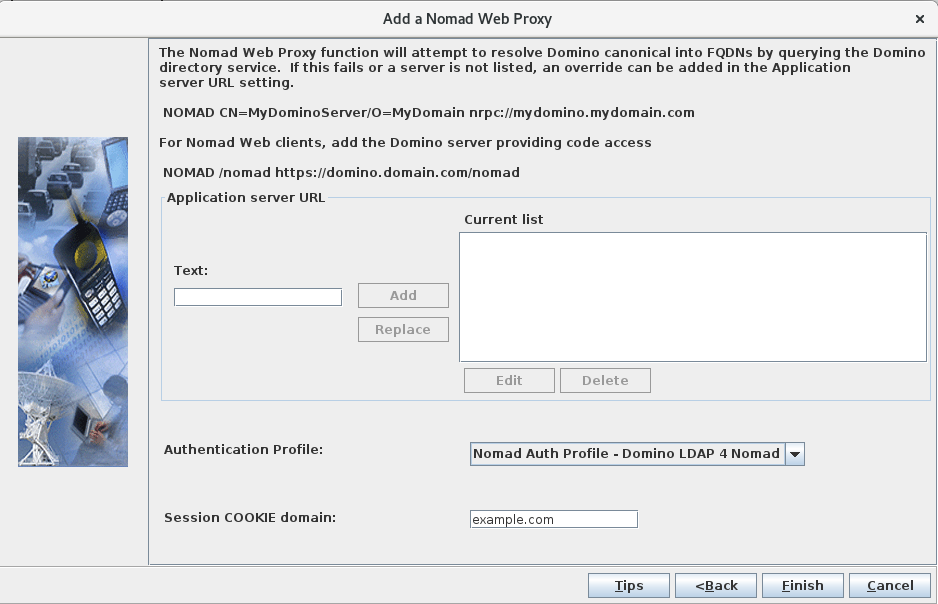
- For the "Authentication Profile" select the authentication profile you defined.
- For the "Session COOKIE domain", use the DNS domain part of the hostname you used for "Service URL" in the previous screen. In this example, it's `example.com´.
In addition to that, the minimum necessary data entry for this form is the mapping for the Nomad web static files.Note: The Nomad web static files are needed only if you use Nomad for web browsers. They are not needed if you only use Nomad on iOS or Android.With the "Application Server URL"s entries described in the following, you instruct SafeLinx/Nomad server to respond to HTTPS requests starting with
/nomadby either returning the files from the local directory or pass the http request on to the Domino HTTP server in the backend.The keyword designation "NOMAD" signals to the underlying SafeLinx server to interpret the defined application server as belonging to "Nomad". See URLs with keyword designations in the HCL SafeLinx documentation for details.
You specify application server URLs in the following format:[ <KEYWORD> | <Map> ] URLSo for the Nomad Web static files this would generally be:NOMAD /nomad URL - Configure the Nomad web static files:
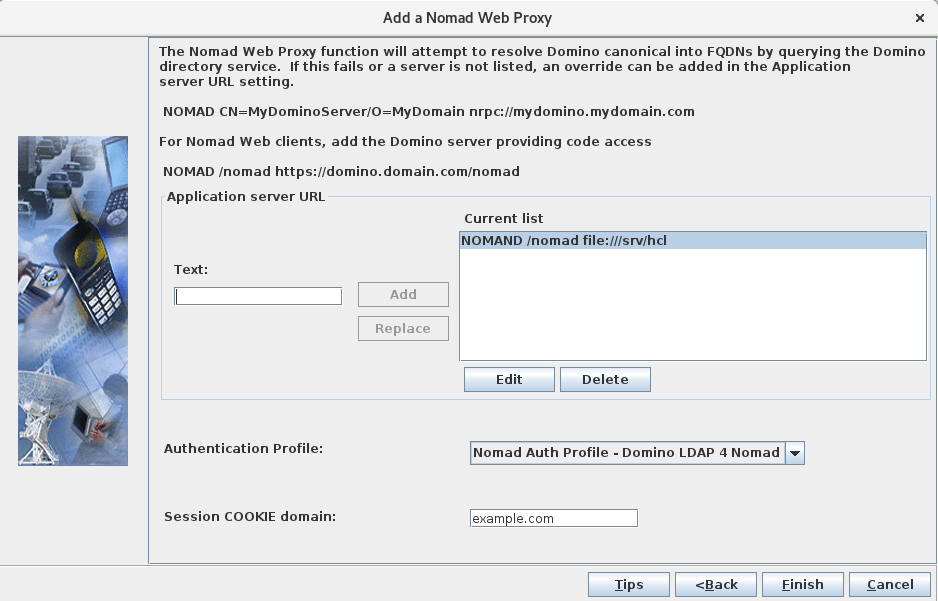
- Static files stored on SafeLinx: In this case, the URL
part of the "Application Server URL" always starts with the
file://protocol, followed by the full path to the directory containing thenomaddirectory you created earlier.Linux
If you followed the instructions for Linux in Hosting the static web files on SafeLinx, you need to add a line similar to this to the Nomad server configuration as a "Application Server URL":
If you decided on a different path for your Nomad static files, modify the statement accordingly.NOMAD /nomad file:///srv/hcl
Windows
If you followed the instructions for Linux in Hosting the static web files on SafeLinx, you need to add a line similar to this to the Nomad server configuration as a "Application Server URL":NOMAD /nomad file://C:/hclIf you decided on a different path for your Nomad static files, modify the statement accordingly.
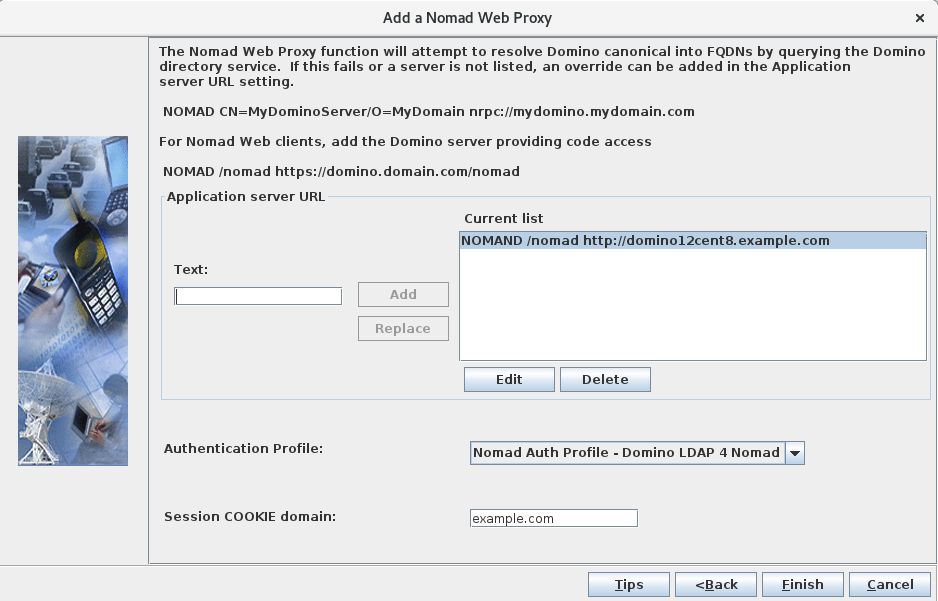
- Static files stored on Domino HTTP server: Add a line
similar to this to the Nomad server configuration as a
"Application Server
URL":
NOMAD /nomad http://domino12cent8.example.com/If you decided on a different path for your Nomad static files, modify the statement accordingly.
- Static files stored on SafeLinx: In this case, the URL
part of the "Application Server URL" always starts with the
- Add Domino server mappings (optional):
- If Domino and Domino LDAP are configured correctly, no further entries are needed in "Application Server URL" form.
- You can optionally add the Domino name and FQDN of any Domino server that cannot be resolved through lookups in the Domino LDAP server defined earlier for authentication.
- You can optionally add the Domino name and FQDN of any Domino server for users that do not have an home mail server defined.
Use the following format for the entries:NOMAD CN=Domino9Apps/OU=SRV/O=EXAMPLE/C=XP nrpc://mydominoapplicationserver.example.com:1352Where
mydominoapplicationserver.example.comis the FQDN (or IP address) of the Domino serverDomino9Appsspecified in this example.
- Add a Nomad server:
-
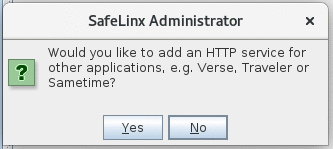
Select No at the SafeLinx Administrator prompt for
additional HTTP Services, as we are currently not defining any additional
services.
-
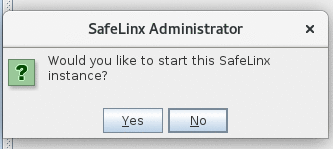
Select Yes at the SafeLinx Administrator prompt to start
the Nomad server we just configured.
-
Verify that Nomad server is running.
In the SafeLinx Administrator Client, navigate to the Resources tab, expand the SafeLinx Server that you just configured and right-click on the "Nomad server" you just configured. In the popup-menu select Properties. In the window that opens up, select the General tab and scroll to the bottom of the page. The field "Current state" should be showing "running".On the command line, you can issue to following command to query the status of the Nomad server:
lswg -s ibm-wlHttpService -L -F cn:state -l cn=nomad-web-proxy0,cn=safelinx.example.com,o=nwp

dn: cn=nomad-web-proxy0,cn=safelinx.example.com,o=nwp
cn: nomad-web-proxy0
state: 0
A value of "0" for "state" corresponds to "running".