Defining the combination box values
In this lesson, you define the values for the warranty term and warranty type combination boxes that display in the list view and properties view. A combination box is a user interface widget that contains a drop-down list of values that a user can select.
About this task
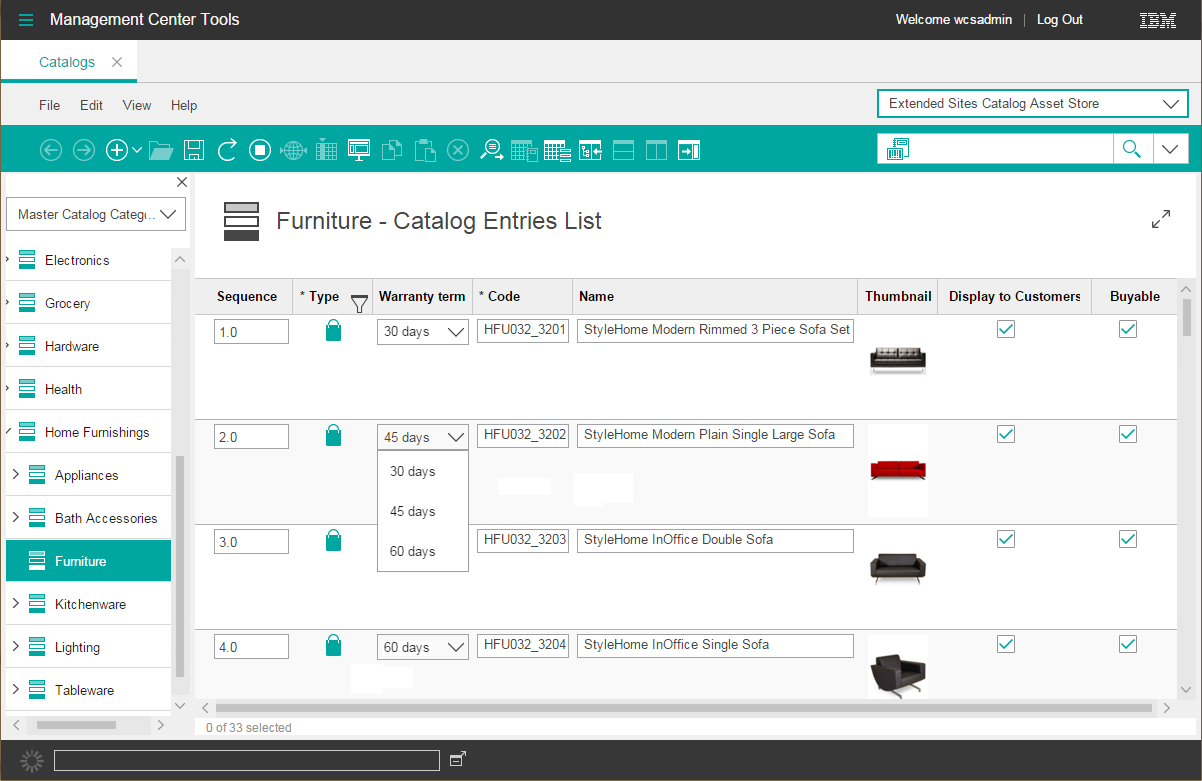
After you complete this lesson, the new warranty term information displays in the column and tab that you added in previous lessons. The warranty type information also displays in the tab that you added. The following image shows the addition of the warranty term and type information to the new column.
Catalog entries list view with warranty term information
Procedure
- In the Enterprise Explorer view, expand .
-
Open the ProductPrimaryObjectDefinition.xml file for editing.
You must define combination box values in an object definition file. Since warranty term and warranty type are product-level properties, you must define values in one of these files.
-
Locate the comment that indicates the property definitions for the product part number.
<!--- Property definition for the part number of the product --> -
Add the following code before the comment that you located. This code defines the warranty term
and warranty type combination boxes that display the warranty information.
<PropertyDefinition propertyName="x_warterm" type="number"> <PropertyValue displayName="${ExtCatalogResources.productWarranty_DisplayNameForTerm1}" value="30"/> <PropertyValue displayName="${ExtCatalogResources.productWarranty_DisplayNameForTerm2}" value="45"/> <PropertyValue displayName="${ExtCatalogResources.productWarranty_DisplayNameForTerm3}" value="60"/> </PropertyDefinition> <PropertyDefinition propertyName="x_wartype" type="string"> <PropertyValue displayName="${ExtCatalogResources.productWarranty_DisplayNameForType1}" value="LIMITED"/> <PropertyValue displayName="${ExtCatalogResources.productWarranty_DisplayNameForType2}" value="COMPREHENSIVE"/> </PropertyDefinition> -
Add the dependency for your custom ExtCatalogResources resource bundle. By
adding this dependency, the product properties view can retrieve and display the text that is
defined in your custom properties files.
Define the dependency with the format
<dependency localName=""
moduleName=""/>
For example, the following code snippet shows the addition of a dependency for the ExtCatalogResources resource bundle.<Definitions> <PrimaryObjectDefinition baseDefinition="cmc/catalog/BaseCatalogEntryPrimaryObjectDefinition" definitionName="cmc/catalog/BaseProductPrimaryObjectDefinition" detailsViewHeaderText="${catalogResources.UtilityPaneHeaderText}" displayName="${catalogResources.product_DisplayName}" displayNameProperty="partnumber" helpLink="tasks/tpnaddpr.htm" idProperty="catentryId" isBaseDefinition="true" newDisplayName="${catalogResources.product_NewDisplayName}" newObjectMenuItemText="${catalogResources.contextMenuNewProduct}" objectGroups="CatalogEntry,Products,CatalogEntriesNotASKU" propertiesDefinition="cmc/catalog/ProductProperties" searchType="FindAllCatalogEntries"> <dependency localName="catalogResources" moduleName="cmc/catalog/CatalogResources"/><dependency localName="ExtCatalogResources" moduleName="cmc/catalog/ExtCatalogResources"/><GetChildrenService objectTypes="CatalogEntryOffer,InheritedCatalogEntryOffer" url="/cmc/GetCatalogEntryChildren-Offer"> <ServiceParam name="storeId"/> <ServiceParam name="objectStoreId" propertyName="objectStoreId"/> </GetChildrenService> ... </PrimaryObjectDefinition> </Definitions> - Save and close the file.