Adding language insensitive properties in the Catalogs tool

In this lesson, you are customizing the Catalogs tool to support more UserData information that is added to the CatalogEntry noun. In this tutorial, you are adding support for catalog entry warranty details information. You can follow the same procedure for any language insensitive properties of a noun.

About this task

In this lesson, you customize the catalog service to include new information as UserData in the CatalogEntry noun and add custom queries to a custom query template file. Then, you customize the Management Center UI with<wcf:getData> tag.

As part of this lesson, you must register the custom access profile on the client side to configure the Management Center client to get the warranty data. To register the custom access profile on the client side, create a custom configuration file, get-data-config.xml. The get-data-config.xml file configures how the Management Center retrieves the data from the server with the foundation tag library <wcf:getData>. The extension version of this file in the com.ibm.commerce.catalog-ext directory overrides the original definition.

The GetData tag configuration tag is executed by the WebSphere Commerce getData action. This action searches for configuration files that are named get-data-config.xml in the WEB-INF/config directory. The configuration files must adhere to the following rules:
  • The root element must be get-data-config.
  • Each component has one configuration file, which is used with the getData action.
  • Each component configuration file is in the LOBTools > WebContent > WEB-INF > config > component directory, where component is the name of the component.
  • Your extension files must be in the following directory: LOBTools > WebContent > WEB-INF > config > > component-ext. These files are loaded after the component configuration files.
In the get-data-config.xml file, you specify the expression builder and the access profile information. The access profile is MyCompany_All. An expression builder is a helper class, or a template, declared in the WebSphere Commerce get-data-config.xml file. It is used by the getData tag in a JSP file to construct an XPath expression that retrieves data.

Procedure

  1. Update the wc-query-MyCompanyCatalogEntry-get.tpl query template file to add data to the CatalogEntry noun.
    This file contains the following information:
    • A symbol definition section that defines the tables included in the query template. In this tutorial, you are including the CATENTRY, CATENTDESC, XWARRANTY, XCAREINSTRUCTION database tables in the symbol definition section.
    • Definition of a new association SQL statement that seeks the new custom data.
    • Definition of a new access profile MyCompany_All, which extends the default CatalogEntry Summary access profile: IBM_Admin_Summary.
      Note: The IBM_Admin_ prefixes that are used in the access profile IBM_Admin_Summary are intended to be used by admininstrative and Management Center services calls. Access profiles that do not follow the new naming conventions continue to function correctly, as compatibility is maintained with earlier versions. It is recommended, however, that they are followed for existing access profiles, and when you change future access profiles.
    The data service layer tutorial that you completed as a prerequisite before you began this tutorial uses a simple query template to add new data. In this lesson, you are updating a Management Center query that displays catalog entries. Depending on how the query is defined by using associated queries, you might have to extend the access profile and add an associated query.
    1. Open IBM WebSphere Commerce Developer and switch to the Enterprise Explorer view.
    2. Expand WC > xml > config > com.ibm.commerce.catalog-ext.
    3. Open the wc-query-MyCompanyCatalogEntry-get.tpl file for editing.
    4. Locate the following code:
      
      BEGIN_XPATH_TO_SQL_STATEMENT
        name=/CatalogEntry[CatalogEntryIdentifier[(UniqueID=)]]+MyCompany_All
        base_table=CATENTRY
          sql=
            SELECT
              CATENTRY.$COLS:CATENTRY$,
              CATENTDESC.$COLS:CATENTDESC$,
              XWARRANTY.$COLS:XWARRANTY$,
              XCAREINSTRUCTION.$COLS:XCAREINSTRUCTION$
            FROM
              CATENTRY 
                 LEFT OUTER JOIN XWARRANTY ON (CATENTRY.CATENTRY_ID = XWARRANTY.CATENTRY_ID)
                 LEFT OUTER JOIN CATENTDESC ON 
                      (CATENTDESC.CATENTRY_ID = CATENTRY.CATENTRY_ID AND CATENTDESC.LANGUAGE_ID in ($CONTROL:LANGUAGES$))
                 LEFT OUTER JOIN XCAREINSTRUCTION ON 
                      (CATENTRY.CATENTRY_ID = XCAREINSTRUCTION.CATENTRY_ID AND XCAREINSTRUCTION.LANGUAGE_ID = CATENTDESC.LANGUAGE_ID)
            WHERE
              CATENTRY.CATENTRY_ID IN (?UniqueID?) AND
              CATENTRY.MARKFORDELETE = 0
      END_XPATH_TO_SQL_STATEMENT
      
    5. Replace it with the following code:
      
      BEGIN_ASSOCIATION_SQL_STATEMENT
        name=MyCompanyWarrantygetCatalogEntryDetailsByParentCatalogGroupId
        base_table=CATENTRY
        additional_entity_objects=true
          SQL=
            SELECT
              CATENTRY.$COLS:CATENTRY$,
              CATENTDESC.$COLS:CATENTDESC$,
              XWARRANTY.$COLS:XWARRANTY$,
              XCAREINSTRUCTION.$COLS:XCAREINSTRUCTION$
            FROM
              CATENTRY
               LEFT OUTER JOIN XWARRANTY ON (CATENTRY.CATENTRY_ID = XWARRANTY.CATENTRY_ID)
               LEFT OUTER JOIN CATENTDESC ON (CATENTDESC.CATENTRY_ID = CATENTRY.CATENTRY_ID 
              AND CATENTDESC.LANGUAGE_ID in ($CONTROL:LANGUAGES$))
               LEFT OUTER JOIN XCAREINSTRUCTION ON (CATENTRY.CATENTRY_ID = XCAREINSTRUCTION.CATENTRY_ID 
              AND XCAREINSTRUCTION.LANGUAGE_ID in ($CONTROL:LANGUAGES$))
            WHERE
              CATENTRY.CATENTRY_ID IN ($ENTITY_PKS$) AND
              CATENTRY.MARKFORDELETE = 0
      END_ASSOCIATION_SQL_STATEMENT
      
    6. Extend the default access profile IBM_Admin_Summary in the profile definition. Add the following code at the bottom of the wc-query-MyCompanyCatalogEntry-get.tpl file:
      
      <!-- ========================================================================= -->
      <!-- =============================PROFILE DEFINITIONS========================= -->
      <!-- ========================================================================= -->
      
      BEGIN_PROFILE
        name=MyCompany_All
        extends = IBM_Admin_Summary
          BEGIN_ENTITY
            associated_sql_statement=MyCompanyWarrantygetCatalogEntryDetailsByParentCatalogGroupId
          END_ENTITY
      END_PROFILE
      
      Where:
      name
      Specify the name of your custom profile, for example MyCompany_All.
      extends
      Specify which default access profile you are going to extend, for example IBM_Admin_Summary.
      associated_sql_statement
      Specify the new associated SQL statement for fetching your custom data for example, MyCompanyWarrantygetCatalogEntryDetailsByParentCatalogGroupId.
      Note: You do not have to copy all associated queries that are defined in the default catalog entry details access profile, such as IBM_Admin_Summary. By following the proceeding steps, both the existing catalog entry data and the new custom data are returned. For more information about defining a new access profile, see Access profiles.
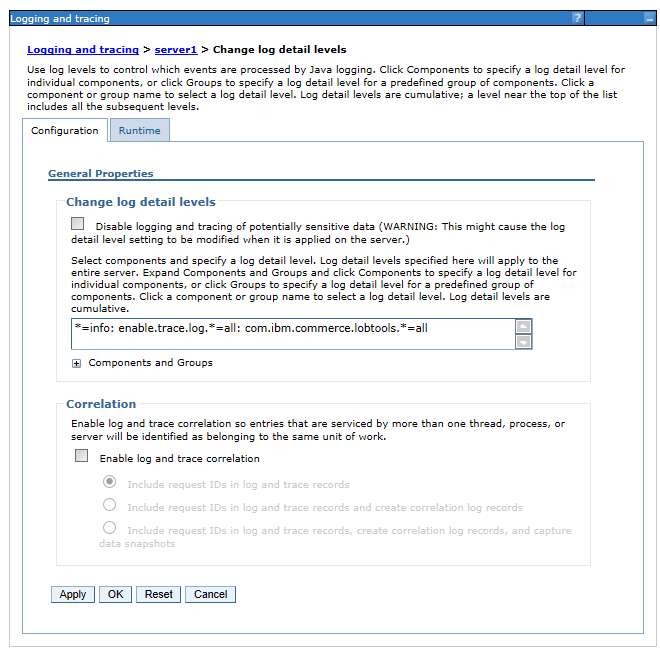
  2. Enable logging and tracing for Management Center.
    1. Open the WebSphere Application Server administrative console. Right-click your test server: select Administration > Run Administrative Console.
    2. Expand Troubleshooting and select Logs and Trace.
    3. Click your server.
    4. Click Change Log detail Levels
    5. Enable the com.ibm.commerce.lobtools.*=all trace in either the Configuration or Runtime tab.
      • Configuration settings cause the log messages to display after you restart the server. When the server restarts, BOD message display without enabling trace in the administrative console.
      • Runtime settings cause the log message to display without restarting the server. After you restart the server, the trace setting must be enabled again, otherwise the log message does not display.


    6. Click Apply. Save your change.
  3. Determine the service URL name. To find the service URL name, you must enable tracing in Management Center.
    1. Open Management Center with logging enabled.
      Use the URL https://host_name:8000/lobtools?logger.display=trueWhere host_name is the host name for your development environment. For more information about logging in Management Center, see Enabling Management Center client-side logging and tracing.
    2. Click Management Center Tools > Logging and Tracing.
    3. In the Logging and Tracing dialog, set the following options:
      • In the Default Log Level field, select CONFIG.
      • Click Enable.
    4. Trace is enabled. Do not close the Logging and Tracing dialog.
    5. Open the Catalogs tool in Management Center. Browse to a product in your catalog and open the properties view for the product.
    6. Click Send Now in the Logging and Tracing panel.
    7. Open WCDE_installdir\wasprofile\logs\server_name\trace.log to view the trace log file. Locate the service call. The service URL should be /cmc/GetCatalogGroupChildren-CatalogEntry.
  4. Determine the controller JSP file.
    1. In the Enterprise Explorer view, Expand LOBTools > WebContent > WEB-INF.
    2. Open the spring-ibm-catalog.xml file to view the file contents.
    3. Search for the line of code that associates a controller JSP with the GetCatalogGroupChildren-CatalogEntry service.
      
      <bean id="/GetCatalogGroupChildren-CatalogEntry" class="org.springframework.web.servlet.mvc.ParameterizableViewController">
        <property name="viewName" value="/jsp/commerce/catalog/restricted/GetChildCatalogEntryForCatalogGroup.jsp"/>
      </bean>
      
      The service is associated with the GetChildCatalogEntryForCatalogGroup.jsp controller JSP file.
  5. Determine the expression builder to use for the customization.
    1. Expand LOBTools > WebContent > jsp > commerce > catalog > restricted
    2. Open the GetChildCatalogEntryForCatalogGroup.jsp file to view the file contents.
    3. Search for the code that defines the getData tag configuration.
      
      <wcf:getData type="com.ibm.commerce.catalog.facade.datatypes.CatalogEntryType[]"
      	var="catalogEntryChildren"
      	expressionBuilder="getCatalogEntryDetailsByParentCatalogGroupId"
      	varShowVerb="showVerb"
      	recordSetStartNumber="${param.recordSetStartNumber}"
      	recordSetReferenceId="${param.recordSetReferenceId}"
      	maxItems="${param.maxItems}">
      	<wcf:contextData name="storeId" data="${param.storeId}"/>
      	<wcf:contextData name="catalogId" data="${param.catalogId}"/>
      	<wcf:contextData name="versionId" data="${param.objectVersionId}"/>
      	<wcf:param name="catGroupId" value="${param.parentId}"/>
      	<wcf:param name="dataLanguageIds" value="${param.defaultLanguageId}"/>
      </wcf:getData>
      
      Note the value of the expressionBuilder attribute, getCatalogEntryDetailsByParentCatalogGroupId. You must declare this expression builder in your custom get-data-config.xml file.
  6. Determine the default access profile for the expression builder.
    1. Expand LOBTools > WebContent > WEB-INF > config > com.ibm.commerce.catalog.
    2. Open the get-data-config.xml file to view the file contents.
    3. Search for the expression builder getCatalogEntryDetailsByParentCatalogGroupId configuration and note the value for the accessProfile parameter.
      
      <expression-builder>
        <name>getCatalogEntryDetailsByParentCatalogGroupId</name>
        <data-type-name>CatalogEntry</data-type-name>
        <expression-template>
         {_wcf.ap=$accessProfile$;_wcf.dataLanguageIds='$dataLanguageIds$'}/CatalogEntry[ParentCatalogGroupIdentifier[(UniqueID='$catGroupId$')]]
        </expression-template>
        <param>
          <name>accessProfile</name>
          <value>IBM_Admin_Summary</value>
        </param>
        <param>
          <name>dataLanguageIds</name>
          <value></value>
        </param>
      </expression-builder>

      The default access profile is IBM_Admin_Summary. You override the expression builder in your custom get-data-config.xml file by changing the value of the access profile.

  7. Override the expression builder within your custom get-data-config.xml file.
    You use your custom configuration file to fetch extra warranty information from the CatalogEntry noun. You custom file must override the base component configuration file.
    1. Expand LOBTools > WebContent > WEB-INF > config.
    2. Right-click the config directory and select New > Folder.
    3. In the Folder name field, enter com.ibm.commerce.catalog-ext
    4. Click Finish. The directory com.ibm.commerce.catalog-ext is created under the config directory.
    5. Right-click com.ibm.commerce.catalog-ext. Then, click New > File.
    6. In the File name field, enter get-data-config.xml
    7. Click Finish. The get-data-config.xml file opens.
    8. Copy the following code into your file.
      <?xml version="1.0" encoding="UTF-8"?>
      <_config:get-data-config 
      xmlns:_config="http://www.ibm.com/xmlns/prod/commerce/foundation/config" 
      xmlns:xsi="http://www.w3.org/2001/XMLSchema-instance" 
      xsi:schemaLocation="http://www.ibm.com/xmlns/prod/commerce/foundation/config ../../xsd/get-data-config.xsd ">
        <expression-builder>
          <name>getCatalogEntryDetailsByParentCatalogGroupId</name>
          <data-type-name>CatalogEntry</data-type-name>
          <param>
            <name>accessProfile</name>
            <value>MyCompany_All</value>
          </param>
        </expression-builder>
      </_config:get-data-config> 
      Note: In this code, the expression template is not included. This expression builder uses the access profile that you defined and the expression template from the IBM provided definition. This behavior is because you extended the expression builder and the name, getCatalogEntryDetailsByParentCatalogGroupId remains the same.
    9. Optional: You can also declare the expression builder findAllCatentriesBasicSearch. The findAllCatentriesBasicSearch ensures that your new custom data displays in the product details that return from shopper searches on your storefront. To use this expression builder, add the code for this expression builder after the code for the getCatalogEntryDetailsByParentCatalogGroupId expression builder in the get-data-config.xml file.
      
      <expression-builder>
        <name>findAllCatentriesBasicSearch</name>
        <data-type-name>CatalogEntry</data-type-name>
        <param>
          <name>accessProfile</name>
          <value>MyCompany_All</value>
        </param>
      </expression-builder>

Results

So far, you registered the custom access profile on the client side, so that client side can communicate with the server side. In the next lesson, you start customizing the client-side user interface.