Creating a properties view tab for custom information
In this lesson, you customize the properties view for products to add a tab for displaying warranty information.
About this task
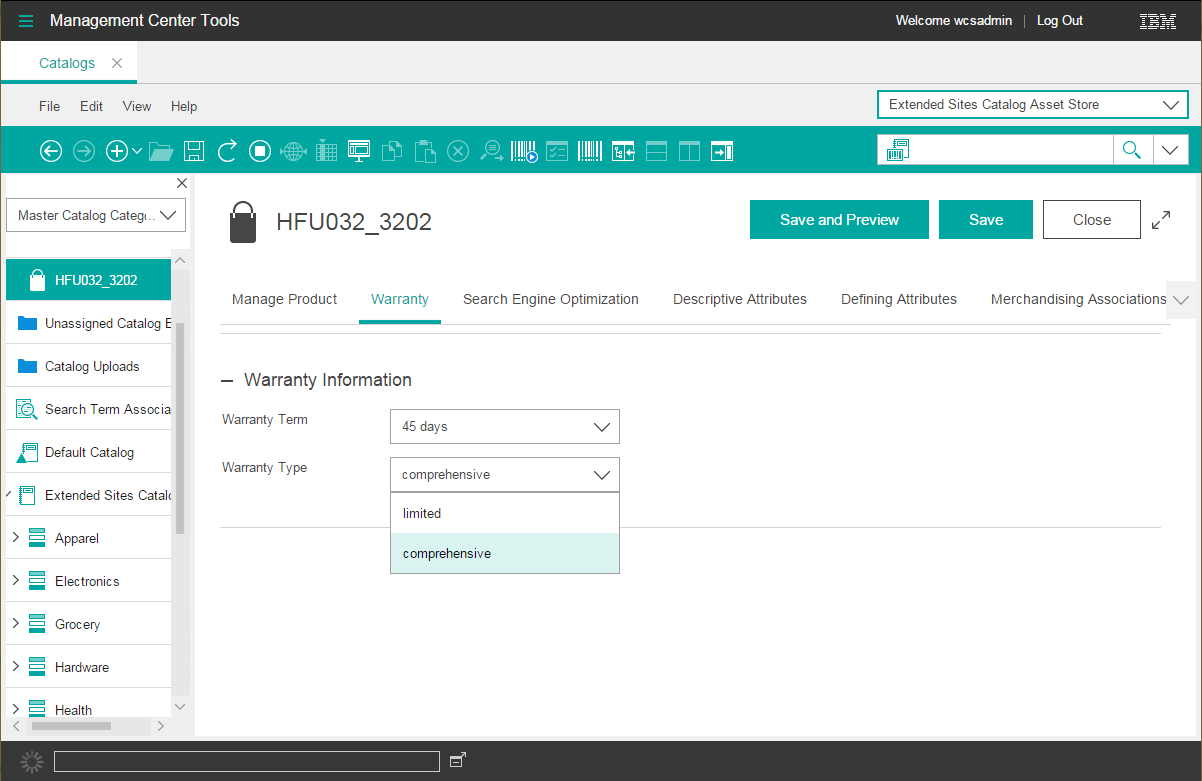
After you complete this lesson, a new tab for warranty information is added to display detailed
warranty information as shown in the following image.
Procedure
- In the Enterprise Explorer view, expand .
- Open the ProductPropertiesView.xml file for editing.
-
Determine the location where you want to place the new tab in relation to other tabs.
For example, if you want to define the tab to display after the Manage Product tab, locate the following code snippet in the file.
<!-- Tab: Manage Product. This tab contains general information about the selected product such as name and description. --> <PropertyTabPane name="manageProductTab" text="${catalogResources.manageProductTab}"> <!-- Property Pane: Manage Product. This is an instantiation of the property pane which contains general product details. --> <PropertyPane baseDefinition="cmc/catalog/ManageProduct"/> </PropertyTabPane> -
Add the tab definition for your custom tab after
<PropertyTabPane>definition for the Manage Product tab.For example, the following code snippet defines a new tab for the warranty information.<Definitions> <ObjectProperties definitionName="cmc/catalog/ProductProperties"> ... <!-- This is the set of tabs to display on the Product properties view --> <PropertyTabs name="tabs"> <!-- Tab: Manage Product. This tab contains general information about the selected product such as name and description. --> <PropertyTabPane name="manageProductTab" text="${catalogResources.manageProductTab}"> <!-- Property Pane: Manage Product. This is an instantiation of the property pane which contains general product details. --> <PropertyPane baseDefinition="cmc/catalog/ManageProduct"/> </PropertyTabPane><!-- Tab: Warranty. This tab contains warranty information for a product. --> <PropertyTabPane name="productwarrantyTab" text="${ExtCatalogResources.productWarranty_TabHeader}"> <!-- Property Pane: warranty. This is an instantiation of the property pane class which contains product warranty details. --> <PropertyPane baseDefinition="cmc/catalog/WarrantyPane"/> </PropertyTabPane>... </PropertyTabs> </ObjectProperties> </Definitions> -
Add the dependency for your custom ExtCatalogResources resource bundle. By
adding this dependency, the product properties view can retrieve and display the text that is
defined in your custom properties files.
Define the dependency with the format
<dependency localName=""
moduleName=""/>
For example, the following code snippet shows the addition of a dependency for the ExtCatalogResources resource bundle.<Definitions> <ObjectProperties definitionName="cmc/catalog/ProductProperties"> <dependency localName="foundationResources" moduleName="cmc/foundation/FoundationResources"/> <dependency localName="catalogResources" moduleName="cmc/catalog/CatalogResources"/><dependency localName="ExtCatalogResources" moduleName="cmc/catalog/ExtCatalogResources"/><!-- This is the set of tabs to display on the Product properties view --> <PropertyTabs name="tabs"> ... </PropertyTabs> </ObjectProperties> </Definitions> - Save and close the file.
Define the properties pane contents that are to display in the warranty tab by adding
the detailed warranty information. When you are defining the properties pane view for your warranty
information, you define the warranty fields as UserData by prefixing the fields. In this tutorial,
the prefix
"x_" is used. This prefix is the defined prefix for general catalog
UserData in the catalog component configuration file,
wc-catalog-clientobjects.xml. This configuration defines how a UserData element
maps to the object noun. For instance, the following configuration for the catalog entry noun
defines that elements that are prefixed with
"x_", such as
x_warterm, are UserData and map to the catalog entry noun with the XPath
/UserData/UserDataField.
<_config:URLParameter name="x_" nounElement="/UserData/UserDataField" type="UserData"/>- Expand .
-
Open the CatalogPropertyPane.xml file for editing.
This file defines the property panes that are used in the Catalogs tool.
-
Add the following code to the end of the file as a child element within the
<Definitions>element.<PropertyPane definitionName="cmc/catalog/WarrantyPane"> <dependency localName="ExtCatalogResources" moduleName="cmc/catalog/ExtCatalogResources"/> <PropertyGroup groupTitle="${ExtCatalogResources.productWarranty_GroupTitleForWarranty}" open="true"> <PropertyCombobox promptText="${ExtCatalogResources.productWarranty_WarrantyTermPrompt}" propertyName="x_warterm" width="200"/> <PropertyCombobox promptText="${ExtCatalogResources.productWarranty_WarrantyTypePrompt}" propertyName="x_wartype" width="200"/> </PropertyGroup> </PropertyPane>For example, the following code snippet shows the placement of the code to define the warranty tab pane contents.<Definitions> <PropertyGroup definitionName="cmc/catalog/ManageGeneralProductInformation" groupTitle="${catalogResources.generalProductInformationSection}" open="true"> ... </PropertyGroup> ...<PropertyPane definitionName="cmc/catalog/WarrantyPane"> <dependency localName="ExtCatalogResources" moduleName="cmc/catalog/ExtCatalogResources"/> <PropertyGroup groupTitle="${ExtCatalogResources.productWarranty_GroupTitleForWarranty}" open="true"> <PropertyCombobox promptText="${ExtCatalogResources.productWarranty_WarrantyTermPrompt}" propertyName="x_warterm" width="200"/> <PropertyCombobox promptText="${ExtCatalogResources.productWarranty_WarrantyTypePrompt}" propertyName="x_wartype" width="200"/> </PropertyGroup> </PropertyPane></Definitions> - Save and close the file.