Creating a dynamic kit and predefined dynamic kit with sample data
Create the association between a dynamic kit and a model, create a predefined dynamic kit, and then test the predefined dynamic kit on the storefront.
Note: This procedure assumes that you published a starter store with the Housewares sample catalog.
If you selected another sample catalog, the sample data is not available for you to use.
Before you begin
- Familiarize yourself with the Sterling Configurator integration sample data provided for this integration.
- Download sample models and images to a temporary directory.
About this task
In this procedure, you associate a model with a computer. A model contains the components that a shopper selects. The components that are contained within each model are not visible in the store or searchable. They can be purchased only as a part of the dynamic kit or predefined dynamic kit. The products cannot be displayed, but the associated SKUs can be displayed and purchased.
Procedure
-
Extract the sample images to the Sterling Configurator Server
work station in the following locations:
Sterling_eardir/sic.war/images/WC/computer_160x160 and
Sterling_eardir/sic.war/images/WC/computer_70x70
These images are shown on the Sterling Configurator Page when a shopper configures a kit.
- Open the Catalogs tool.
- From the explorer filter, select Master Catalog.
-
To demonstrate dynamic kit integration, make the computer displayable to customers and
purchasable.
-
Click Edit Column
 . The Edit Column dialog is shown. In the Select column to update list, choose
Display to Customers. Check Display to Customers check
box; click Apply, then click OK. Click
. The Edit Column dialog is shown. In the Select column to update list, choose
Display to Customers. Check Display to Customers check
box; click Apply, then click OK. Click
-
Click Edit Column . The Edit Column dialog is shown. In the Select column to update list, choose
Buyable. Check the Buyable check box; click
Apply, then click OK. Click
On the storefront, customers can purchase the computer.
-
Click Edit Column
-
SKUs in a dynamic kit can be purchased, and by default, the SKUs in the AuroraPC 001 dynamic
kit can be purchased. You can make SKUs in a dynamic kit Buyable when they
are part of a dynamic kit by following these steps:
-
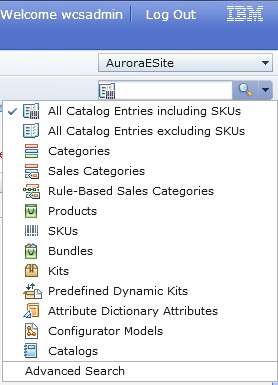
To find all catalog entries that are included in the kits, use Advanced Search. In the Find
area, select Advanced Search.
-
Click Edit Column . The Edit Column dialog is shown. In the Select column to update list, choose
Buyable. Check the Buyable check box; click
Apply, then click OK. Click .
-
Click Edit Column . The Edit Column dialog is shown. In the Select column to update list, choose
Displayable to Customers. Check the Displayable to
Customers check box; click Apply, then click
OK. Click .
-
To find all catalog entries that are included in the kits, use Advanced Search. In the Find
area, select Advanced Search.
-
Go back to the Electronics category, open the dynamic kit,
AuroraPC 001, and then click the Configurator tab. -
Choose one of the following to either import or create a model.
- Import the sample models to .
- Click Visual Modeler. opens.
- Expand Model Groups and select the model group that is created for the store that you are working with.
- Click Import in the toolbar. The Import window is shown.
- Click Browse... to find the XML file you want to import. (The file that you downloaded to a temporary directory). When you select the file, the file is shown in the field along with the complete path to the file.
- Select the import option Import into the selected destination model group.
- Click Import Now. The imported model group or model and its structure is
imported based on the import option you selected. A model group that is called
SampleModelsis created. - Go to the SampleModels Group you imported.
- In the Models and Groups section, select the model,
AuroraPC 001, and then click Compile in the toolbar. A version of the model that WebSphere Commerce and Sterling Configurator can use is created. - Compile the other models.
- Create a model.
- Click Visual Modeler.
- Expand Model Groups and expand the store. If you create multiple models, create a model group.
- Click New Model. Type a Name.
- Click the Save and Edit. Add Option classes are the components that the shopper configures. Click New Option Class.
- On the New Option Class tab, browse or search to find items in the catalog to add to
the option class. Click Save and Edit.Tip: To search for components in , type the first few characters of the component name. For example, to find Kevlar, type kev. To search for multiple components at once type the component names and separate the names by a space (
red green). - Repeat these steps for all Option classes and Option items. Tip: Make sure you that select the NormalTemplate.
- When you are finished, click the Model, and then click Save all Changes and Compile.
- Import the sample models to .
-
In Configurator tab for the dynamic kit, associate a model to the
dynamic kit.
- In Configurator tab for the dynamic kit, select the Configurable option. This step enables shoppers to reconfigure the dynamic kit's associated predefined dynamic kits.
- Click Save. If you preview the dynamic kit on the storefront, the kit shows a Configure button but not an Add to cart button. Shoppers must configure the dynamic kit before they can add the dynamic kit to the shopping cart. To configure the dynamic kit, shoppers click the Configure button, which starts Sterling Configurator.
-
You can create multiple predefined dynamic kits for a dynamic kit. In this example, define a
predefined dynamic kit for the
AuroraPC 001dynamic kit.-
To see the components in the predefined dynamic kit, click
 .
The Preconfigured Components table refreshes showing the items that you selected.
.
The Preconfigured Components table refreshes showing the items that you selected. -
Click
 to preview the predefined dynamic kit on the storefront. The predefined dynamic kit
includes an Add to cart button and a Reconfigure
button. The shopper can purchase the kit. The shopper can reconfigure the kit before purchasing it.
to preview the predefined dynamic kit on the storefront. The predefined dynamic kit
includes an Add to cart button and a Reconfigure
button. The shopper can purchase the kit. The shopper can reconfigure the kit before purchasing it.
-
To see the components in the predefined dynamic kit, click