Load Commerce Composer layout for Shopping Cart display page
In this lesson, you load a Page Layout for use in composing the design of the
Shopping Cart page within the Commerce Composer tool.
To compose
a Shopping Cart page with the Commerce Composer tool, the page can be composed
of four components:
Header
Footer
Catalog Entry Recommendation widget
Your new Sample Shopping Cart Details widget
To display a page on the storefront that uses the Commerce Composer framework, the framework
must use a Page Layout to determine the content and design of a page. A layout is used to define the
widgets that display and the placement of the widgets on the store page.
By default, the
Commerce Composer tool provides a set of sample layout templates. Your store developers can
customize the layout templates for a store. As an example, this lesson uses the default provided
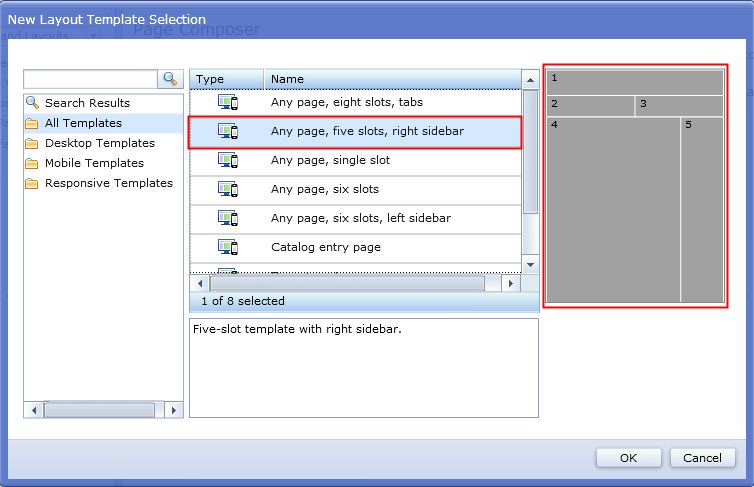
Any page, five slots, right sidebar layout template for composing a layout
for the Shopping Cart page. Within the selected template, the header and footer
are predefined. You must add the Catalog Entry Recommendation widget and your new Sample Shopping
Cart Details widget into the template to create the layout. To add the widgets, you can use the
Commerce Composer tool or the Data Load utility. The following steps use the Data Load utility to
demonstrate how to compose a layout. When you are creating the input CSV files to load your layout,
add the Catalog Entry Recommendation widget into slot 5 and your new Sample
Shopping Cart Details widget into slot 4. Leave slots
1-3 empty. The default provided Any page,
five slots, right sidebar layout template, resembles the following image:
For more information about composing a layout with the Commerce Composer tool, see
Creating a layout for a page.
In a File Manager, go to the DataLoad directory within your new widget
project.
For example, if your new widget project is at the top level in your workspace the filepath
to the com directory, can be
workspace_dir\NewWidgetProject\Dataload.
Create a folder and name the folder layout.
Go to the directory NewWidgetProject\DataLoad\layout.
Create the input CSV files within the directory:
layout.csv
layoutWidgetRelationship.csv
widgetnvp.csv
Open your new layout.csv input CSV file for editing. The file is used to
load templates and layouts into a store so that business users can use the templates and layouts
within the Commerce Composer tool. The input CSV file loads information into the PAGELAYOUT and PLTEMPLATEREL database
tables.
Within the layout.csv file, specify the following columns and
values:
LayoutName
The external reference name for the layout. For the tutorial, set the value to be
SampleShoppingCartDetailPageLayout.
PageGroup
The page group (type) to which the layout belongs. The value that is specified for the column
maps to the following PAGELAYOUT_ID column within the PAGELAYOUT
database table. For the tutorial, set the value to be Content.
TemplateName
The external reference name of the template you are loading, or the external reference name
template that the layout your are loading is based on. For the tutorial, set the value to be
Any page, five slots, right sidebar. This column is mandatory whether you are
loading a template or a layout.
Description
The default layout for pages. The description is the administrative description of the layout,
for example, The default layout for ShopCartDisplay pages.
DeviceClass
The type of device that the layout is used with. You can set the following values for the column:
Web
The layout is designed for pages that are viewed on desktop, notebook, and tablet
computers.
Mobile
The layout is designed for pages that are viewed on mobile devices.
All
The layout is designed for pages that can be viewed on any device because the layout is
responsive.
For the tutorial, set the value to be Web
State
The state of the layout. You can set the following values for the column:
0
Inactive. The layout is not available in the Commerce Composer tool.
1
Active. The layout is available in the Commerce Composer tool.
2
Mark for delete. When the Database Cleanup utility runs, the utility deletes the layout, but
maintains the referential integrity of the database.
For the tutorial, set the value to be 1.
IsTemplate
A flag that indicates whether you are loading a template or a layout. You can set the following
values for the flag:
TRUE
You are loading a template.
FALSE
You are loading a layout and not a template.
For the tutorial, set the value to be FALSE.
IsDefault
a flag that indicates whether you are loading a default layout. You can set the following values
for the flag:
TRUE
The layout is a default layout.
FALSE
The layout is not a default layout.
For the tutorial, set the value to be FALSE
StartDate
Optional: (Timestamp) The start date for the assignment of this layout to a page or search term
to take effect. If you do not specify a start date, the layout is assigned immediately. The default
timestamp format is:yyyy-MM-dd hh:mm:ss.nnnnnn. For this tutorial, you
can leave the value for this column empty.
EndDate
Optional: (Timestamp) The end date for the assignment of this layout to a page or search term.
If you do not specify an end date, the layout is assigned indefinitely. The default timestamp format
is:yyyy-MM-dd hh:mm:ss.nnnnnn. For this tutorial, you can leave the
value for this column empty.
Priority
Optional: (Integer) The priority of this layout in relation to other layouts. Assign a priority
by entering a number between zero (lowest priority) and one thousand (highest priority). If more
than one layout is assigned to or inherited by a page for a given time period, the layout with the
highest priority is applied on the storefront. For this tutorial, you can leave the value for this
column empty.
Delete
A flag that indicates whether to delete the row for the layout from the database. Specify 1 to
delete the row. The default value is 0, which indicates that the Data Load utility is to load the
information for the row into the database.
Your layout.csv input CSV file can resemble the following file: For more information about completing your layout.csv input CSV file,
see layout input file.
Open your new layoutWidgetRelationship.csv input CSV file for editing. The
file is used to add a container and widgets into a template or layout.
Within the layoutWidgetRelationship.csv file, specify the following
columns and values:
LayoutName
The external reference name for the layout that you are adding a container and widgets within,
for example, SampleShoppingCartDetailPageLayout.
AdminName
The administrative name of the container within the layout.
ChildWidgetDefIdentifier
The external reference name of the widget. The value for the property must match the value that
is specified for the WidgetDefIdentifier column within the
registerWidgetdef.csv input CSV file, for example,
ShoppingCartDetailWidget or EMarketingSpot.
ChildWidgetAdminName
The name that identifies the widget within a specific layout. The name displays within the
Commerce Composer tool to help business users identify the purpose of the widget within the layout.
You can use any name as the value for the property, for example,
ShoppingCartDetailWidget.
WidgetSequence
A number that defines the order in which to stack a widget relative to other widgets that are
included within the same slot. The data type for the value of this column is double. The default
value is 0.0.
SlotID
The internal name for the slot. You can use text or numerical values as the internal name for
the slot.
Your layoutWidgetRelationship.csv input CSV file can resemble the
following image: For more information about completing your layoutWidgetRelationship.csv
input CSV file, see layoutWidgetRelationship input file.
Open the widgetnvp.csv input CSV file for editing. The file sets the
properties of the widgets that you include as a predefined widget within a template, or to complete
a layout. The values are saved with information to associate the widget and the widget settings with
a specific template or layout within the PLWIDGETNVP database
table.
Within the widgetnvp.csv file, specify the following columns and values
for the e-Marketing spots that you are adding into slot 5:
LayoutName
The external reference name for the template or layout that contains the widget. The value for
the property must match the value that you specify within the layout.csv input
CSV file. Use the SampleShoppingCartDetailPageLayout as the value for the
property.
AdminName
The name that identifies the widget within a specified layout. Use
CatalogEntryWidget as the value for the property.
Name
The name of the property that you want to set within the widget. The widget properties are
defined in the JSP file for the widget.
Value
The value of the property.
Sequence
The sequence of the property. Use 0 as the value for the property.
Your widgetnvp.csv input CSV file can resemble the following file:For more information about completing your widgetnvp.csv input CSV file,
see widgetnvp input file.
Add business object configuration files for loading your new input files. Business object
configuration files define how to load data into the database. In the file, the implementation
classes that specify the Data Reader, Business Object Builder, and Business Object Mediator
components are included. By default, sample business object configuration files are provided for
loading widget, template, and layout information with the Data Load utility.
You can copy and use the sample business object configuration files to load your new input CSV
files.
Go to the
WCDE_installdir\components\foundation\samples\DataLoad\CommerceComposer
directory.
Copy the following business object configuration files:
wc-loader-pagelayout.xml
wc-loader-widget.xml
wc-loader-widgetnvp.xml
Go to the workspace_dir\NewWidgetProject\Dataload
directory.
Create a data load order configuration file for the Data Load utility to use to load your
layout and widget information. The load order configuration file controls the order that the Data
Load utility loads data. The file includes pointers to the data load environment configuration file,
business object configuration file, and input CSV files.
Go to the
workspace_dir\NewWidgetProject\Dataload\layout
directory.
Right-click within the folder. Select New > File. Name the file wc-dataload-layout.xml.
In the following lesson, you create the data load configuration files and input CSV file for
loading a page into the Commerce Composer tool. Then, you load both the page and your layout input
CSV files with the Data Load utility.