Creating a tab in the product properties view for warranty information
In this lesson, you customize the product properties view by adding a tab for displaying warranty information.
To
define the new tab, you must first update one of the following files:

 ProductPropertiesView.lzx
 ProductPropertiesView.def
- catalogPropertyPanel.lzx
- CatalogPropertyPane.def
About this task
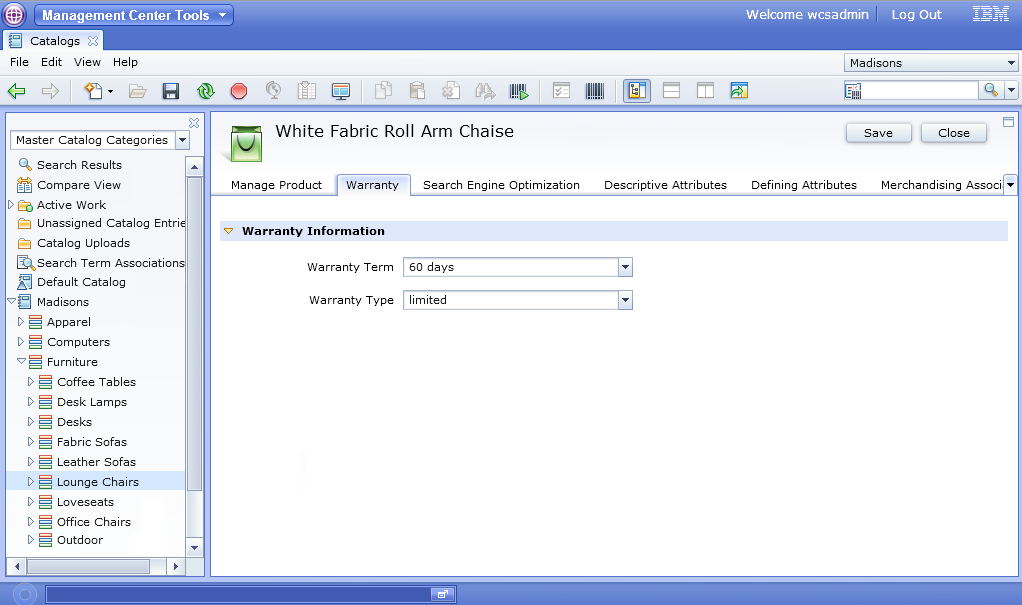
The following screen captures show the result of the customization. A new tab for warranty information is added, and detailed warranty information is included in the properties pane for the new tab. Within the tab pane, the warranty term and warranty type display in editable combination boxes. The values in the XWARRANTY table display in these boxes and are editable and persist to the database.
Note: The user
interface that is shown is not complete after this lesson. This image
is shown to demonstrate the design you are working towards as you
perform this lesson. In the following lesson, the combination boxes
are defined and the OpenLaszlo Project rebuilt.
Procedure
- Define the Warranty tab in one of the following files:
Option Description ProductPropertiesView.lzx- Open WebSphere Commerce Developer.
- Open the Java EE perspective, Enterprise Explorer view.
- Navigate to .
- Open the ProductPropertiesView.lzx file.
- Determine the location that you want to place the new tab in relation to other tabs. For example, in this scenario, the newly created tab is added between the Manage Product and Product Search Engine Optimization (SEO) properties tabs.
- Locate the following code for the Manage Product tab:
<!-- Tab: Manage Product. This tab contains general information about the selected product such as name and description. --> <wcfPropertyTabPane name="manageProductTab" text="${catalogResources.manageProductTab.string}"> <!-- Property Pane: Manage Product. This is an instantiation of the property pane class which contains general product details. --> <catManageProduct/> </wcfPropertyTabPane> - Add code for the Warranty tab after the code for the Manage
Product tab:
<!-- Tab: Warranty. This tab contains warranty information for a product. -->
<wcfPropertyTabPane name="productwarrantyTab" text="${extCatalogResources.productWarranty_TabHeader.string}">
<!-- Property Pane: warranty. This is an instantiation of the property pane class which contains product warranty details. -->
<catWarrantyPane/>
</wcfPropertyTabPane>
ProductPropertiesView.def - Open WebSphere Commerce Developer.
- Open the Java EE perspective, Enterprise Explorer view.
- Navigate to .
- Open the ProductPropertiesView.def file.
- Determine the location that you want to place the new tab in relation to other tabs. For example, in this scenario, the newly created tab is added between the Manage Product and Descriptive Attributes tabs.
- Locate the following code for the Manage Product tab:
<!-- Tab: Manage Product. This tab contains general information about the selected product such as name and description. --> <PropertyTabPane name="manageProductTab" text="${catalogResources.manageProductTab}"> <!-- Property Pane: Manage Product. This is an instantiation of the property pane class which contains general product details. --> <PropertyPane baseDefinitionName="catManageProduct"/> </PropertyTabPane> - Add code for the Warranty tab after the code for the Manage
Product tab.
<!-- Tab: Warranty. This tab contains warranty information for a product. -->
<PropertyTabPane name="productwarrantyTab"
      text="${extCatalogResources.productWarranty_TabHeader}">
   <!-- Property Pane: warranty. This is an instantiation of the property pane
        class which contains product warranty details. -->
    <PropertyPane baseDefinitionName="catWarrantyPane"/>
</PropertyTabPane>
- Define the contents that are to display in the warranty
tab by adding the detailed warranty information.When you are defining the properties pane view for your warranty information, you are identifying the warranty fields as UserData by prefixing the fields. In this tutorial, the prefix
"x_"is used. This prefix is the defined prefix for general catalog UserData in the catalog component configuration file, wc-catalog-clientobjects.xml. This configuration defines how a UserData element maps to the object noun. For instance, the following configuration for the catalog entry noun defines that elements that are prefixed with"x_", such asx_warterm, are UserData and map to the catalog entry noun with the XPath/UserData/UserDataField.
Any prefix that you use to identify a field as UserData must match the defined UserData prefix in the component configuration file for an object.<_config:URLParameter name="x_" nounElement="/UserData/UserDataField" type="UserData"/>Option Description CatalogPropertyPane.lzx- Open the Java EE perspective and select Enterprise Explorer view.
- Navigate to .
- Open the CatalogPropertyPane.lzx file. The CatalogPropertyPane.lzx file contains all property panes that are used in the Catalogs tool. Update this file to add detailed warranty information.
- Add the following code between the
<library>and</library>tags:<class name="catWarrantyPane" extends="wcfPropertyPane"> <wcfPropertyGroup open="true" groupTitle="${extCatalogResources.productWarranty_GroupTitleForWarranty.string}"> <wcfPropertyCombobox promptText="${extCatalogResources.productWarranty_WarrantyTermPrompt.string}" width="200" propertyName="x_warterm"/> <wcfPropertyCombobox promptText="${extCatalogResources.productWarranty_WarrantyTypePrompt.string}" width="200" propertyName="x_wartype"/> </wcfPropertyGroup> </class>Tip: TheobjectPathis the path that is required to navigate from the reference object to its child object. TheobjectPathis used to locate a child Management Center object relative to the current object. If the property applies to the current object, then you do not need to specify an object Path. In this example, both Warranty Term and Warranty Type applies to the current object, CatalogEntry. - Save and close the file.
CatalogPropertyPane.def- Open the Java EE perspective and select Enterprise Explorer view.
- Navigate to .
- Open the CatalogPropertyPane.def file. The CatalogPropertyPane.def file contains all property panes that are used in the Catalogs tool. Update this file to add detailed warranty information.
- Add the following code between the
<Definitions>and</Definitions>tags:<PropertyPane definitionName="catWarrantyPane"> <PropertyGroup open="true" groupTitle="${extCatalogResources.productWarranty_GroupTitleForWarranty}"> <PropertyCombobox promptText="${extCatalogResources.productWarranty_WarrantyTermPrompt}" width="200" propertyName="x_warterm"/> <PropertyCombobox promptText="${extCatalogResources.productWarranty_WarrantyTypePrompt}" width="200" propertyName="x_wartype"/> </PropertyGroup> </PropertyPane>Note:- The
objectPathis the path that is required to navigate from the reference object to its child object. TheobjectPathis used to locate a child Management Center object relative to the current object. If the property applies to the current object, then you do not need to specify an object Path. In this example, both Warranty Term and Warranty Type applies to the current object, CatalogEntry. - The UserData field name cannot contain an underscore (_).
- The
- Save and close the file.