Creating the Warranty Display page
In this lesson, you create an XML layout and activity class to display the warranty information.
About this task
Procedure
- Create the related warranty display page layout.
- In the Package Explorer, navigate to res > layout.
- Right click and select New > Android XML File.
- In the file creation dialog, name the file catalog_product_warranty.xml. Notice that Layout is already selected as the type of resource to create and LinearLayout is selected by default. Keep these default values and click Finish.
- Switch to the XML view.
- Replace existing code with the following code in the
file:
<?xml version="1.0" encoding="utf-8"?>
<LinearLayout xmlns:android="http://schemas.android.com/apk/res/android"
  android:layout_width="match_parent"
  android:layout_height="match_parent"
  android:orientation="vertical" >

  <LinearLayout
    android:orientation="vertical"
    android:background="@drawable/category_name_bg"
    android:layout_width="match_parent"
    android:layout_weight="match_parent"
    android:layout_weight="1">

    <TextView android:id="@+id/warrantyTermLabel"
    android:layout_height="wrap_content"
    android:layout_marginBottom="3dp"
    android:text="@String/Warranty1"
    style="@style/BoldText"/>

    <TextView android:id="@+id/warrantyTerm"
    android:layout_height="wrap_content"
    android:layout_width="wrap_content"
    android:layout_marginBottom="1dp"
    android:layout_marginLeft="3dp"
    android:layout_marginRight="1dp"
    android:layout_marginTop="1dp"
    android:padding="5dp"
    android:text="@string/WarrantyTerm"
    style="@style/BoldText"/>

    <TextView android:id="@+id/warrantyTypeLabel"
    android:layout_height="wrap_content"
    android:layout_width="wrap_content"
    android:layout_marginBottom="3dp"
    android:text="@string/Warranty2"
    style="@style/BoldText"/>

    <TextView android:id="@+id/warrantyType"
    android:layout_height="wrap_content"
    android:layout_width="wrap_content"
    android:layout_marginBottom="1dp"
    android:layout_marginLeft="3dp"
    android:layout_marginRight="1dp"
    android:layout_marginTop="1dp"
    android:padding="5dp"
    android:text="@string/WarrantyType"
    style="@style/BoldText"/>

  </LinearLayout>
</LinearLayout>
The first section defines the related warrantyTerm display area while the second section defines the related warrantyType display area. Notice that the text is reusing the resource string that you created in the previous part. Warranty information is shown in a grid layout.
- Save the file and before you close it, switch back to the Graphical Layout tab to see your new page layout.
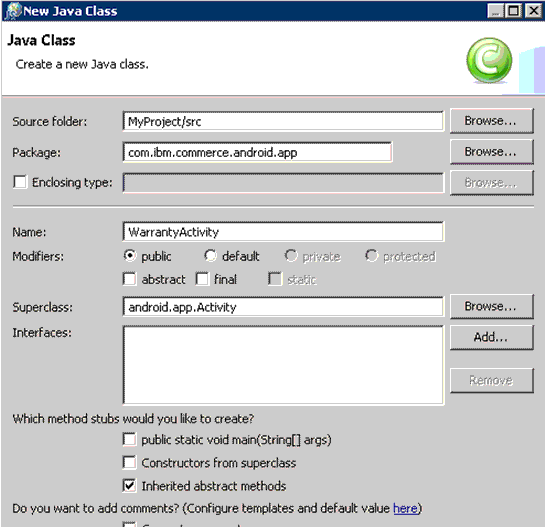
- Create an activity for the related warranty display page
- In the Package Explorer, navigate to src > com.ibm.commerce.android.nativeapp.mobile.activity.catalog
- Right-click and select New > Class
- Name the class WarrantyActivity and
set the superclass to android.app.Activity. Click Finish.
- Implement the following class. The R class is auto-generated.
package com.ibm.commerce.android.nativeapp.mobile.activity.catalog; import com.ibm.commerce.android.nativeapp.mobile.activity.R; import android.app.Activity; import android.os.Bundle; import android.widget.TextView; public class WarrantyActivity extends Activity { public void onCreate(Bundle bundle) { super.onCreate(bundle); Bundle extras = getIntent().getExtras(); // Get the String value from the parameter passed from putExtra method String warrantyTerm = extras.getString("warrantyTerm"); String warrantyType = extras.getString("warrantyType"); // Set the screen content from a layout resource. setContentView(R.layout.catalog_product_warranty); //Set the text value TextView tv1 = (TextView)findViewById(R.id.warrantyTerm); tv1.setText(warrantyTerm); TextView tv2 = (TextView)findViewById(R.id.warrantyType); tv2.setText(warrantyType); } } - Save and close the file.
- Register the new activity in the manifest file
- In the Package Explorer view, open the AndroidManifest.xml file.
- Click the AndroidManifest.xml tab to see the code, and scroll to the bottom on the file.
- Add your new activity before the
</application>tag.<activity android:name="com.ibm.commerce.android.nativeapp.mobile.activity.catalog.WarrantyActivity" android:configChanges="locale|orientation|keyboard" android:screenOrientation="portrait"> </activity> - Save and close the file.
- If there are errors in any of your files, clean your project.
- In the Package Explorer view, right-click MyProject and select Properties > Java Compiler.
- Set Compiler compliance level to 1.6 and press OK.
- In Eclipse, select Project > Clean...All errors should now be fixed.
