In your WebSphere Commerce development environment,
you can separate your WebSphere Commerce search enterprise archive
(EAR) to a different application server than your WebSphere Commerce
EAR. If you want to separate your WebSphere Commerce store web archive
(WAR) from the WebSphere Commerce EAR in your development environment,
you must first move the WebSphere Commerce search EAR to a different
application server.
When you separate your store WAR
from the WebSphere Commerce EAR to be a new store EAR, you use shared
libraries to handle files between the enterprise archives. When you
use the shared library solution in your development environment, the
search properties files and WebSphere Commerce properties files conflict.
The WebSphere Commerce search EAR and WebSphere Commerce EAR cannot
share the custom class loader that loads the shared library. You must
create a WebSphere Application Server profile for the WebSphere Commerce
search server and deploy the WebSphere Commerce search EAR to the
new search server.
Before you begin
Ensure that you complete the following task:
- Run
the setdbtype utility to switch your development environment database
from the provided Derby database.
For example, you can switch
your database to be a DB2 or Oracle database. In your development
environment, the provided Derby database supports only one connection.
If the WebSphere Commerce EAR and WebSphere Commerce search EAR are
deployed to different application server profiles, the archives must
still access the same database. To ensure that the archives can access
the database, you must switch your development environment database
to a database that supports multiple connections.
Procedure
- Create a WebSphere Application Server profile for the WebSphere
Commerce search EAR.
- Open WebSphere Commerce Developer and switch to the Servers view.
- Expand WebSphere Commerce Test Server and
right-click Search. Select .
The New Server window opens.
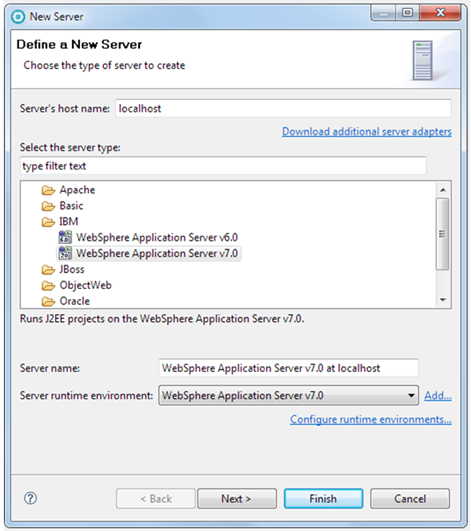
- In the Define a New Server settings
of the New Server window, choose the WebSphere
Application Server type for your development environment. Click Next.
- In the WebSphere Application Server Settings options,
click Configure profiles.
- In the Preferences settings, click Run
Profile Management Tool. The Profile Management
Tool window opens.
- In the Profile Management Tool window,
click Launch Profile Management Tool.
- In the Launch Profile Management Tool window,
click Create.
- In the Environment Selection settings,
expand WebSphere Application Server and select Application
server. Click Next.
- In the Profile Creation Options settings,
select Typical profile creation. Click Next.
- In the Administrative Security settings,
ensure that Enable administrative security is
not selected to disable the login security. Click Next.
- Review the Profile Creation Summary.
Record the ports information for the server profile and the profile
name. Click . Your new server profile creates. For this task, the
name AppSrv01 is used as an example profile name.
- Close the Profile Management Tool window.
- In the Preferences window, select
your new search profile. Click OK. Your new
profile now displays in the Profile name list
for the WebSphere Application Server Settings options
in the New Server window.
- Add the WebSphere Commerce search projects to your new
WebSphere Application Server profile.
- In the WebSphere Application Server Settings options
in the New Server window, select your new server
profile from the Profile name list. Click Next.
- In the Add and Remove settings,
select Search from the list of Available resources.
Click Add.
- Click Finish. The search projects
are added to the new WebSphere Application Server profile.
- Remove the WebSphere Commerce search projects from your
WebSphere Commerce Test Server profile.
- In the Servers view for WebSphere
Commerce Developer, Expand WebSphere Commerce Test Server.
- Right-click Search. Click .
- Configure the WebSphere Commerce search server
- Switch to the Enterprise Explorer view.
Right-click the WebSphere Commerce EAR project, WC.
Select .
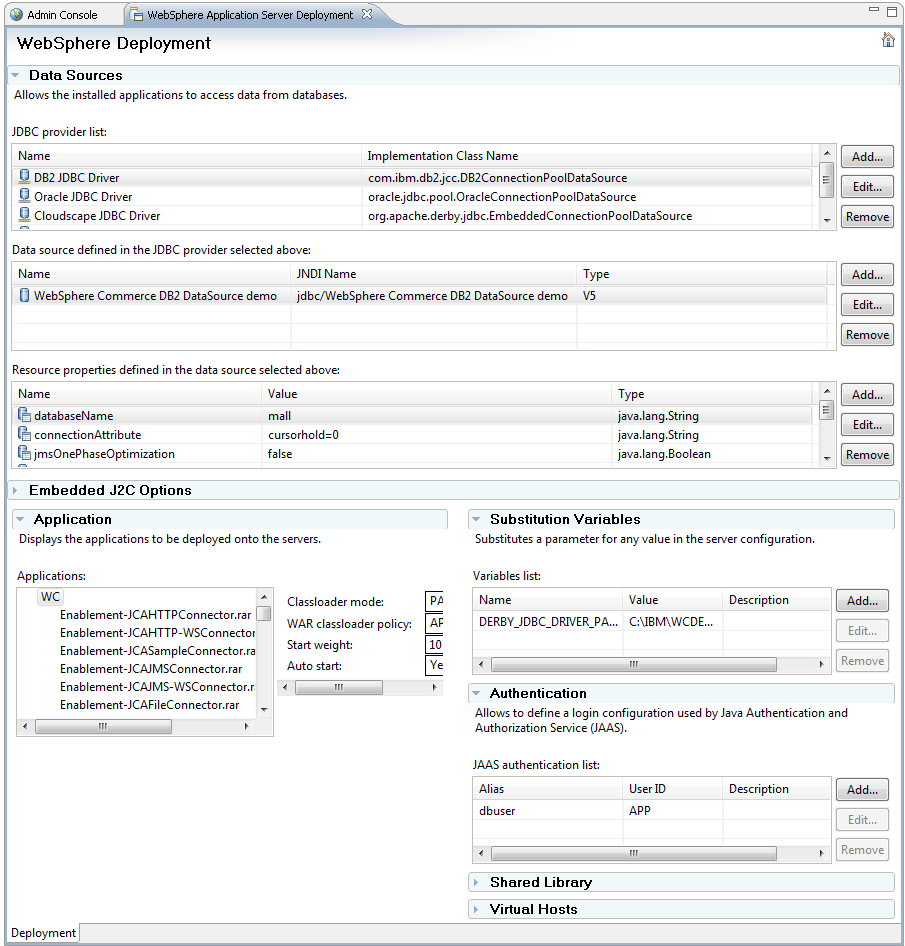
- In the WebSphere Application Server Deployment tab,
record the following information for the WebSphere Commerce EAR project
- The information in the Data Sources section
for EAR project. This information includes the JDBC provider, the
data source that is defined in the JDBC provider, and the resource
properties that are defined in the data source.
- The JAAS authentication information in the Authentication section.
- The variables that are defined in the Substitution Variables section.
- Right-click the WebSphere Commerce search EAR project, Search.
Select .
- In the WebSphere Application Server Deployment,
add the information for the WebSphere Commerce search EAR project.
Use the values that you recorded for the WebSphere Commerce EAR project.
Save the configuration.
- Publish the applications.
- In the Servers view, start the
WebSphere Commerce search server and the WebSphere Commerce Test Server.
- Right-click each server and click Publish to
synchronize the configuration modification for the servers.
- Update the name space bindings for the WebSphere Commerce
search server.
- In the Servers view, right-click
the WebSphere Commerce search server and select . The
WebSphere Application Server administration console opens.
- Expand . Click Name
space bindings.
- Click New. Select String for
the Binding type and click Next.
- In the Specify basic properties settings,
enter an identifier, relative name, and string value to configure
a name space binding for the host name.
- Click Next. Review the summary
of your new name space binding and click Finish.
- Repeat this step to create a name space binding for
the data source.
Use the information for the WebSphere Commerce Test Server
to help you create these bindings. You can view the information in
the WebSphere Application Server administration console for the WebSphere
Commerce Test Server. For example, if your database is a DB2 database,
your name space bindings can use the following information.
| Binding setting |
Host name binding |
Data source binding |
| Binding type |
String |
String |
| Binding identifier |
com.ibm.commerce.foundation.server.services.commerce.hostname |
com.ibm.commerce.foundation.server.services.search.datasource |
| Name in name space relative to looup name prefix |
com.ibm.commerce.foundation.server.services.commerce.hostname |
com.ibm.commerce.foundation.server.services.search.datasource |
| String value |
localhost |
jdbc/WebSphere Commerce DB2 DataSource demo |
- Change the custom properties for the WebSphere Commerce
search server JVM.
- In the WebSphere Application Server administrative console
for the WebSphere Commerce search server, expand . Click WebSphere application servers.
In the list of application servers, select your server.
- On the Configuration tab, expand Java
and Process Management and click .
- Click New. On the Configuration tab,
enter the Name and Value for
the WebSphere Commerce search home path.
For example,
set
solr.solr.home as the name. The value for
your home path can be
WCDE_installdir/search/solr/home.
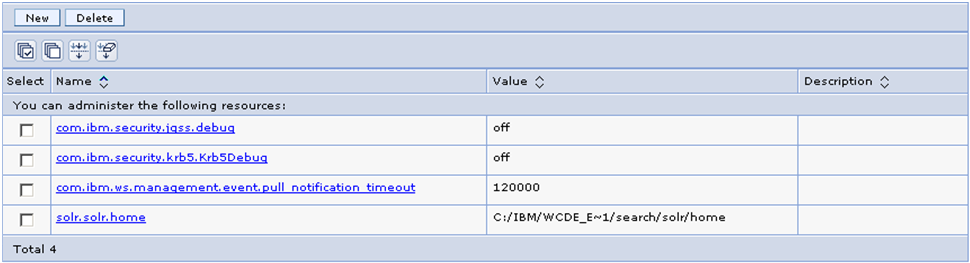
 Click New.
On the Configuration tab, enter the following
name and value to enable the
Click New.
On the Configuration tab, enter the following
name and value to enable the SolrResourceLoader to
load files from an external server.
| Name |
Value |
| solr.allow.unsafe.resourceloading |
true |
By default, the resource loader does not load files
from an external server for security reasons.
- Click .
- Add the Virtual hosts for the WebSphere Commerce search
server.
- In the WebSphere Application Server administrative console
for the WebSphere Commerce search server, expand Environment and
click Virtual hosts.
- Click New. On the Configurations tab,
enter WC_default_host as the Name for
the virtual host.
- Click . On the Configurations tab,
enter the Host Name and Port for
the virtual host. Enter the value for the port that the new WebSphere
Commerce search server uses.
- Click .
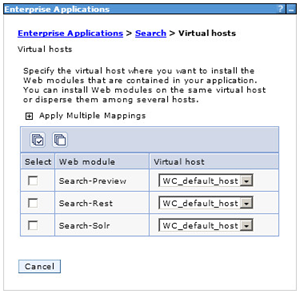
- Expand . Click .
- In the list of virtual hosts, expand Apply
Multiple Mappings. Change the value for the virtual host
to be WC_default_host and select each web module.
Click Apply.
- Configure the WebSphere Commerce search server JNDI binding.
- In the Servers view, restart the
WebSphere Commerce search server and the WebSphere Commerce Test Server.
- Right-click the WebSphere Commerce Test Server and select .
- Expand . Click Name
space bindings.
- Configure the name space bindings for the search-related
bindings to use the information for the new WebSphere Commerce search
server. To configure a name space binding, click the binding name
to open the Configuration tab for the binding.
Change the configuration values to match the information for the WebSphere
Commerce search server and click .
Update the following name space bindings:
- com.ibm.commerce.foundation.server.services.search.port
The
HTTP port of the new WebSphere Commerce search server.
- com.ibm.commerce.foundation.server.services.search.preview.port
- com.ibm.commerce.foundation.server.services.search.url
The
path of the new WebSphere Commerce search server. Change the value
for the port to be the new port that is used, the default HTTP port
of the search server.
- Review the contents of your SRCHCONFEXT and SRCHCONF database tables.
Ensure that
the data in the CONFIG column of the tables matches the values for
the WebSphere Commerce search server host name and server port. If
the values do not match, update the value in the database table column
to use the correct value.
- Publish the configuration changes.
- In the Servers view, start the
WebSphere Commerce search server and restart the WebSphere Commerce
Test Server.
- Right-click each server and click Publish to
synchronize the configuration changes.
What to do next
You can separate the store web archive (WAR) in your development
environment from the WebSphere Commerce EAR to create a new store
EAR. For more information, see Enabling store separation in a development environment.