You can set up a sample store within your development environment to use multiple store
enterprise (EAR) archives. You can use the multiple archives to separate store pages for specific
components into one archive, with the store pages for the remaining components in another
archive.
Before you begin
Ensure that you complete the following tasks:
About this task
The sample store that is separated across multiple store EAR files in the following steps is
based on the Aurora store that is provided with Feature Pack 7. The steps use a store ID value of
10651 for the Aurora store. If the store ID on your environment is different, replace the store ID
with the value for your store ID.
These steps separate only order and payment store pages into a separated WAR file from remaining
store pages. To separate a different store component into a new store WAR file, the EJB references,
struts configuration, and code files that you need to move, change, or create are different.
Procedure
-
Create an empty EAR application project for your store.
-
Open WebSphere Commerce Developer and switch to the Enterprise Explorer view.
-
Right-click within the Enterprise Explorer view. Select .
-
In the New EAR Application Project window, enter a value for the
Project name for your new archive.
For example, the following steps use WCStores1_demo as the value for
the Project name.
-
Click Finish.
-
Create a store web (WAR) archive in the new EAR project.
-
Right-click your new EAR project, WCStores1_demo. Select .
-
In the New Dynamic Web Project window, enter a value for the
Project name.
For example, the following steps use
Stores1 as the value for the
Project name.
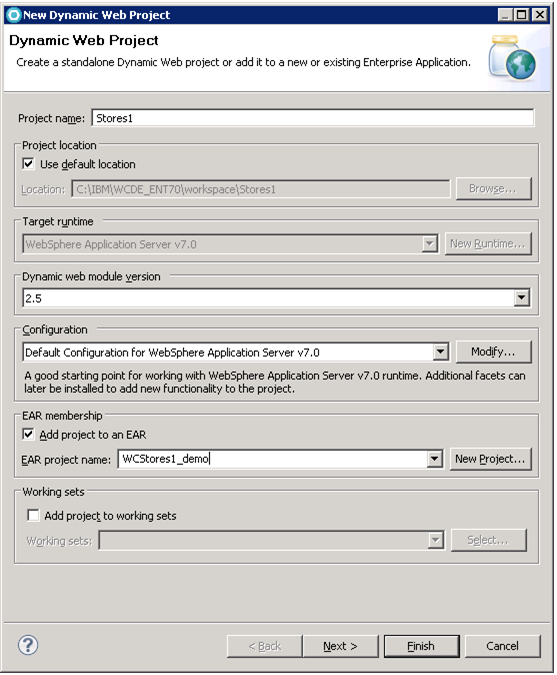
-
Click Finish to create an empty WAR.
-
Go to the Stores\WebContent\WEB-INF directory.
-
Copy the following files and subfolders from the WEB-INF directory.
- tiles-defs.xml
- validator-rules.xml
- *.tld
- lib/Foundation-TagLib.jar
- web.xml
-
Go to the Stores1\WebContent\WEB-INF directory. Add the copied files and
subfolders into this WEB-INF directory to add the files to your new WAR.
Overwrite the web.xml that exists in your new WAR.
-
In your Stores1\WebContent\WEB-INF directory, open the
web.xml file for editing.
Update the values for the display-name element, ServletName
parameter, and the struts configuration files.
For example, your updated
web.xml values can resemble the following
code
snippet:
<web-app ...
    <servlet>
         <display-name>Stores1</display-name>
         ......
          <init-param>
            <param-name>config</param-name>
            <param-value>...struts config files...</param-value>
         </init-param>
    </servlet>
    ......
     <filter>
        ......
        <init-param>
            <param-name>ServletName</param-name>
            <param-value>Stores1</param-value>
        </init-param>
    </filter>
   ......
</web-app>
-
Save and close the file.
-
Configure the extended document root for your two store WAR files. The extended document root
allows JSP file resources to be shared across WAR files.
-
In your Stores1\WebContent\WEB-INF directory, open the
ibm-web-ext.xml file for editing.
-
Add the following element to configure the extended document root to point the JSP directory of
your new store WAR to the Stores.war in your original store WAR file.
<jsp-attribute name="extendedDocumentRoot" value="workspace_dir/Stores/WebContent" />
-
In your Stores\WebContent\WEB-INF directory, open the
ibm-web-ext.xml file for editing.
-
Add the following element to configure the extended document root to point the JSP directory of
your old store WAR to the Stores1.war in your new store WAR file.
<jsp-attribute name="extendedDocumentRoot" value="workspace_dir/Stores1/WebContent" />
-
Save and close the files.
-
Copy the EJB references from your original store WAR file into your new store WAR file.
-
In the Stores\WebContent\WEB-INF directory, open the
ibm-web-bnd.xml file for editing.
-
Copy the following EJB references:
<ejb-ref name="ejb/BusinessContextServiceWrapperLocal"
 binding-name="ejb/com/ibm/commerce/component/contextservice/objects/BusinessContextServiceWrapperHome" />
<ejb-ref name="ejb/MemberGroupMemberService"
 binding-name="ejb/com/ibm/commerce/user/objects/service/MemberGroupMemberServiceLocalHome" />
<ejb-ref name="ejb/ContextManagement"
 binding-name="ejb/com/ibm/commerce/context/objects/ContextManagementHome" />
<ejb-ref name="ejb/ContextData"
 binding-name="ejb/com/ibm/commerce/context/objects/ContextDataHome" /></web-bnd>
-
Go to the Stores1\WebContent\WEB-INF directory, and open the
ibm-web-bnd.xml file for editing.
-
Add the copied EJB references into the file. Then, save and close the file.
-
Update the struts configuration files for your original store WAR.
-
Download and extract the following struts template for your original store WAR in a temporary
folder.
-
Copy the files in the extracted struts templates temporary folder.
-
Go to the Stores\WebContent\WEB-INF directory.
-
Add the copied files to the directory and override the existing struts configuration
files.
-
Create the struts configuration files for your new store WAR.
-
Download and extract the following struts template for your original store WAR in a temporary
folder.
-
Copy the files in the extracted struts templates temporary folder.
-
Go to the Stores1\WebContent\WEB-INF directory.
-
Add the copied files to the directory to create the struts configuration files.
-
Move your order and payment store pages into the new store WAR file.
-
Go to the Stores\WebContent\store_name directory in the
original store war, where store_name is the name of your store, for instance
Aurora.
-
Copy the following store file structure and files. Where * is identified, copy all subfolders
and files in the identified directory.
- ShoppingArea/CheckoutSection/*
- ShoppingArea/OrderCreationSection/*
- ShoppingArea/ShopcartSection/*
- Snippet/EDP/*
- Snippet/Order/*
-
Go to the Stores1\WebContent\store_name folder in the
new store WAR. If the folder structure does not exist, you must create this structure.
-
Add the copied store file structure and files to the new store WAR.
-
Enable multiple store WAR files for your WebSphere Commerce instance in the
wc-server.xml for your site:
-
Go to the workspace_dir\WC\xml\config directory and
open the wc-server.xml file for editing.
-
Search for
StoreWebModuleName="Stores" in the file. Add the configuration
MultipleStoreWARs="true" to the file
For example,
<Instance
  ...
  StoreWebModuleName="Stores"
  MultipleStoreWARs="true"
  .../>
-
Save and close the file. You must republish the WebSphere Commerce application before the
change takes effect.
-
Add the new store EAR, WCStores1_demo, to the WebSphere Commerce Test
Server.
-
Right-click the WebSphere Commerce Test Server. Select Add and
Remove.
-
Select WCStores1_demo and click Add to add the
project to the WebSphere Commerce Test Server.
-
Right-click the WebSphere Commerce Test Server. Click Publish.
-
Restart the WebSphere Commerce Test Server.
-
Deploy the new store WAR module by adding the module to your new store EAR. For more
information, see Deploying a WAR module.
-
Configure the context roots for the new store WAR, Stores1, within the new
store EAR, WCStores1_demo.
-
In the new store EAR, go to the Stores1\META-INF directory and open the
application.xml file for editing.
-
Add the context root information for the new Stores1 WAR.
For example, the updated file can resemble the following code snippet
<?xml version="1.0" encoding="UTF-8"?>
<application id="Application_ID" version="5"
 xmlns="http://java.sun.com/xml/ns/javaee"
 xmlns:xsi="http://www.w3.org/2001/XMLSchema-instance"
 xsi:schemaLocation="http://java.sun.com/xml/ns/javaee
 http://java.sun.com/xml/ns/javaee/application_5.xsd">
...
 <display-name>WCStores1_demo</display-name>
 <module id="Module_1396511150409">
  <web>
    <web-uri>Stores1.war</web-uri>
    <context-root>/webapp/wcs/Stores1</context-root>
  </web>
 </module>
...
</application>
-
Save and close the file.
-
Configure the order that the new EAR starts within the WebSphere Commerce application. The
WebSphere Commerce EAR must start before any store EAR.
-
Go to the
WCDE_installdir\wasprofile\config\cells\localhost\applications\WCStores1_demo.ear\deployments\WCStores1_demo
directory and open the deployment.xml file for editing.
-
In the
<appdeployment configuration, search for the
startingWeight attribute. Set the value for the attribute to be higher than the
value for the WebSphere Commerce EAR.
For example, set the value to be
"100"
<appdeployment:Deployment ... >
  <deployedObject... startingWeight="100" ... >
-
Save and close the file.
-
Add any resource bundle files that are used by files in both store EAR files into the shared
library.
-
In the WebSphere Application Server, expand Environment. Click
Shared libraries.
-
Click the shared library that you need to update. The General Properties
for the library open.
-
Edit the list class paths in the library to add or update the appropriate class paths.
For example, add the properties files in the following directories into the shared library:
- workspace_dir/Stores/WebContent/WEB-INF/classes
- workspace_dir/Stores1/WebContent/WEB-INF/classes
-
Click .
-
Restart the WebSphere Commerce Test Server.
-
Publish your new store EAR on the WebSphere Commerce Test server. Right-click the WebSphere
Commerce Test Server and select Publish.
-
Open your store and complete a shopping flow to verify that your store functions
correctly.
What to do next
You can use the multiple store archive setup in your development environment to set up a
sample store to work with multiple store archives in your production environment. For more
information, see Example: Enabling multiple store archives for a sample store in a production environment.
