Lab Exercise 4 – Installation of BigFix Runbook AI with Document Search and Analysis in non-HA mode
This lab exercise provides a detailed procedure for installing BigFix Runbook AI with Document Search and Analysis in non-HA mode. It includes prerequisites, steps for installing components, configuring MongoDB and Solr, server configuration, pre-requisite checking, configuring admin details, and completing the installation.
Scenario
An Organization has asked for installation of BigFix Runbook AI in non-HA mode. They are looking for only ticket resolution automation along with Document Search and Analysis functionality. You are part of the implementation team who has been asked to prepare the environment based on the requirements.
In this lab, we will showcase the detailed procedure for installing BigFix Runbook AI with Document Search and Analysis in non-HA mode.
Prerequisites
Hardware should be provisioned for a small environment (non-HA mode) as mentioned in the BigFix Runbook AI Installation Guide – One Server for Web and Application Components, One Server for AI components and One Server for Database.
All the prerequisites mentioned should be installed on the servers as mentioned in the prerequisite guide
Database credentials should be available
All the required ports should be opened
Connectivity between servers should be available
MongoDB and Solr access credentials should be available
The user should have “Write” permission on the Apache24 folder
The user should have access to the BigFix Runbook AI installer exe
Solution
Copy the installer on the both the servers meant for Web & Application components and AI components.
To install BigFix Runbook AI components on Web and Application server, follow the steps mentioned in Lab Exercise 2.
- To install the required components on AI server, locate Installer.exe and click Run as Administrator to begin the installation. On running the exe, the following page appears:
.png)
- Click Start. It will extract required binaries, the following page appears
.png)
- Click Next.
- The page lists the setup required for installation in the left pane and the details of the selected setup in the right pane.
- The next step is to populate the database details.
Database Details
For this exercise, the authentication type is considered as ‘SQL Server Authentication’ for database.
- On the Database Details view, type the Server Name, and the Database Instance Name.
- Select Authentication type as ‘SQL Server Authentication’.
- In the UserName and Password fields, type username and password to access the server.
- In the Database Name field, iAutomateDB is auto filled by default.
- To check the connectivity to a server using the credentials provided, click Check Connection. This displays a message for Connection Success or Connection Failure.
- Successful connection to the database enables the Next button.
.png)
- Click Next to get to the Component Selection view.
Component Selection
- Under Component Selection, select Advanced AI Component.
- Type Environment Name for identification purposes.
.png)
The administrator can add or remove components based on their environment as decided during the planning phase.
- Click Next, to continue with the installation.
Configure MongoDB
- Type the MongoDB Server Name (including the port details).
- In the User ID and Password fields, type username and password to access the server.
- Select the Version Type as Community.
Configure Solr
- Type the Solr Server.
- In the User ID and Password fields, type username and password to access the server.
- The default ports are auto filled in the PORT field next to each component.
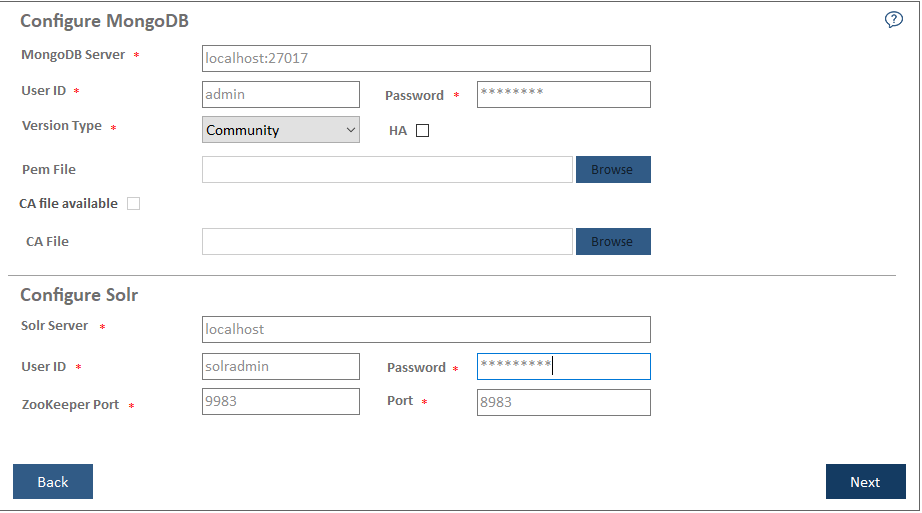
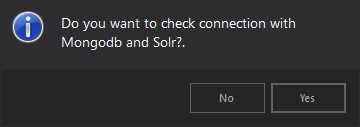
- Click Next. You will be prompted to check the connection status. Click Yes to proceed with the checking the connection status or No to continue with the Installation.
The Server Configuration page appears.
Server Configuration
- The IP Address / Hostname is auto populated.
- Select the Account Type as Domain Administrator.
- Type in the organization domain in Domain field.
- In the UserName and Password fields, type the login credentials.
- Click Check User Validity to ensure the following:
User should be part of domain defined in field Domain Name
User should have administrative privileges to install BigFix Runbook AI components
- Click Browse to specify the appropriate Installation Path to install the server components.
- On successful connection to the server, a Validation Successful message appears beside the Password field.
.png)
- Click Next to get to the Pre-requisite Checker view.
Pre-requisite Checker
Pre-requisite Checker is responsible for checking if all BigFix Runbook AI installation pre-requisites have been met before beginning the installation setup. It identifies all the missing pre-requisite software and utilities and highlights to the user. User will have to ensure that the identified pre-requisites are installed before proceeding further.
- Click Run to begin the process.
.png)
The Pre-requisite Checker always runs as part of the BigFix Runbook AI setup.
A progress bar appears while the Pre-Requisite Checker runs.
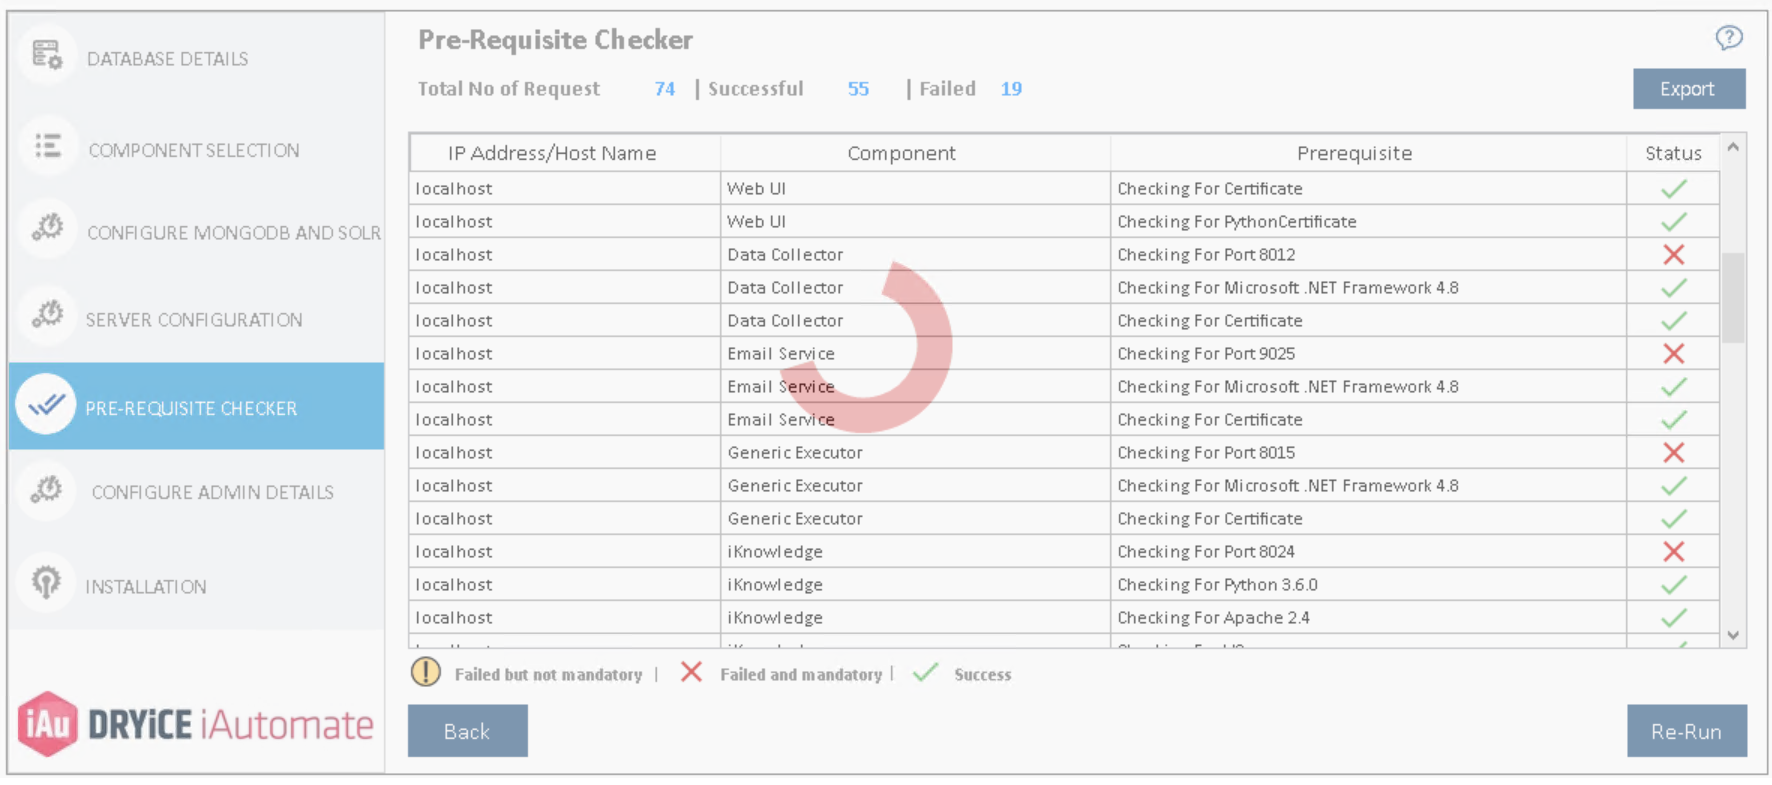
- In the Status column, each pre-requisite is marked as Success or Failure.
.png)
- In case of Failure, Re-Run button appears. Please ensure that the identified issue is resolved and re-run the pre-requisite checker.
- Please refer case failure as mentioned in figure. This is quite common error where port 80 is not available. In this case, select a different port from component selection page or remove default website from IIS.
- Upon successful validation of all pre-requisites, Next is enabled.
- Click Next to get to the Configure Admin Details view.
.png)
Configure Admin Details
To configure Super Administrator user for BigFix Runbook AI, perform the below steps:
- Type the new administrator’s Name, Email and Password.
- Enter the same password again in Re-enter Password field.
.png)
If the database provided in the Database Setup already exists at the time of installation, then the Configure Admin Details page will remain unavailable.
- Click Next to review the information provided so far.
Installation
- Before proceeding with installation, review the information provided so far. To make any changes, click Back to go back to previous views.
- Click Run to begin the installation process.
.png)
- The progress bar displays the installation progress.
- In case of any installation failure, error messages for the corresponding component appears on the screen. Click Rollback button to uninstall the components and re-run the Installer after resolving the issues. To perform the cleanup, delete all the folders manually on the servers’ installation path provided earlier. If there are any BigFix Runbook AI services still running, remove them manually.
Contact the product team administrator for further assistance.
- Once the installation is successful, the Finish button appears.
.png)
- Click Finish to complete the installation process.
Conclusion
After the conclusion of this exercise, you should have a thorough understanding of installation of BigFix Runbook AI Web, Application and Advanced AI components for a small environment in non-HA mode.
Now, let’s explore the installation procedure for other modes and scenarios.