Editing SWIFT messages
After you have applied the SWIFT schema to messages that you used in your tests, you might want to modify some or all of the configurations for SWIFT messages. You can then edit the SWIFT messages to make changes to the content, change the message type, or reapply the schema among other tasks.
Before you begin
About this task
You can edit the SWIFT messages by performing any of the following tasks:
Editing the SWIFT schema in SWIFT messages
Before you begin
- Configured a SWIFT schema message. See Applying the SWIFT schema to a message.
- Opened the message from the Test Factory view.
Procedure
-
Right-click text (String) in the
Message field, and then click
Schema.
The Schema Selector dialog is displayed.
The schema that was applied to the message is displayed. You can choose to change any of the following configurations that were set earlier either at the time you applied the SWIFT schema or during a subsequent edit.
-
Expand the Formatter Properties section and perform the action listed in the following table:
Option Description Action Include newline at the end of message
When a Swift message is sent, some systems expect the formatting of the last block to include or omit a trailing new line. By using the Include newline at the end of message check box, you can control the appending behavior of the newline character in the schema message.
When this check box is selected, a newline character is appended in the SWIFT message.
When this check box is not selected, a newline character is not appended in the SWIFT message.
Select from the following options:- Retain the default selection.
- Clear the selection.
- Select this option, if it is not selected.
Normalise new line characters
By using the Normalise new line characters check box, you can control the CRLF end of line character normalization behavior in the Swift message.
When this check box is selected, all Swift message LF characters are normalized to CRLF characters.
When this check box is not selected, all Swift message LF characters are not normalized to CRLF characters.
Select from the following options:- Retain the default selection.
- Clear the selection.
- Select this option, if it is not selected.
-
Expand the Content Options section and select your action from the following options:
Option
Description
Action
Retain existing content
When this option is selected, you can apply a schema or expand a field without losing the original data in the messages.
When this option is not selected, existing data is cleared before the new schema is applied.
Select from the following options:- Retain the default selection.
- Clear the selection.
- Select this option, if it is not selected.
Include Text nodes
When this option is selected, you can generate Text nodes with the message.
When this option is not selected, the text nodes do not appear.
Select from the following options:- Retain the default selection.
- Clear the selection.
- Select this option, if it is not selected.
Include optional nodes
When this option is selected, you can select and add the optional fields that the schema includes in the message.
When this option is not selected, you cannot add any optional fields.
Select from the following options:- Retain the default selection.
- Clear the selection.
- Select this option, if it is not selected.
- Click OK to save the updated message settings.
Changing a message from input to output
Before you begin
- Configured a SWIFT schema message. See Applying the SWIFT schema to a message.
- Opened the message from the Test Factory view.
About this task
Procedure
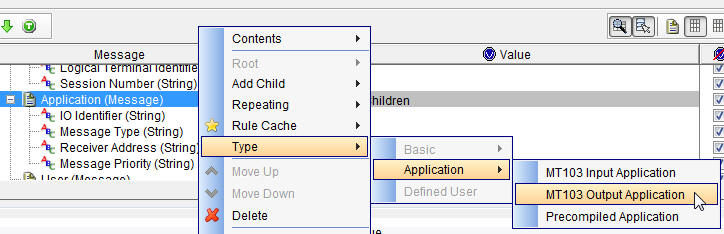
- Right-click the Application (Message) node in the Message pane.
-
Click , and then click the output message type.
 Note: After the edit, the value of the IO Identifier field changes from I (for input) to O (for output).
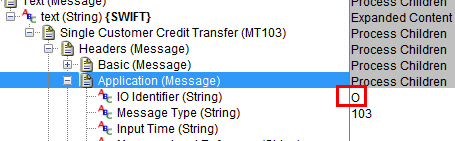
- Save and close the message.
Adding a field to the message
Before you begin
- Configured a SWIFT schema message. See Applying the SWIFT schema to a message.
- Opened the message from the Test Factory view.
About this task
Procedure
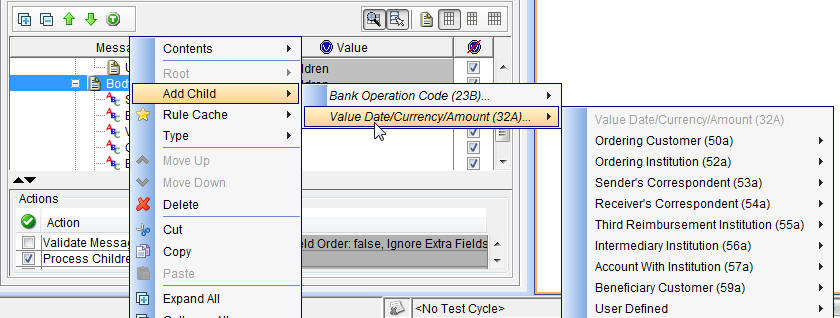
- Right-click the Body (Message) node in the Message pane.
-
Click Add Child.
Because the list of possible fields is long, it is divided alphabetically. Two field names are displayed, each of which is the first name in one of the lists. Move your cursor over each name to see the available fields. Fields that are already in the message and that cannot have multiple instances are disabled.
-
Click a field to add it to the message.
The last option on the second menu is User Defined. If you choose this option, click (String).
-
In the Field Editor, enter an optional value for the
field, among other information.
For fields from the current SWIFT schema, the Name field is prefilled and disabled. For user-defined fields, you must enter a name. This name must be a valid field number, that is, 2 digits followed by an optional letter. Descriptive names cannot be used for user-defined fields. Click OK when finished.
- Save and close the message.