
Push customizations to the production environment
Once you have enabled Catalog Asset Store (CAS) indexing in your Live environment, you are ready to push your customizations to the production environment.
Before you begin
Complete the profit margin customization steps in the Auth environment to Create the customization in NiFi
Procedure
- Deploy the HCL Commerce Live environment by following the instructions in the topic Deploying HCL Commerce Version 9.1 with Docker Compose (for non-production usage)
-
Run the stagingprop utility as shown below in the Utility server Docker container of the Auth environment:
./stagingprop.sh -scope all -dbtype db2 -sourcedb source_db_server:db_port/db_name
-sourcedb_user AuthDbUsername -sourcedb_passwd AuthDbPassword -destdb dest_db_server:db_port/db_name -destdb_user LiveDbUsername
-destdb_passwd livedbpassword -trace 1
Note: Refer to Stagingprop Utility for more information. -
Create a connector using Ingest for the LIVE environment using the same process
you used in AUTH environment, as described in Create a custom connector using Ingest. Use the following content.
{ "name": "custom.live.cas", "description": "This is the connector for the custom processing using CAS index model for LIVE", "pipes": [ { "name": "ProfitMarginSchemaUpdateConnector" }, { "name": "ProfitMarginDatabaseConnectorPipe", "properties": [ { "name": "Database Driver Location(s)", "value": "${LIVE_JDBC_DRIVER_LOCATION}", "scope": { "name": "Database Connection Pool", "type": "CONTROLLER_SERVICE" } }, { "name": "Database Driver Class Name ", "value": "${LIVE_JDBC_DRIVER_CLASSNAME}", "scope": { "name": "Database Connection Pool", "type": "CONTROLLER_SERVICE" } }, { "name": "Database Connection URL", "value": "${LIVE_JDBC_URL}", "scope": { "name": "Database Connection Pool", "type": "CONTROLLER_SERVICE" } }, { "name": "Database User", "value": "${LIVE_JDBC_USER_NAME}", "scope": { "name": "Database Connection Pool", "type": "CONTROLLER_SERVICE" } }, { "name": "Password", "value": "${LIVE_JDBC_USER_PASSWORD}", "scope": { "name": "Database Connection Pool", "type": "CONTROLLER_SERVICE" } } ] }, { "name": "Terminal" } ] }Note:For instructions on creating the
ProfitMarginSchemaUpdateConnectorandProfitMarginDatabaseConnectorPipe, see Step 13 of Configure the connector in NiFi. -
Join the custom process groups to the connector.
-
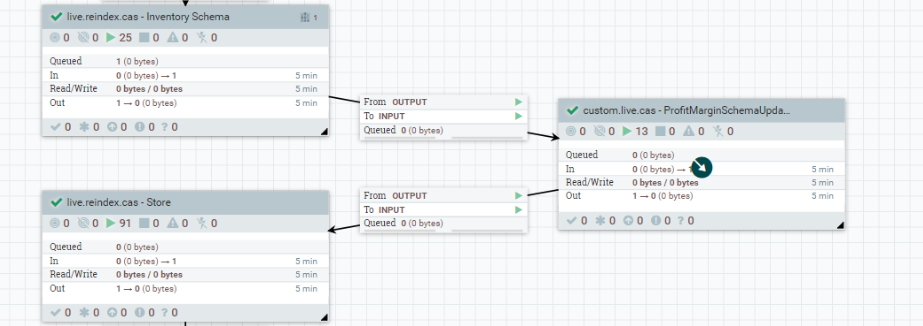
Add the custom.live.cas -
ProfitMarginSchemaUpdateConnector process group before
the live.reindex.cas-Store process group, as shown
below.
-
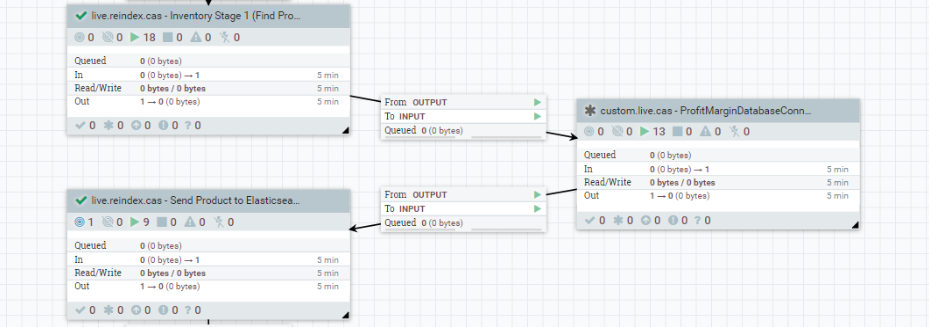
Add the custom.live.cas –
ProfitMarginDatabaseConnectorPipe process group before
live.reindex.cas - Send Product to
Elasticsearch process group as shown below.
-
Add the custom.live.cas -
ProfitMarginSchemaUpdateConnector process group before
the live.reindex.cas-Store process group, as shown
below.
-
Use the Push-to-live command to copy the AUTH search indices
and profit margin values to the LIVE environment.
POST: https://CommerceServerHostname:TransactionServerPort/wcs/resources/admin/index/dataImport/build?connectorId=push-to-live&storeId=catalogAssetStoreIdGET: https://CommerceServerHostname:TransactionServerPort/wcs/resources/admin/index/dataImport/status?jobStatusId=jobNumber -
Verify that the profit margin field is indexed.
-
Modify the user data field name mapping to map the Profit
Margin field to user data using the configuration API.
- Modify the store to display the profit margin in store preview .
- Validate that the profit margin is visible on the store preview of the production environment by following the instructions in Testing the customization.