
Configure the connector in NiFi
In this lesson, you configure the connector that you created in the previous step using NiFi.
Before you begin
About this task
Use the following link for NiFi:
http://hostname/IP:30600/nifi/
- This lesson uses the connector name custom.cas. Ensure that you replace custom.cas with the name of the connector that you created in the previous step.
- If you are on the NiFi home page where you can view all the processors, you might have to scroll to the right of the pipeline and zoom in to find the required processors.
Procedure
- Scroll to the right side of the NiFi canvas. The custom.cas connector you created in the previous step is located here.
-
Update the properties for the processor
custom-cas_Template-Schema-CAS.
- Go to the new custom.cas pipeline and double-click custom-_Template-Schema-CAS.
- Double-click Schema Update process group.
- Find the Setup Elasticsearch Index Schema process group and double-click on it.
- Find and right-click Specify Schema to Update and stop the processor.
- Double-click the processor to modify the settings.
- Go to the Properties tab and update the property param.schema with the value product.
- Click Apply.
- Start the processor by right-clicking and selecting Start.
-
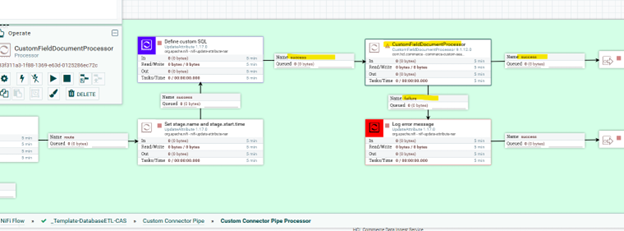
Update Processor Populate Index Schema.
- Open
- Drag a Processor button to a blank space in the canvas and then type Custom. Select CustomFieldDocumentProcessor and click on the ADD button.
-
Add the CustomFieldDocumentProcessor, as in the following
example screen shot.
Note: You need to stop the corresponding processors to change the flow relationships.
-
Select the CustomFieldDocumentProcessor properties tab
and fill in values for the following properties:
- Database Connection Pooling Service:
Database Connection Pool - SQL Pre-Query:
${ingest.database.schema.sql} - SQL select query:
${ingest.database.sql}
- Database Connection Pooling Service:
-
Open Define custom SQL processor. Update processor
Define custom SQL and index name. Update
ingest.database.sqlwith the SQL below:SELECT OP.CATENTRY_ID, CASE WHEN OP.PRICE <> 0 THEN (OP.PRICE - CP.PRICE) / OP.PRICE * 100 ELSE NULL END AS PROFIT_MARGIN FROM (SELECT O.CATENTRY_ID CATENTRY_ID, P.PRICE PRICE FROM OFFER O INNER JOIN OFFERPRICE P ON (O.OFFER_ID = P.OFFER_ID AND P.CURRENCY = 'USD') INNER JOIN TRADEPOSCN ON (O.TRADEPOSCN_ID = TRADEPOSCN.TRADEPOSCN_ID AND TRADEPOSCN.NAME = 'Extended Sites Catalog Asset Store') WHERE (O.STARTDATE IS NULL OR CURRENT_TIMESTAMP > O.STARTDATE) AND (O.ENDDATE IS NULL OR O.ENDDATE > CURRENT_TIMESTAMP) AND O.PUBLISHED = 1 ) OP, (SELECT OFFER.CATENTRY_ID CATENTRY_ID, OFFERPRICE.PRICE PRICE FROM OFFER INNER JOIN OFFERPRICE ON (OFFER.OFFER_ID = OFFERPRICE.OFFER_ID AND OFFERPRICE.CURRENCY = 'USD') INNER JOIN TRADEPOSCN ON (OFFER.TRADEPOSCN_ID = TRADEPOSCN.TRADEPOSCN_ID AND TRADEPOSCN.NAME = 'My Company Cost Price List' ) ) CP WHERE OP.CATENTRY_ID = CP.CATENTRY_ID AND OP.CATENTRY_ID IN (${data.catentryId})Note the
OP.CATENTRY_ID IN (${data.catentryId})clause in the SQL. Each flow will process a batch of catalog entries.The result of this SQL contains two columns, CATENTRY_ID and PROFIT_MARGIN .
 Note: Ensure that cost price data is available in your database. This connector does not verify if the SQL returns any results. If the cost price data is not available in the database, the data returned for the SQL is empty and results in errors.
-
Create a new version for
custom-cas_Template-Schema-CAS.
Right-click the process group, custom-cas_Template-Schema-CAS.
Click .
Right-click the process group custom-cas_Template-Schema-CAS.
Click .
Add the required Flow Name and Save.
In this tutorial, the Flow Name =
ProfitMarginSchemaUpdateConnector. -
Create a new version for custom.cas -
_Template-DatabaseETL-CAS.
Right-click the process group, custom.cas - _Template-DatabaseETL-CAS.
Click .
Right-click the process group, custom.cas - _Template-DatabaseETL-CAS.
Click .
Add the required Flow Name and Save.
In this tutorial, the Flow Name =
ProfitMarginDatabaseConnectorPipe. -
Copy custom.cas - _Template-Schema-CAS process group and
paste it to a blank space beside auth.reindex.cas -
Workspace Schema.
Insert this new custom process group between Workspace Schema and the next process group as the following:
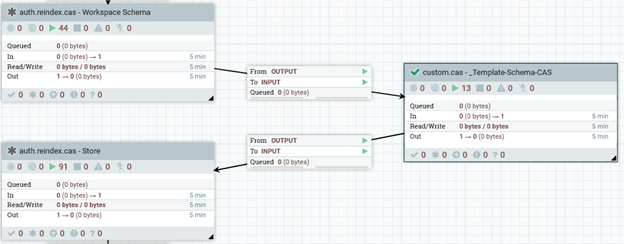
The sequence of the process group may change. The custom process group needs to be inserted after workspace schema.
Right click on the
custom.cas - _Template-Schema-CASprocess group and select Start to start the process group. -
Follow similar steps to add _Template-DatabaseETL-CAS process group to before
the Send Product to Elasticsearch process group.
Right click on the
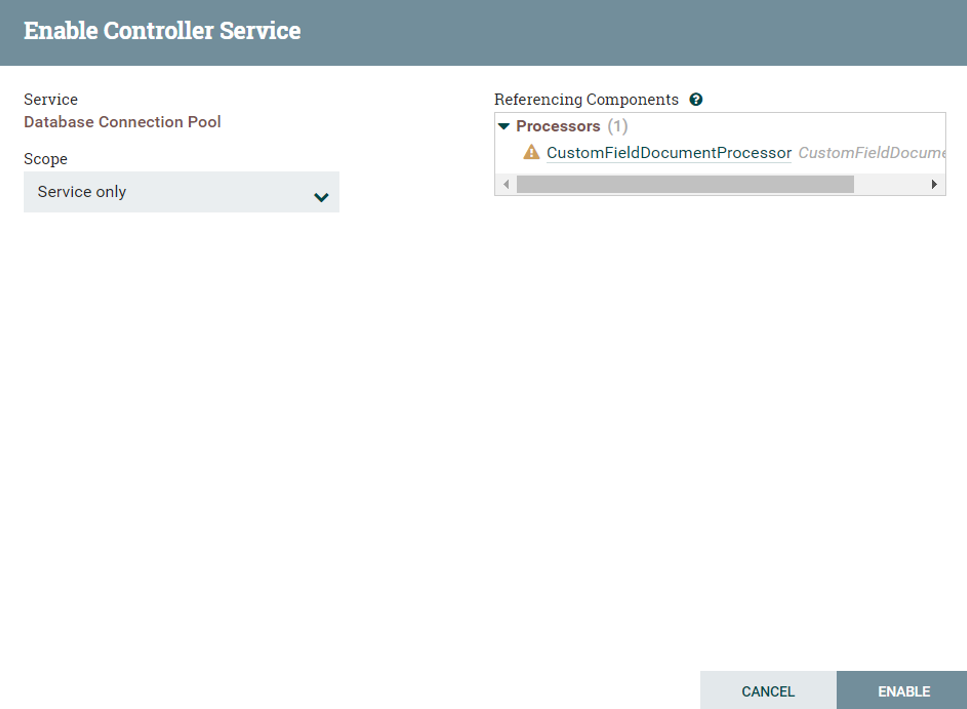
_Template-DatabaseETL-CASprocess group and select Start to start the process group.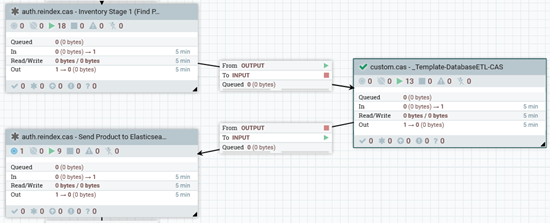 Note: If you see invalid component in _custom.cas - _Template-DatabaseETL-CAS _process group, follow the steps given below:
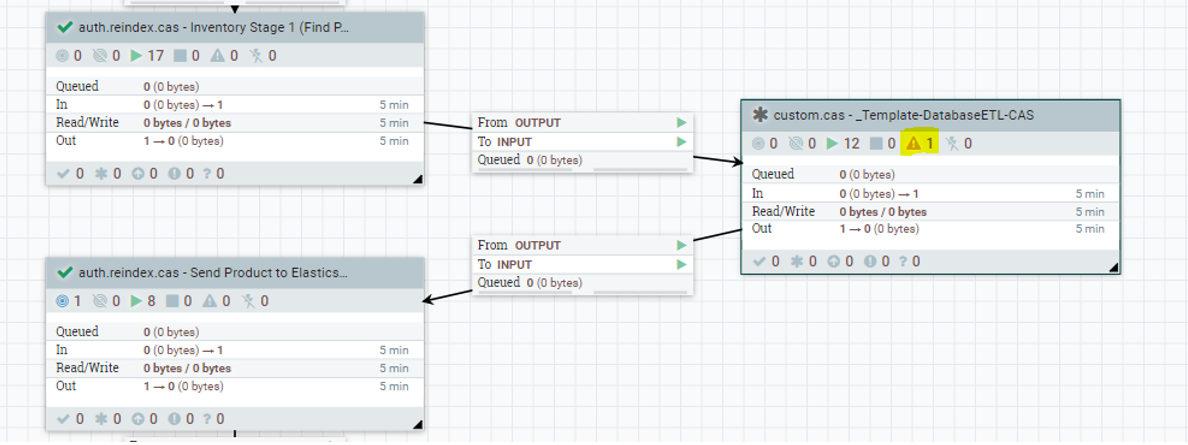
- Right-click on custom.cas - _Template-DatabaseETL-CAS process group and select Configure.
- Navigate to Controller Services.
- Click on Enable for
Database Connection Pool
services.

- Click Enable button and to exit the
Enable Controller Services pop-up,
click Close.
- Right-click custom.cas - _Template-DatabaseETL-CAS process group and select Start.
-
Extract the versioned connector.