In this tutorial, you learn how to customize the storefront for a custom store by
shortening the store URL and adding a view to the for the storefront by updating the context root,
and add a view to display the home page.
Before you begin
Ensure that you have a custom storefront asset store and custom
extended sites store published within your development environment and your runtime environment.
This tutorial uses a custom storefront asset store that is named
MytoyStorefrontAssetStore and an extended site store that is named
MytoyESite as examples.
About this task
The Store server is separate from the transaction server and. It operates as a remote
application, sending outbound calls to interact with the Transaction and Search servers. Developing
the storefront for this environment is different than in previous versions of HCL Commerce.
This tutorial guides you through the end to end flow of storefront customization in your
development environment. You then deploy the newly created package to the runtime environment for
verification.
This procedure has two parts:
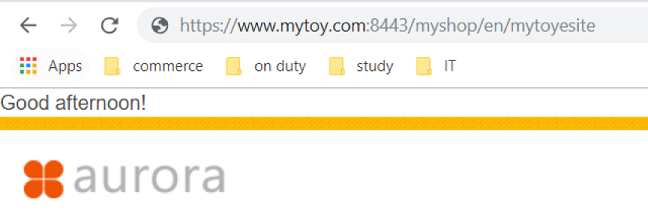
Shorten the SEO URL, by updating the context root from /wcs/shop to
/myshop. The new URL will be:
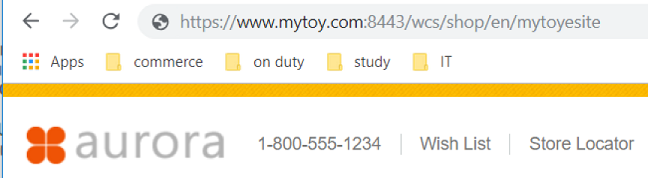
https://hostname:port/myshop/en/storename
Add a new view to display the homepage.
Customize a Java class to display a greeting according to time, that will be used by a JSP
file.
Customize a store-level JSP file, adding a greeting above the logo.
Add a new view bean in the spring configuration file to set the customized JSP as the site's
Home page.
Perform these steps in the development environment.
Procedure
Shorten the SEO URL.
Open for editing the configuration file
WCDE_installdir\workspace\crs\META-INT\application.xml.
Change the following element:
<context-root>/</context-root>
Open for editing the configuration file
WCDE_installdir\workspace\crs\xml\config\wc-store.xml.
Update the following element:
Create a Java package under the src-extensions-logic project. In
the dialog box, enter src in the Source Folder field,
and com.mycompany in the Name field.
Add a Java class under the package. In this example, set the
Source folder as crs-extensions-logic/src, and the
Package as com.mycompany. The
Name in this example is Welcome.
Change directories to the crs-web project. Copy the file
/WebContent/MytoyStorefrontAssetStore/ShoppingArea/CatalogSection/CategorySubsection/TopCategoriesDisplay.jsp
to TopCategoriesDisplay1.jsp.
Open TopCategoriesDisplay1.jsp for editing. Add the following
code below the <!-- BEGIN TopCategoriesDisplay.jsp -->
comment.
Add
the following code below the <div id="grayOut"></div>
tag.
<div><c:out value = "${welcome}"/></div>
Update the view.
Open for editing the configuration file
/WebContent/WEB-INF/spring/MytoyStorefrontAssetStore/views-ext.xml. Add the
following code after the beans section of the
file.
Copy the file
WCDE_installdir\wcbd\wcbd-setenv.bat.template to
setenv.bat.
Open for editing setenv.bat, and set the environment variables
ANT_HOME, WAS_HOME, and WC_HOME. For
example:
set ANT_HOME=W:\WCDE_V9\wcbd\apache-ant-1.10.1
set WAS_HOME=W:\IBM\WebSphere\AppServer
set WC_HOME=W:\WCDE_V9
Copy the file
WCDE_installdir\wcbd\extract\wcbd-sample-extract-local.xml
to WCDE_installdir\wcbd\extract-local.xml.
Open for editing extract-local.xml. Change <project
name="wcbd-sample-extract-local" default="all"> to <project name="extract-local"
default="all">.
Copy the properties file
WCDE_installdir\wcbd\extract\wcbd-sample-extract-local.properties
to
WCDE_installdir\wcbd\extract-local-crs.properties.
Open for editing extract-local-crs.properties and set the
variable local.extract.dir to the local extract directory you created or
designated. In this example, use local.extract.dir=D:/repo.
Optional: Copy the template file
WCDE_installdir\wcbd\wcbd-build.private.properties.template
to build-local-crs.private.properties, and set the variables
mail.user and mail.password.
Copy the template file
WCDE_installdir\wcbd\wcbd-build.properties.template to
build-local-crs.properties.
Set the following properties and values in
build-local-crs.properties.
Build a new image by using the customized package.
Extract
wcbd-deploy-server-local-crs-sampleCus.zip
into the directory CusDeploy.
Deploy the code into your runtime environment.
Create a Dockerfile in /opt/bvt/store/. The contents of the file
are as follows:
FROM  crs-app:latest
	# Using yum in RHEL/CentOS for package installation
	# RUN yum install -y nc && yum clean all
	COPY CusDeploy /SETUP/Cus
	RUN /SETUP/bin/applyCustomization.sh
Change directories to /opt/bvt/store. Create a Docker image that
uses the command docker build -f Dockerfile -t crs-app:cus .
Run a new container based on the new image.
Change the store setting in
docker-compose.yml to store: image: crs-app:cus .
Run the docker command to start the new container:
docker-compose up -d .
Verify your changes in the storefront, to make sure the two customizations take effect
after the custom Docker image is deployed.
The storefront before the customizations displays the default Aurora Starter Store banner.After your changes, the time-dependent banner text that you added to the Java
class Welcome now appears above the Aurora banner.