In this lesson, you customize the widget using HCL Commerce Developer.
Procedure
-
In the crs-web project, go to the WebContent
directory and create a new directory called MyWidgets.
-
Copy the directory to the new MyWidgets directory that you created in
the preceding step.
-
From the Enterprise Explorer view, right-click crs-web and select
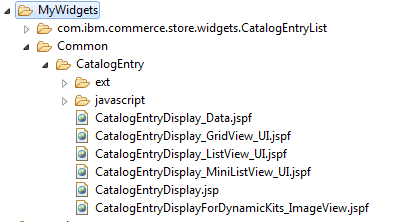
Refresh. The new MyWidgets directory and its contents
should now be visible in the project.
The directory and its contents should resemble the following screen capture within the
project:

-
Expand
-
Open the CatalogEntryList_UI.jspf file and switch to the
Source view.

Notice that this widget contains many dependencies on other files that are located in the directory. In the next steps, the dependencies are resolved.
-
Resolve the dependencies by copying the files that you need and updating them
accordingly.
There are two basic principles to follow when performing your customization:
- If you want to reuse dependencies for the default files, you must ensure that the reference path
is correct in your widget.
- If you want to modify the dependency files that are located in , you must copy them into your equivalent customized folder, .
-
Locate and copy the following directory and its files: .
-
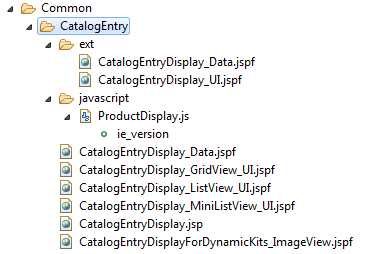
Paste the directory and files into your equivalent customized folder:
The directory and its contents should resemble the following screen capture within the
project:
-
Update the JSP files to include the new information in the storefront. That is, the
manufacturer name of the products.
Each widget has separate user interface provider files and data provider files. The data provider
files contain a _Data suffix, for example,
CatalogEntryList_Data.jspf. The user interface provider files contain a
_UI suffix, for example, CatalogEntryList _UI.jspf.
This separation allows you to modify the user interface without considering the data. You can
have multiple user interface provider files that share the same data file.
-
Expand .
The files are displayed in the Enterprise Explorer view:

-
Open the CatalogEntryList_UI.jspf file.
-
Locate all three instances of the following line:
<c:import url="${env_siteWidgetsDir}Common/CatalogEntry/CatalogEntryDisplay.jsp">
-
Change the lines to:
<c:import url="/MyWidgets/Common/CatalogEntry/CatalogEntryDisplay.jsp">
-
Save your changes and close the file.
-
Open the CatalogEntryList.jsp file.
-
Locate the following line:
<jsp:include page="../com.ibm.commerce.store.widgets.PDP_AddToRequisitionLists/AddToRequisitionLists.jsp" flush="true">
-
Change it to:
<jsp:include page="/Widgets_801/com.ibm.commerce.store.widgets.PDP_AddToRequisitionLists/AddToRequisitionLists.jsp" flush="true">
-
Save your changes and close the file.
-
Open the AdditionalContents_UI.jspf file.
-
Locate the following line:
<%@ include file="../Common/ESpot/ESpotTitle_UI.jspf"%>
-
Change it to:
<%@ include file="/Widgets_801/Common/ESpot/ESpotTitle_UI.jspf"%>
-
Save your changes and close the file.
-
Open the AdditionalContents_Data.jspf file.
-
Locate the following line:
<%@ include file="../Common/ESpot/ESpotTitle_Data.jspf"%>
-
Change it to:
<%@ include file="/Widgets_801/Common/ESpot/ESpotTitle_Data.jspf"%>
-
Save your changes and close the file.
-
Update the JSP files to include the new information in the storefront. That is, the
manufacturer name of the products.
-
Expand
The files are displayed in the Enterprise Explorer view:
-
Open the CatalogEntryDisplay.jsp file.
-
Locate the following block of code:
   <c:choose>
      <c:when test="${param.pageView == 'list'}">
         <%@ include file="CatalogEntryDisplay_ListView_UI.jspf" %>
      </c:when>
      <c:when test="${param.pageView == 'miniList'}">
         <%@ include file="CatalogEntryDisplay_MiniListView_UI.jspf" %>
      </c:when>
      <c:otherwise>
         <%@ include file="CatalogEntryDisplay_GridView_UI.jspf" %>
      </c:otherwise>
</c:choose>
Note
the following: When no extra parameter is used (the
c:otherwise condition), the
CatalogEntryDisplay_GridView_UI.jspf file is the user interface file used to
display the Catalog Entry List by default. Therefore, the next step will update that file.
-
Open the CatalogEntryDisplay_GridView_UI.jspf file.
-
Locate the following line:
<div class="product_info">
Note the following: This is the
beginning of the block that displays the information of a catalog entry. That is, the div shown in
the following screen capture that is surrounded by a red box:

-
Immediately above this line, add the following code snippet:
<wcf:url var="manufacturerSearchDisplayViewURL" value="SearchDisplay">
   <wcf:param name="langId" value="${langId}"/>
   <wcf:param name="storeId" value="${WCParam.storeId}"/>
   <wcf:param name="catalogId" value="${WCParam.catalogId}"/>
   <wcf:param name="pageView" value="${pageView}"/>
   <wcf:param name="beginIndex" value="0"/>
   <wcf:param name="pageSize" value="${WCParam.pageSize}"/>
   <wcf:param name="manufacturer" value="${catalogEntryDetails.manufacturer}"/>
   <wcf:param name="sType" value="SimpleSearch"/>
   <wcf:param name="showResultsPage" value="true"/>
</wcf:url>
-
Immediately above the closing
</div> statement of the
product_info div, add the following code snippet:
<div id="mfname_<c:out value='${catalogEntryID}'/>" style="font-size:12px; padding-left:15px">
<a href='<c:out value="${manufacturerSearchDisplayViewURL}" />'>
<c:out value="${catalogEntryDetails.manufacturer}" escapeXml="${env_escapeXmlFlag}"/></a></div>
-
Open the CatalogEntryDisplay_ListView_UI.jspf file.
-
Locate the following block of code:
<jsp:include page="../../com.ibm.commerce.store.widgets.PDP_SKUList/SKUList.jsp" flush="true">
-
Change it to:
<jsp:include page="/Widgets_801/com.ibm.commerce.store.widgets.PDP_SKUList/SKUList.jsp" flush="true">
-
Save and close the file.
-
Update the definition of the widget in the database to point to your custom JSP file.
-
Create a CSV file by using the
RegisterWidgetDef keyword to load the widget
definitions.
-
Save the file to a folder under
WCDE_installdir/transaction-dataload/data/.
For example,
WCDE_installdir/transaction-dataload/data/Widget/registerWidgetdef.csv
-
Load the CSV file to the database by completing one of the following tasks: Load your widget into the database by using Data Load utility or
Configuring the remote store Data Load utility scheduler job.
-
Restart the Store Test Server, and start the Customization Test Server and Search Test server
container, if the server and container are not already running. For more information, see the
Servers view:

Results
You have updated the JSP files to include the correct file paths and dependencies, and have
added a new div to display the manufacturer name of each catalog entry, which shows a link to search
the store catalog of all products with the same manufacturer.