Creating the object definitions for the new promotion type
Define new promotion element object definitions to collect input from the Management Center. When business users create new promotions in the Management Center, the promotion element object definitions persist promotion element data in two tables: PX_ELEMENT and PX_ELEMENTNVP.
Before you begin
- PurchaseConditionObjectDefinition definition declared in LOBTools/WebContent/WEB-INF/src/xml/commerce/promotion/objectDefinitions/elements/PurchaseConditionObjectDefinition.xml
- How promotion data is stored and managed
- Promotion authoring tables for Management Center:
About this task
When a business user creates a promotion, the input data about the promotion is persisted in the PX_ELEMENT and PX_ELEMENTNVP tables. When the business user activates the promotion, the input data is used to form the authoring promotion XML; XSLT templates then transform the authoring promotion XML to the runtime promotion XML.
Procedure
- Examine the abbreviated XML structure you created in the
previous procedure (Identifying the business user input for the new promotion type) and
identify each node in the structure as either:
- An element: These are nodes that have child nodes.
- A name-value pair (NVP): These are nodes that do not have child elements and they are used to describe a value.
See the example section after the last step of this procedure.
Now that you have identified the elements and name-value pairs, you can build the object definition to collect information from the Management Center user interface and persist the data in the PX_ELEMENT and PX_ELEMENTNVP tables.
- Open HCL Commerce Developer and switch to the Enterprise Explorer view.
-
Create a directory to store your new promotion element object definition.
You can store the file in a directory structure similar to the following example: LOBTools/WebContent/WEB-INF/src/xml/your_company_name/promotion/objectDefinitions/elements/PurchaseConditionObjectDefinition.xml
- Create a new XML file for the promotion element object definition.
- Define the promotion element object definition.See the sample promotion element object definition after the last step of this procedure.
- Define the new promotion element object definition wherever it is used.
Example
For your custom promotion type, Customers who purchase two dining chairs (FULO-01) qualify to purchase a dining table (FULO-02) at the reduced price of $200, you must create a purchase condition object definition with the following name: ProductLevelPWPFixedCostPurchaseCondition.
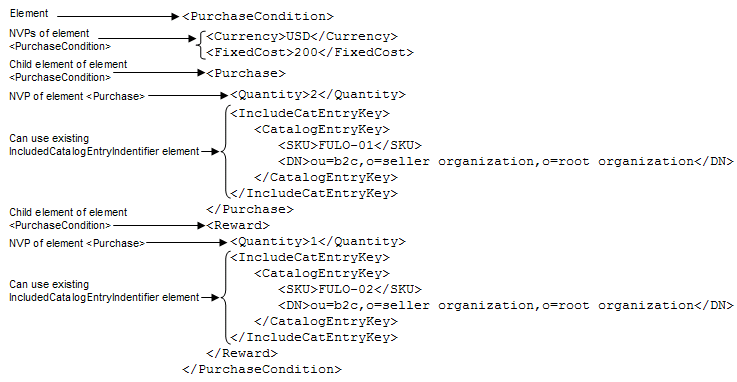
First, you examine the abbreviated XML structure you previously created and identify each node in the structure as either an element or a name-value pair (NVP) as shown here:

For this custom promotion type, you reuse the predefined IncludedCatalogEntryIdentifier to gather the catalog entry ID.
When a business user activates a promotion created with your custom promotion type, the authoring promotion XML will be built from the PX_ELEMENT and PX_ELEMENTNVP tables. The authoring promotion XML looks like the following sample:
<PurchaseCondition>
   <Data>
      <Currency>USD<Currency>
  	   <FixedCost>200</FixedCost>
   </Data>
   <Purchase>
      <Data>
         <Quantity>2</Quantity>
      </Data>
      <IncludeCatalogEntryIdentifier>
         <Data>
            <Id>10251</Id>
            <SKU>FULO-01</SKU>
            <DN>ou=b2c,o=seller organization,o=root organization</DN>
         </Data>
      </IncludeCatalogEntryIdentifier>
   </Purchase>
   <Reward>
      <Data>
         <Quantity>1</Quantity>
      </Data>
      <IncludeCatalogEntryIdentifier>
         <Data>
            <Id>10253<Id>
            <SKU>FULO-02</SKU>
            <DN>ou=b2c,o=seller organization,o=root organization</DN>
         </Data>
      </IncludeCatalogEntryIdentifier>
   </Reward>
</PurchaseCondition>
| PX_ELEMENT_ID | PX_PROMOTION_ID | NAME | TYPE | SUBTYPE | PARENT | SEQUENCE | OPTCOUNTER |
|---|---|---|---|---|---|---|---|
| 65 | 10002701 | '65' | 'PurchaseCondition' | 'ProductLevelPWPFixedCostPurchaseCondition' | NULL | 0.0 | 0 |
| 66 | 10002701 | '66' | 'Reward' | 'Reward' | '65' | 0.0 | 0 |
| 67 | 10002701 | '67' | 'IncludeCatalogEntryIdentifier' | 'Identifier_CatalogEntry' | '66' | 0.0 | 0 |
| 68 | 10002701 | '68' | 'Purchase' | 'Purchase' | '65' | 0.0 | 0 |
| 69 | 10002701 | '69' | 'IncludeCatalogEntryIdentifier' | 'Identifier_CatalogEntry' | '68' | 0.0 | 0 |
| PX_ELEMENTNVP_ID | PX_ELEMENT_ID | NAME | VALUE | OPTCOUNTER |
|---|---|---|---|---|
| 65 | 65 | 'Currency' | 'USD' | 0 |
| 66 | 65 | 'FixedCost' | '200' | 0 |
| 68 | 66 | 'Quantity' | '1' | 0 |
| 69 | 67 | 'Id' | '10253' | 0 |
| 70 | 68 | 'Quantity' | '2' | 0 |
| 71 | 69 | 'Id' | '10251' | 0 |
There are some default predefined element types, such as IncludeCatalogEntryIdentifier, that require an additional process in the Java command to generate the corresponding XML fragment, which contains a unique index such as SKU and distinguished name (DN). This new promotion type in this example uses the predefined IncludedCatalogEntryIdentifier element type.
Next, you
create the new ProductLevelPWPFixedCostPurchaseCondition object definition. It looks like the
following sample. In this sample, you can see the existing promotion element object definitions
proPWPPurchaseItemObjectDefinition and
proPWPRewardItemObjectDefinition are
reused.
<PromotionElementObjectDefinition
   package="pro"
   definitionName="proProductLevelPWPFixedCostPurchaseConditionObjectDefinition"
   baseDefinitionName="proPurchaseConditionObjectDefinition"
   objectType="ProductLevelPWPFixedCostPurchaseCondition">
   <PromotionElementObjectDefinition
      package="pro"
      baseDefinitionName="proPWPPurchaseItemObjectDefinition">
      <Xml name="template">
         <elementType>Purchase</elementType>
      </Xml>
   </PromotionElementObjectDefinition>
   <PromotionElementObjectDefinition
      package="pro"
      baseDefinitionName="proPWPRewardItemObjectDefinition">
      <Xml name="template">
         <elementType>Reward</elementType>
      </Xml>
   </PromotionElementObjectDefinition>
   <PropertyDefinition propertyName="FixedCost" required="true" minValue="0"
         displayName="Fixed cost (no translation)" />
</PromotionElementObjectDefinition><PrimaryObjectDefinition definitionName="proBasePromotionPrimaryObjectDefinition"
isBaseDefinition="true"...>
.
.
.
<PromotionElementObjectDefinition
baseDefinitionName="proProductLevelPWPFixedCostPurchaseConditionObjectDefinition"
package="pro"/>
.
.
</PrimaryObjectDefinition>