In this
lesson, you are testing your new Web service with
a Java application. This application uses the content of the input.xml
file as the body of the Web service request and makes the request.
When the response is received, the application prints out the SOAP
body of the Web service response.
About this task
This sample uses the OAGIS ConfirmBOD schema
to represent
the result of the Web service request. The standard JAX-RPC Web service
tooling can have difficulties when generating the appropriate Java
code to represent a client for this Web service. The JAX-WS 2.0 specification
is designed to handle these limitations, however, there is an alternative
approach to use the Eclipse Modeling Framework and SOAP binding options
to generate Java clients. However, to quickly test the Web service,
SAAJ can be used to create a quick test client for the newly created
Web service.
Executing the Java application
When
executing this application with the same input.xml file, the success
scenario of creating a user can occur:
Procedure
- Download
and extract the sample InboundWebServiceTutorial.zip file
to a temporary directory.
- Open WebSphere Commerce
Developer and switch to the Java
perspective.
- In the Package Explorer view,
select .
- Select Java
Project; click Next.
- In the Project name field, enter SyncCustomerTest;
click Finish.
- In the
Package Explorer view, right-click the SyncCustomerTest project;
select .
- In the Name field, enter com.mycompany.webservice;
click Finish.
- In the
Package Explorer view, navigate to SyncCustomerTest/com.mycompany.webservice.
- Right-click com.mycompany.webservice;
select Import.
- Expand General;
select File
system. Click Next.
-
Click the Browse button to the right
of the From directory field.
- Navigate to the
directory where you extracted SyncCustomerTest.java
and input.xml from the sample InboundWebServiceTutorial.zip file
and click OK.
- Select SyncCustomerTest.java and input.xml files
from the list; click Finish to import the file.
- Start or restart the WebSphere Commerce Test Server.
- Right-click the WebSphere Commerce Test Server and
select Publish.
- Set
up a TCP/IP Monitor in WebSphere Commerce Developer.
You use this TCP/IP Monitor to observe the request and response documents
traveling to and from the WebSphere Commerce service you created.
To create a TCP/IP Monitor to forward requests to WebSphere Commerce:
- Select .
- From the Preferences panel, expand .
- Click
Add.
- Type the
following information:
- Local monitoring
port:81.
- Hostname: The
hostname of
the WebSphere Commerce Server where the Project service is running.
- Port:80 for WebSphere Commerce Developer
- Click OK.
- Select the created TCP/IP Monitor.
- Click Start.
- Click OK.
- Select . Expand Debug; select TCP/IP
Monitor and click OK.
- In the Enterprise Explorer view, verify
that there are
no compilation errors in all projects.
- Right-click SyncCustomerTest.java;
select
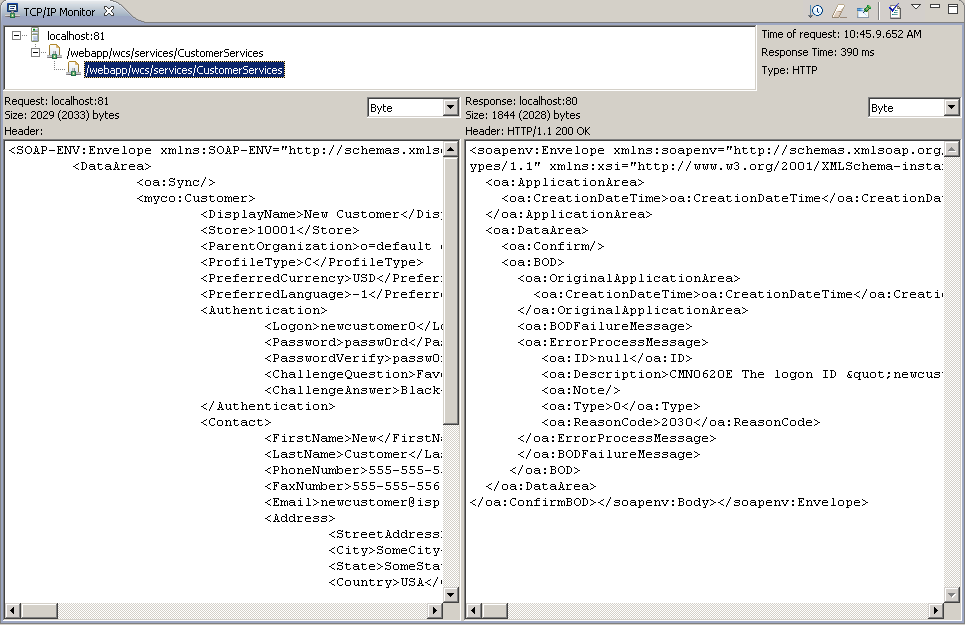
- View the Request and Response panes of the TCP/IP Monitor.
If you see a <oa:BODSuccessMessage>
entry
in your output, then you have successfully created a Web SyncCustomer
service. Ensure that your TCP/IP Monitor panes resemble the following
image: 
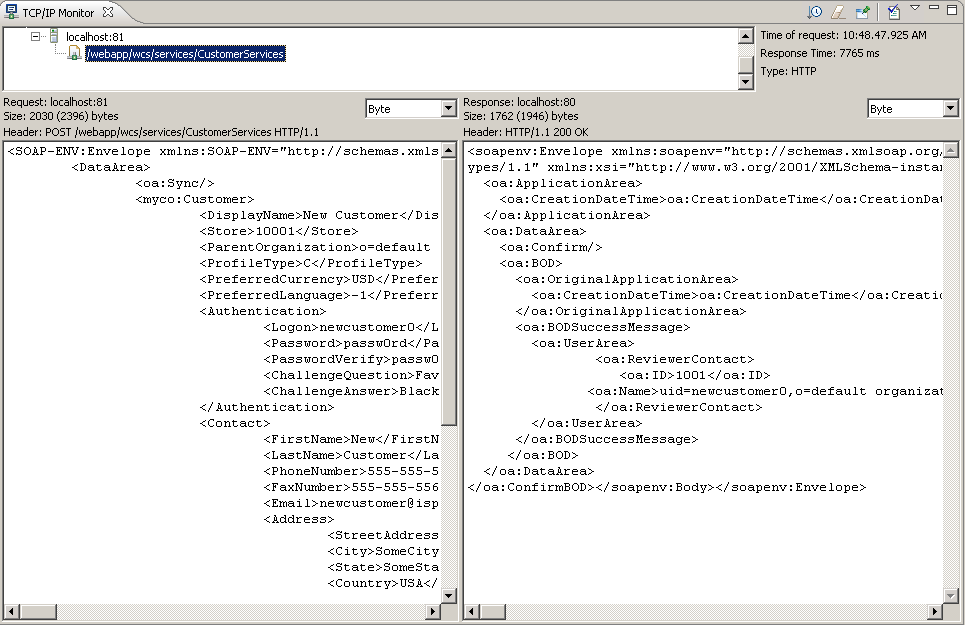
When executing the application
with the same input.xml a second time, the failure scenario will occur
because the logon id of the user is already specified. By executing
the application twice both types of responses can be tested. After
re-executing the application, you should receive a <oa:BODFailureMessage>
entry
in your output. Ensure that the error response that displays resembles
the following image: 
You have successfully
testing your response messages for you inbound Web service.