In this lesson, you are mapping the WSDL document
from the previous lesson to the WebSphere Commerce Web services framework.
About this task
Enabling WebSphere Commerce to handle
the web service
To map the WSDL document to the Web services
framework you must enable WebSphere Commerce to handle the Web service.
Enabling the WebSphere Commerce Web Service framework to handle the
WSDL defined previously involves two steps. The first step is configuring
the WebSphere Commerce Web Services runtime to delegate the Web Service
request to the WebSphere Commerce Web Services framework. The second
step is configuring the WebSphere Commerce Web Services to process
the request. This configuration is done by using the message mapping
facility to convert the XML request to a name-value-pair. The name-value-pair
passes to the business logic and JSP to handle the response and configure
the JSP that generates the web service response.
Mapping
the WSDL to the WebSphere Commerce web services framework
The
approach taken in this tutorial is to map the WSDL to the WebSphere
Commerce Web Services framework. The Web Services tooling can be used
to create and update existing deployment files to generate this mapping.
By using the wizard to generate a Java Bean Skeleton, you generate
the required files to create the mapping and update the web services
deployment descriptors to register the new WSDL.
Procedure
- In the Enterprise Explorer view ,
select .
- Right click the WSDL file and select . The Web Services wizard displays.
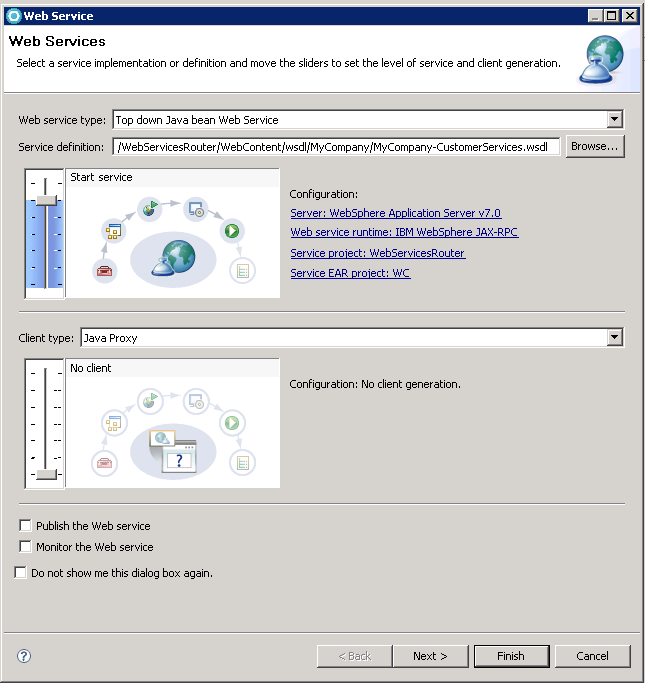
- Ensure that your configuration settings in the Web Services
wizard matches the following values:
| Configuration setting |
Value |
| Web service type: |
Top down Java bean Web Service |
| Service definition: |
/WebServicesRouter/WebContent/wsdl/MyCompany/MyCompany-CustomerServices.wsdl |
| Server: |
WebSphere Application Server v7.0 |
| Web service runtime: |
IBM WebSphere JAX-RPC |
| Service project: |
WebServicesRouter |
| Service EAR project: |
WC |
| Client type: |
Java Proxy |
Clear all the check boxes. Ensure that your Web Services
wizard settings resembles the following image:
- Click Finish. A warning displays
while generating the Java bean skeleton. Select OK
to continue the process. If your WebSphere Commerce test server is
not started, selecting OK causes your WebSphere
Commerce test server to start.
- Edit the MyCompany-CustomerServices_mapping.xml
file to modify the service endpoint interface to begin mapping your
service to the WebSphere Commerce Web services framework:
- In the Enterprise Explorer view,
navigate to WebServicesRouter/WebContent/WEB-INF.
- Right-click the MyCompany-CustomerServices_mapping.xml
file; click Open.
- Click the Source tab.
- Search for the following code within the file:
<port-mapping>
  <port-name>CustomerServices</port-name>
  <java-port-name>CustomerServices</java-port-name>
</port-mapping>
- Change the value for the
java-port-name.
Replace the content between the java-port-name tags
with the following code:
<java-port-name>com.ibm.commerce.webservices.OpenWebServicePortType</java-port-name>
- Search for the following line within the file:
<param-position>0</param-position>
<param-type>com.mycompany.www.schema.SyncCustomerType</param-type>
- Replace the
param-type with following
code:
<param-type>javax.xml.soap.SOAPElement</param-type>
- Search for the following line within the file:
<wsdl-return-value-mapping>
- Replace the
method-return-value
with following code:
<method-return-value>
javax.xml.soap.SOAPElement</method-return-value>
- Search for the following line within the file:
<service-endpoint-interface>
com.mycompany.www.MyCompanyCustomerServicesPortType</service-endpoint-interface>
- Replace the line with following service-endpoint-interface:
<service-endpoint-interface>
com.ibm.commerce.webservices.OpenWebServicePortType</service-endpoint-interface>
- Change the value of the
<java-method-name>
from syncCustomer to executeService.
This value is the method name for the service that is handled by the
WebSphere Commerce Web Services framework.
- Ensure that your updated
service-interface-mapping and service-endpoint-interface-mapping
for the MyCompany-CustomerServices_mapping.xml
file resembles the following code: <service-interface-mapping>
<service-interface>com.mycompany.www.MyCompanyCustomerServices</service-interface>
<wsdl-service-name xmlns:sim="http://www.mycompany.com/">sim:MyCompany-CustomerServices</wsdl-service-name>
<port-mapping>
<port-name>CustomerServices</port-name>
<java-port-name>com.ibm.commerce.webservices.OpenWebServicePortType</java-port-name>
</port-mapping>
</service-interface-mapping><service-endpoint-interface-mapping>
<service-endpoint-interface>com.ibm.commerce.webservices.OpenWebServicePortType</service-endpoint-interface>
<wsdl-port-type xmlns:seimwpt="http://www.mycompany.com/">seimwpt:MyCompany-CustomerServicesPortType</wsdl-port-type>
<wsdl-binding xmlns:seimwb="http://www.mycompany.com/">seimwb:MyCompany-CustomerServicesSOAP</wsdl-binding>
<service-endpoint-method-mapping>
<java-method-name>executeService</java-method-name>
<wsdl-operation>SyncCustomer</wsdl-operation>
<method-param-parts-mapping>
<param-position>0</param-position>
<param-type>javax.xml.soap.SOAPElement</param-type>
<wsdl-message-mapping>
<wsdl-message xmlns:mppm="http://www.mycompany.com/">mppm:SyncCustomer</wsdl-message>
<wsdl-message-part-name>SyncCustomer</wsdl-message-part-name>
<parameter-mode>IN</parameter-mode>
</wsdl-message-mapping>
</method-param-parts-mapping>
<wsdl-return-value-mapping>
<method-return-value>javax.xml.soap.SOAPElement</method-return-value>
<wsdl-message xmlns:wrvm="http://www.mycompany.com/">wrvm:ConfirmBOD</wsdl-message>
<wsdl-message-part-name>ConfirmBOD</wsdl-message-part-name>
</wsdl-return-value-mapping>
</service-endpoint-method-mapping>
</service-endpoint-interface-mapping>
- Save your changes to the MyCompany-CustomerServices_mapping.xml
file and close the editor.
- Edit the Web Service settings for your MyCompany-CustomerServices
web service:
- In the Enterprise Explorer view
navigate to WebContent/WEB-INF.
- Right-click the webservices.xml
file, select .
- Click the Web Services tab.
- In the Web service descriptions section, select MyCompany-CustomerServices.
- In the Web service description implementation details
section, click the browse button to the right of the WSDL file field.
- In the Resource browser dialog, navigate to WebContent/WEB-INF/wsdl/wsdl/MyCompany;
select MyCompany-CustomerServices.wsdl.
- Click OK.
- Save your changes. Keep the Web Services Editor open.
- Edit the Port Components settings for your MyCompany-CustomerServices
web service:
- In the Web Services Editor, click the Port
Components tab.
- For the Web service description field in the Port Components
section, select MyCompany-CustomerServices.
- In the Port component implementation details section,
click the browse button to the right of the Service endpoint interface
field.
- In Browse for a Java class field in the Class browser
dialog, enter com.ibm.commerce.webservices.OpenWebServicePortType
- Select the Java class com.ibm.commerce.webservices.OpenWebServicePortType click OK.
The value ensures that the WSDL maps to the WebSphere Commerce Web
services framework.
- For the Service implementation bean field, select OpenWebServiceBinding
from the drop-down menu and select the Servlet link radio button.
- Save your changes. Keep the Web Services Editor open.
- Edit the Handlers settings for your MyCompany-CustomerServices
web service:
- In the Web Services Editor, click the Handlers
tab.
- In the Handlers section, select the Web service description
field; select MyCompany-CustomerServices from
the drop-down menu.
- In the Port Components field, select CustomerServices
- Click the Add button to add
a handler.
- In the Browse for a Java class field of the Class browser
dialog, enter com.ibm.commerce.webservices.OpenWebServiceHandlerImpl
- Select the Java class com.ibm.commerce.webservices.OpenWebServiceHandlerImpl;
click OK.
- For the SOAP headers of the selected handler table
in the SOAP headers section, click the Add
button twice to create two header entries in the table.
- For the SOAP header entries, change the default values
to match the following content:
| Namespace URI |
Local part |
| http://docs.oasis-open.org/wss/2004/01/oasis-200401-wss-wssecurity-secext-1.0.xsd |
Security |
| http://docs.oasis-open.org/wss/2004/01/oasis-200401-wsswssecurity-secext-1.0.xsd |
Security |
- For the SOAP roles of the selected handler field in
the SOAP roles section, click Add to create
a SOAP role entry.
- Change the value to " ". An
entry that contains only a single space. Do not include the quotation
marks.
Note: If the value is left empty, the tooling
removes the SOAP role. Setting a value of empty space allows the service
to not specify a SOAP actor to use this handler
- Save your changes. Close the Web Services Editor.
- Edit the Web servlet settings for your web.xml file.
- In the Enterprise Explorer view
navigate to WebServiceRouter/WebContent/WEB-INF.
- Right-click the web.xml file,
select .
- Replace the contents of your file with the following
code:
<?xml version="1.0" encoding="UTF-8"?>
<web-app id="WebApp_ID" version="2.5" xmlns="http://java.sun.com/xml/ns/javaee" xmlns:xsi="http://www.w3.org/2001/XMLSchema-instance" xsi:schemaLocation="http://java.sun.com/xml/ns/javaee http://java.sun.com/xml/ns/javaee/web-app_2_5.xsd" metadata-complete="true">
	<display-name>WebServicesRouter</display-name>
	<servlet>
		<description></description>
		<display-name></display-name>
		<icon>
			<small-icon></small-icon>
			<large-icon></large-icon>
		</icon>
		<servlet-name>OpenWebServiceBinding</servlet-name>
		<servlet-class>com.ibm.commerce.webservices.OpenWebServiceBindingImpl</servlet-class>
		<load-on-startup>1</load-on-startup>
</servlet>
</web-app>
- Save your changes. Close the XML Editor.
Results
In this lesson, you mapped your service to the WebSphere
Commerce Web Services framework for request handling. Within this
process, the following new and changed files must be updated when
deploying the web services to an existing or new WebSphere Commerce
instance.
- WEB-INF/ibm-webservices-bnd.xmi (updated)
- WEB-INF/ibm-webservices-ext.xmi (updated)
- WEB-INF/MyCompany-CustomerServices_mapping.xml (new)
- WEB-INF/webservices.xml (updated)
- WEB-INF/web.xml (updated)
- wsdl/MyCompany/MyCompany-CustomerServices.wsdl (new)
- xsd/OAGIS/9.0/Overlays/MyCompany/BODs/SyncCustomer.xsd (new)
- xsd/OAGIS/9.0/Overlays/MyCompany/Resources/Nouns/Customer.xsd
(new)