Defining the XML schema that extends the OAGIS BusinessObjectDocument
In this lesson, you define the XML schema, SyncCustomer. The SyncCustomer XML schema defines a web service to extend the OAGIS BusinessObjectDocument. Since this tutorial follows the OAGIS structure, the directories in which the XML schema is placed follows the OAGIS overlay recommendation. When you complete this lesson, you have an XML schema that is used to define the web services.
Procedure
- Create the SyncCustomer.xsd schema
file that you must use to define the SyncCustomer service to extend
the OAGIS BusinessDocument:
- In the Enterprise Explorer view, go to WebServiceRouter/WebContent/xsd/OAGIS/9.0/Overlays/MyCompany/BODs.
- Right-click the BODs directory; select .
- In the Select a wizard dialog, select XML/XML Schema; click Next.
- In the file name field, enter SyncCustomer.xsd.
- Click Finish.
- Open the SyncCustomer.xsd schema file
in the XML schema editor to set the schema properties
- Right-click the SyncCustomer.xsd file; click Open.
- Click the Properties tab.
- In the Prefix field, enter myco
- In the Target namespace field, enter http://www.mycompany.com/schema
- Import the BOD.xsd schema file into
the SyncCustomer.xsd schema file.
- Click the Design tab.
- In the View menu, select Detailed.
- In the Directives section, right-click; click Add Import.
- Select the new import and click the Properties tab.
- Click the Browse button to the right of the Schema location field.
- In the Select XML schema file dialog, select Workbench projects; click Next
- Go to the WebServicesRouter/WebContent/xsd/OAGIS/9.0/Resources/Nouns directory.
- Select the BOD.xsd file; click Finish.
- In the Directives section, select the BOD.xsd file and click the Properties tab.
- In the Prefix field, enter oa.
- Include the Customer.xsd schema file
into the SyncCustomer.xsd schema file:
- In the Directives section for the SyncCustomer.xsd schema file in the XML schema editor, right-click; click Add Include.
- Select the new include; click Properties.
- Click the Browse button to the right of the Schema location field.
- In the Select XML schema file dialog, select Workbench projects; click Next.
- Go to the WebServicesRouter/WebContent/xsd/OAGIS/9.0/Overlays/MyCompany/Resources/Nouns directory.
- Select the Customer.xsd schema file; click Finish.
- Create the complex type SyncCustomerDataAreaType for
the SyncCustomer.xsd schema file.
- Ensure that your design for the complex type SyncCustomerDataAreaType
resembles the following screen capture:
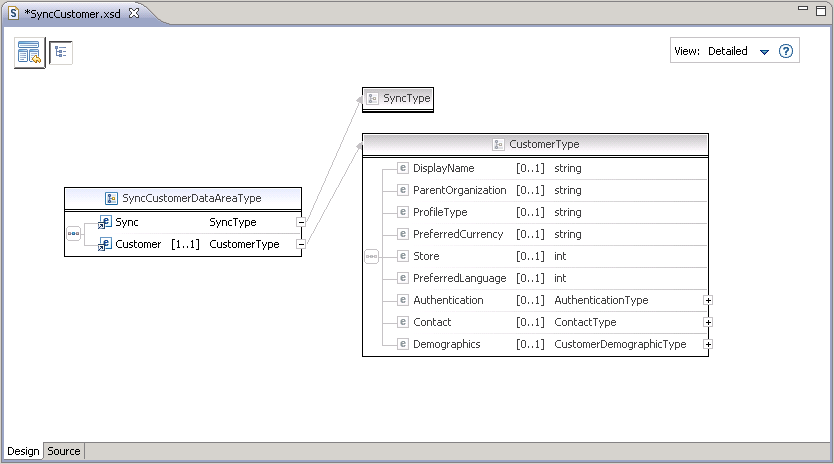
- Ensure that your design for the complex type SyncCustomerDataAreaType
resembles the following screen capture:
- Click the show schema index view
 button in the upper left of the XML Schema
Editor to return to the schema.
button in the upper left of the XML Schema
Editor to return to the schema. - In the XML Schema Editor, create the SyncCustomerType type
for the SyncCustomer.xsd schema file.
- Ensure that your design for the complex type SyncCustomerType resembles
the following screen capture:
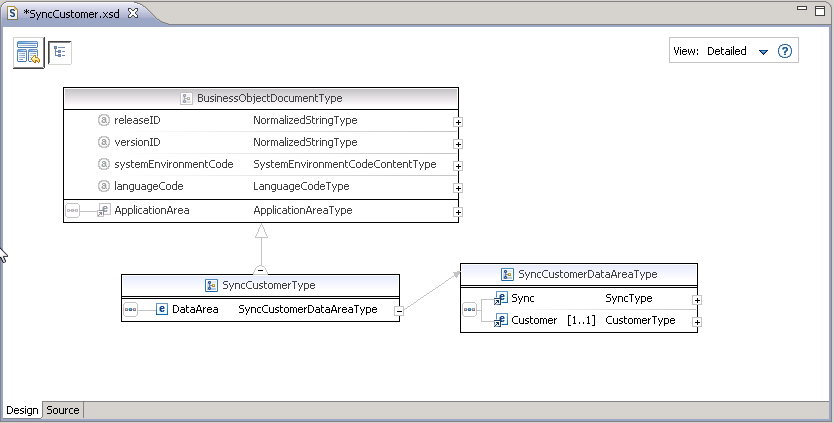
- Ensure that your design for the complex type SyncCustomerType resembles
the following screen capture:
- Click the show schema index view button in the upper left of the XML Schema
Editor to return to the schema.
- In the XML Schema Editor, create the
element SyncCustomer type for the schema:
- Ensure that your design for the schema SyncCustomer.xsd resembles
the following screen capture:

- Ensure that your design for the schema SyncCustomer.xsd resembles
the following screen capture:
- Save your work and close the XML Schema Editor.