This section describes the steps involved in creating an
XML schema definition. In this lesson you are defining the XML schema,
Customer.xsd. The Customer XML schema defines a Web service to create
customers. Since this tutorial follows the OAGIS structure, the directories
in which the XML schema is placed follow the OAGIS overlay recommendation.
After completing this section, you will have an XML schema that is
used to define the Web services.
Procedure
- Create the directories to contain the service XML schema
and customer data objects:
- In the Enterprise Explorer view,
navigate to WebServiceRouter/WebContent/xsd/OAGIS/9.0/Overlays
- Right-click the Overlays directory; select .
Name the folder MyCompany.
- Right-click the MyCompany directory;
select . Name the folder BODs. This
folder contains the service XML schema.
- Right-click the MyCompany directory;
select . Name the folder Resources.
- Right-click the Resources directory;
select . Name the folder Nouns. This
folder contains the customer data objects.
- Create the Customer.xsd schema file:
- In the Enterprise Explorer view,
navigate to WebServiceRouter/WebContent/xsd/OAGIS/9.0/Overlays/MyCompany/Resources/Nouns
- Right-click the Nouns folder; select
- In the Select a Wizard dialog box, select XML/XML
Schema; click Next.
- In the File name field, type Customer.xsd.
- Click Finish to create the XML
schema file.
- In the XML Schema Editor, set the schema properties:
- Select
- Click the Customer.xsd in the schema editor
and click Properties tab.
- In the Prefix field, type myco.
- In the Target namespace field, type http://www.mycompany.com/schema.
- In the XML Schema Editor, create the CustomerDemographicsType type
for the schema:
- Click the Design tab.
- In the drop-down menu for the View: options
select Detailed.
- In the Types section, right-click the section and select Add
Complex Type.
- Select your new complex type and click the Properties tab.
- In the Name field, type CustomerDemographicsType.
- Double-click CustomerDemographicsType to
open the complex type for editing.
- Right-click inside the CustomerDemographicsType section
and select Add Sequence.
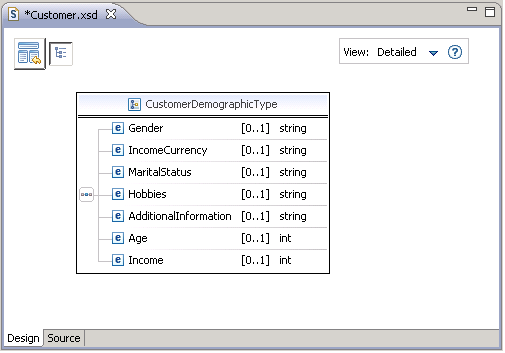
- Create the element, Gender of
type string for the CustomerDemographicsType sequence:
- Right-click the sequence and select Add Element.
- Select the new element and click the Properties tab.
- In the Name field, type Gender.
- In the Type field, select string.
- In the minOccurs field, select 0.
- In the maxOccurs field, select 1.
- Repeat substep h for the elements IncomeCurrency, MaritalStatus, Hobbies,
and AdditionalInformation
- Create the element Age of type
integer for the CustomerDemographicsType:
- Right-click the sequence and select Add Element.
- Select the new element and click the Properties tab.
- In the Name field, type Age.
- In the Type field, select int.
- In the minOccurs field, select 0.
- In the maxOccurs field, select 1.
- Repeat substep j for the element Income.
- Ensure that your design for the complex type CustomerDemographicsType resembles
the following screen capture:
- Click the show schema index view
 button in the upper left of the XML Schema Editor
to return to the schema.
button in the upper left of the XML Schema Editor
to return to the schema. - In the XML Schema Editor, create the AuthenticationType type
for the schema:
- Click the Design tab.
- In the drop-down menu for the View: options
select Detailed.
- In the Types section, right-click the section and select Add
Complex Type.
- Select your new complex type and click the Properties tab.
- In the Name field, type AuthenticationType.
- Double-click AuthenticationType to
open the complex type for editing.
- Right-click inside the AuthenticationType section
and select Add Sequence (Element)
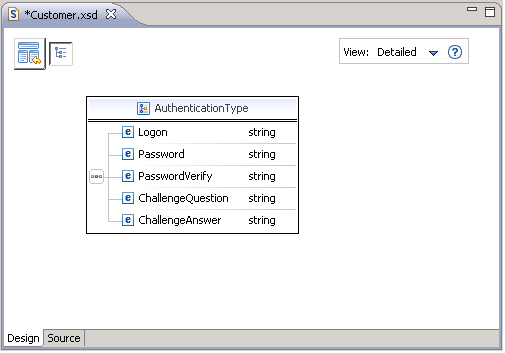
- Create the element Logon of type
string for the AuthenticationType sequence:
- Right-click the sequence and select Add Element.
- Select the new element and click the Properties tab.
- In the Name field, type Logon.
- In the Type field, select string.
- Repeat substep h for the elements Password, PasswordVerify, ChallengeQuestion,
and ChallengeAnswer.
- Ensure that your design for the complex type AuthenticationType resembles
the following screen capture:
- Click the show schema index view button in the upper left of the XML Schema Editor
to return to the schema.
- In the XML Schema Editor, create the AddressType type
for the schema:
- Click the Design tab.
- In the drop-down menu for the View: options
select Detailed.
- In the Types section, right-click the section and select Add
Complex Type.
- Select your new complex type and click the Properties tab.
- In the Name field, type AddressType.
- Double-click AddressType to open
the complex type for editing.
- Right-click inside the AddressType section
and select Add Sequence.
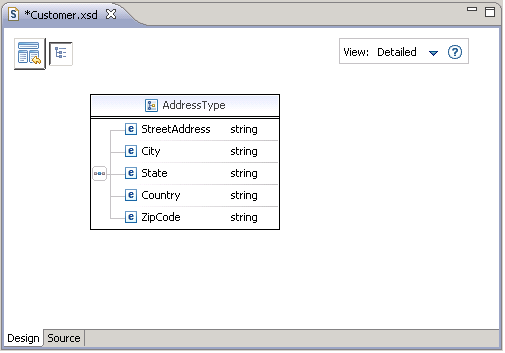
- Create the element StreetAddress of
type string for the AddressType sequence:
- Right-click the sequence and select Add Element.
- Select the new element and click the Properties tab.
- In the Name field, type StreetAddress.
- In the Type field, select string.
- Repeat substep h for the elements City, State, Country,
and ZipCode.
- Ensure that your design for the complex type AddressType resembles
the following screen capture:
- Click the show schema index view button in the upper left of the XML Schema Editor
to return to the schema.
- In the XML Schema Editor, create the ContactType type
for the schema:
- Click the Design tab.
- In the drop-down menu for the View: options
select Detailed.
- In the Types section, right-click the section and select Add
Complex Type.
- Select your new complex type and click the Properties tab.
- In the Name field, type ContactType.
- Double-click ContactType to open
the complex type for editing.
- Right-click inside the ContactType section
and select Add Sequence.
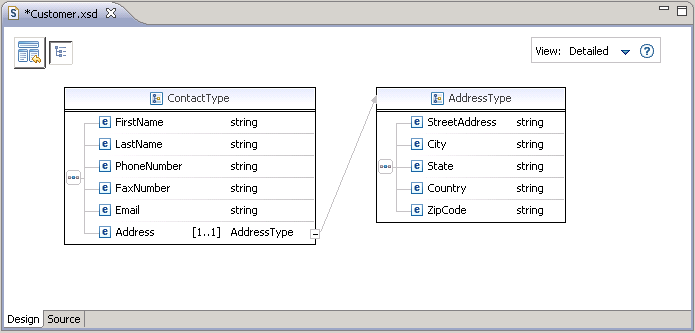
- Create the element FirstName of
type string for the ContactType sequence:
- Right-click the sequence and select Add Element.
- Select the new element and click the Properties tab.
- In the Name field, type FirstName.
- In the Type field, select string.
- Repeat substep h for the elements LastName, PhoneNumber, FaxNumber,
and Email.
- Create the element Address with
a user defined complex type for the ContactType sequence:
- Right-click the sequence and select Add Element.
- Select the new element and click the Properties tab.
- In the Name field, type Address.
- In the Type field, select Browse....
- In the Set Type dialog, select AddressType;
click OK.
- In the maxOccurs field, select 1.
- Ensure that your design for the complex type ContactType resembles
the following screen capture:
- Click the show schema index view button in the upper left of the XML Schema Editor
to return to the schema.
- In the XML Schema Editor, create the complex type CustomerType for
the schema:
- Click the Design tab.
- In the drop-down menu for the View: options
select Detailed.
- In the Types section, right-click the section and select Add
Complex Type.
- Select your new complex type and click the Properties tab.
- In the Name field, type CustomerType.
- Double-click CustomerType to
open the complex type for editing.
- Right-click inside the CustomerType section
and select Add Sequence.
- Create the element DisplayName of
type string for the CustomerType sequence:
- Right-click the sequence and select Add Element.
- Select the new element and click the Properties tab.
- In the Name field, type DisplayName.
- In the Type field, select string.
- In the minOccurs field, select 0.
- In the maxOccurs field, select 1.
- Repeat substep h for the elements ParentOrganization, ProfileType,
and PreferredCurrency.
- Create the element Store of type
integer for the CustomerType sequence:
- Right-click the sequence and select Add Element.
- Select the new element and click the Properties tab.
- In the Name field, type Store.
- In the Type field, select int.
- In the minOccurs field, select 0.
- In the maxOccurs field, select 1.
- Repeat substep j for the element PreferredLanguage.
- Create the element Authentication for
the CustomerType sequence. The element Authentication has
a user defined complex type:
- Right-click the sequence and select Add Element.
- Select the new element and click the Properties tab.
- In the Name field, type Authentication.
- In the Type field, select Browse....
- In the Set Type dialog, select AuthenticationType;
click OK.
- In the minOccurs field, select 0.
- In the maxOccurs field, select 1.
- Create the element Contact for
the CustomerType sequence. The element Contact has
a user defined complex type:
- Right-click the sequence and select Add Element.
- Select the new element and click the Properties tab.
- In the Name field, type Contact.
- In the Type field, select Browse....
- In the Set Type dialog, select ContactType;
click OK.
- In the minOccurs field, select 0.
- In the maxOccurs field, select 1.
- Create the element Demographics for
the CustomerType sequence. The element CustomerDemographicsType has
a user defined complex type:
- Right-click the sequence and select Add Element.
- Select the new element and click the Properties tab.
- In the Name field, type Demographics.
- In the Type field, select Browse....
- In the Set Type dialog, select CustomerDemographicsType;
click OK.
- In the minOccurs field, select 0.
- In the maxOccurs field, select 1.
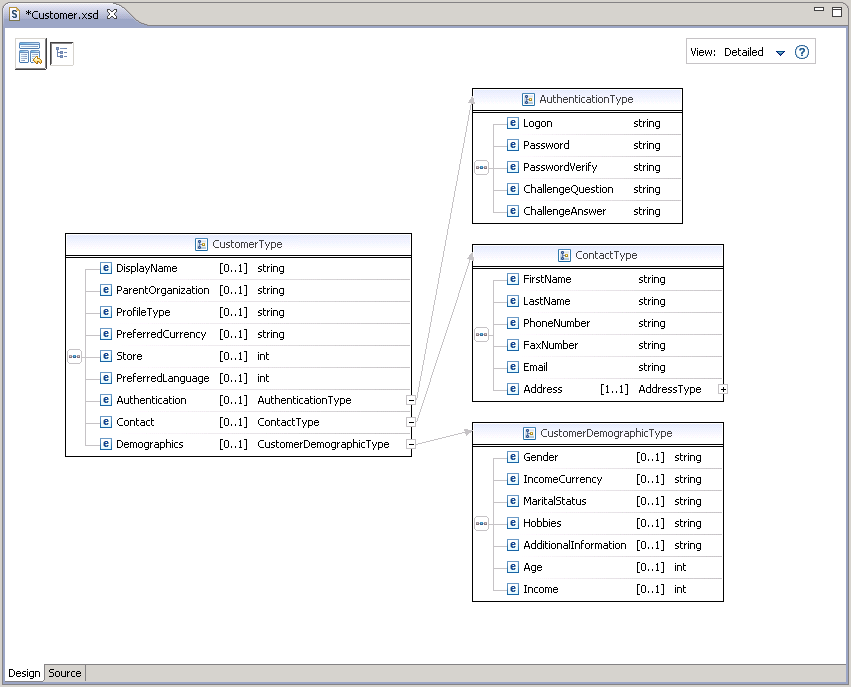
- Ensure that your design for the complex type CustomerType resembles
the following screen capture:
- Click the show schema index view button in the upper left of the XML Schema Editor
to return to the schema.
- In the XML Schema Editor, create the element Customer type
for the schema:
- Click the Design tab.
- In the drop-down menu for the View: options
select Detailed.
- In the Elements section, right-click the section and
select Add Element.
- Select your new element and click the Properties tab.
- In the Name field, type Customer.
- In the Type field, select Browse....
- In the Set Type dialog, select CustomerType;
click OK.
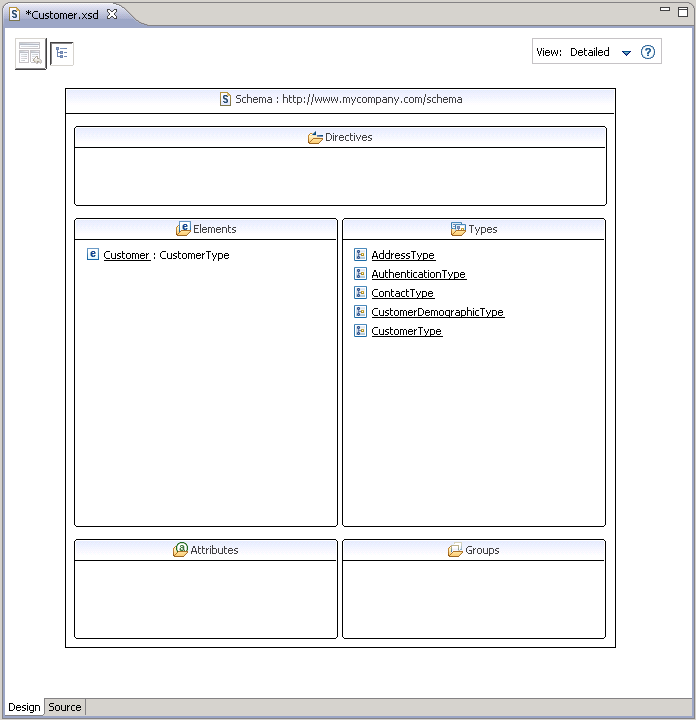
- Ensure that your design for the schema Customer.xsd resembles
the following screen capture:
- Save your work and close the XML Schema Editor.