Creating the promotion properties view for the user interface

 or a definition that defines the
user interface components that business users use when they create
a promotion using the Management Center. These components include
the customized gift reward grid you created in the previous lesson.
or a definition that defines the
user interface components that business users use when they create
a promotion using the Management Center. These components include
the customized gift reward grid you created in the previous lesson.About this task
or properties view definition that
is used to edit the properties of that specific object type. In the
Promotions tool, all promotions are represented by a single object
type. This means that they all share the same:
 wcfObjectProperties class
- properties view definition
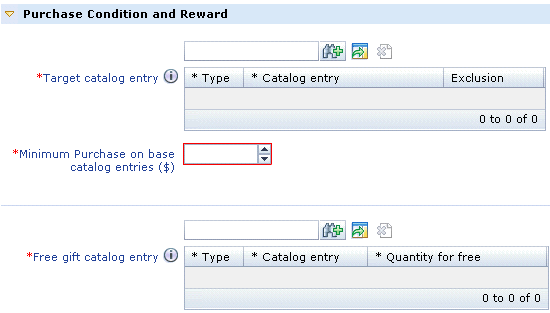
In this lesson, you define a property group that contains the widgets for the Purchase Condition and Reward section of the user interface specific to the new promotion type. The resulting properties view looks like this:
Procedure
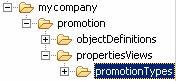
- Create a new directory for the properties object:
- Complete one of the following steps:
- In the Enterprise Explorer view,
navigate to the directory.
- In the Enterprise Explorer view,
navigate to the directory.
- In the Folder name field, type promotionTypes.
Click Finish.
Your directory structure should now look like this screen capture:
- Complete one of the following steps:
- Create a new file to define the property group:
- Name your new file:
- ProductLevelFreeGiftProperties.lzx
- ProductLevelFreeGiftProperties.def
- Name your new file:
- Complete one of the following steps:
Option Description ProductLevelFreeGiftProperties.lzxIn this new class file:- Copy and paste the following code sample:
<library>
   <!--Property group for the ProductLevelFreeGift promotion.-->
   <class name="extProductLevelFreeGiftProperties" extends="wcfPropertyGroup" collapsable="false">
       <wcfEnablementCondition conditionId="promotionType" propertyName="promotionType" enablementValue="ProductLevelFreeGift"/>
       <wcfPropertyGroup name="purchaseConditionAndRewardGroup" groupTitle="${promotionResources.promotion_purchaseConditionAndRewardTitle.string}" open="true">
            1 <wcfPropertyGroup name="purchaseConditionGroup" collapsable="false" displayGrouping="true">
                 <wcfPropertyChildListEditor
                     objectPath="ProductLevelFreeGiftPurchaseCondition"
                     objectTypes="Identifier_CatalogEntry,Identifier_InheritedCatalogEntry" name="catalogEntry"
                     listClass="proProductElementTypeGrid" required="true" promptText="${promotionResources.promotion_Select_Catalog_Entry.string}"
                     helpText="${promotionResources.promotion_Product_Promotion_SKU_Search_helpText.string}"/>
                 <wcfPropertyStepper
                     objectPath="ProductLevelFreeGiftPurchaseCondition"
                     propertyName="BaseItemTotalPrice"
                     required="true" promptText="${extPromotionResources.promotion_Minimum_purchase_TotalPrice.string}" />
            </wcfPropertyGroup>
            2 <wcfPropertyGroup name="rewardGroup" collapsable="false" displayGrouping="true">
                 <wcfPropertyChildListEditor
                     objectPath="ProductLevelFreeGiftPurchaseCondition" name="giftSKU"
                     objectTypes="Identifier_GiftCatalogEntry,Identifier_InheritedGiftCatalogEntry"
                     listClass="extProGiftRewardGrid" required="true" promptText="${promotionResources.promotion_Free_gift_sku.string}"
                     helpText="${promotionResources.promotion_FreeGift_SKU_Search_helpText.string}"/>
              </wcfPropertyGroup>
      </wcfPropertyGroup>
   </class>
</library>
In this code sample, the property group is separated into two subgroups:- 1 purchaseConditionGroup
- The first widget instantiated in this subgroup is a wcfPropertyChildListEditor
widget. In the Management Center, business users use this widget to
specify the catalog entry that must be purchased to qualify for the
promotion. The
objectPathspecifies where in the model this input value will be stored. TheobjectTypesspecify the types of objects that can be displayed in the list. ThelistClassspecifies the class for this view. The second widget is a wcfPropertyStepper. In the Management Center, business users use this widget to select the total price threshold of catalog entries that must be purchased. - 2 rewardGroup
- The wcfPropertyChildListEditor widget is instantiated in this
subgroup. In the Management Center, business users use this widget
to specify multiple catalog entries as gifts. In this section, observe
the line in boldface text. The value for the
listClassattribute is "extProGiftRewardGrid"; this is your customized gift reward grid. To allow business users to add additional rows to the gift reward grid, the line in boldface text does not include the attribute singleChild="true"; therefore this grid can have multiple rows.
Take note of the line near the top of the snippet containing the <wcfEnablementCondition> element. This indicates whether the parent object is enabled. In this customization code, the new promotion type property group is enabled only when promotionType is ProductLevelFreeGift. Business users select the promotion type from the Promotion Type Selector window in the Promotions tool.
- Save and close the file.
ProductLevelFreeGiftProperties.defIn this new definition file:- Copy and paste the following code sample:
<Definitions>
    <!--Property group for the ProductLevelFreeGift promotion.-->
    <PropertyGroup definitionName="extProductLevelFreeGiftProperties"
        collapsable="false">
        <EnablementCondition conditionId="promotionType" propertyName="promotionType"
            enablementValue="ProductLevelFreeGift"/>
        <PropertyGroup name="purchaseConditionAndRewardGroup"
            groupTitle="${promotionResources.promotion_purchaseConditionAndRewardTitle}"
            open="true">
            1 <PropertyGroup name="purchaseConditionGroup" collapsable="false"
                displayGrouping="true">
                <PropertyChildListEditor
                    objectPath="ProductLevelFreeGiftPurchaseCondition"
                    objectTypes=
                        "Identifier_CatalogEntry,Identifier_InheritedCatalogEntry"
                    name="catalogEntry"
                    listDefinitionName="proProductElementTypeGrid"
                    required="true"
                    promptText="${promotionResources.promotion_Select_Catalog_Entry}"
                    helpText=
                "${promotionResources.promotion_Product_Promotion_SKU_Search_helpText}"/>
                <PropertyStepper
                    objectPath="ProductLevelFreeGiftPurchaseCondition"
                    propertyName="BaseItemTotalPrice"
                    required="true"
                    promptText=
                       "${extPromotionResources.promotion_Minimum_purchase_TotalPrice}"/>
            </PropertyGroup>
            2 <PropertyGroup name="rewardGroup" collapsable="false" displayGrouping="true">
                <PropertyChildListEditor
                    objectPath="ProductLevelFreeGiftPurchaseCondition" name="giftSKU"
                    objectTypes=
                       "Identifier_GiftCatalogEntry,Identifier_InheritedGiftCatalogEntry"
                    listDefinitionName="extProGiftRewardGrid" required="true"
                    promptText="${promotionResources.promotion_Free_gift_sku}"
                    helpText=
                        "${promotionResources.promotion_FreeGift_SKU_Search_helpText}"/>
            </PropertyGroup>
        </PropertyGroup>
   </PropertyGroup>
</Definitions>
In this code sample, the property group is separated into two subgroups:- 1 purchaseConditionGroup
- The first widget instantiated in this subgroup is a wcfPropertyChildListEditor
widget. In the Management Center, business users use this widget to
specify the catalog entry that must be purchased to qualify for the
promotion. The
objectPathspecifies where in the model this input value will be stored. TheobjectTypesspecify the types of objects that can be displayed in the list. ThelistDefinitionNamespecifies the definition for this view. The second widget is a wcfPropertyStepper. In the Management Center, business users use this widget to select the total price threshold of catalog entries that must be purchased. - 2 rewardGroup
- The wcfPropertyChildListEditor widget is instantiated in this
subgroup. In the Management Center, business users use this widget
to specify multiple catalog entries as gifts. In this section, observe
the line in boldface text. The value for the
listDefinitionNameattribute is "extProGiftRewardGrid"; this is your customized gift reward grid. To allow business users to add additional rows to the gift reward grid, the line in boldface text does not include the attribute singleChild="true"; therefore this grid can have multiple rows.
Take note of the line near the top of the snippet containing the <EnablementCondition> element. This indicates whether the parent object is enabled. In this customization code, the new promotion type property group is enabled only when promotionType is ProductLevelFreeGift. Business users select the promotion type from the Promotion Type Selector window in the Promotions tool.
- Save and close the file.
- Copy and paste the following code sample:
- Right-click the ProductLevelFreeGiftProperties.lzx file;
then click Build OpenLaszlo Project on the
context menu.
- Register the ProductLevelFreeGiftProperties.lzx file
in the promotion extensions library:
- Complete one of the following steps:
Option Description Create an instance of your new property groupInstantiate the new property group within the overall promotions
properties view class, proPromotionManageTabPaneContent, which is
located in the PromotionPropertiesView.lzx file:- In the Enterprise Explorer view, navigate to the directory.
- Open the PromotionPropertiesView.lzx file.
- Locate the section of the file where the other property groups
are instantiated; here are a few examples:
<proCategoryLevelPerItemPercentDiscountProperties/> <proCategoryLevelPerItemValueDiscountProperties/> <proProductLevelPWPPercentDiscountProperties/> - Create an instance of your promotion property group at the bottom
of the list by adding the following code:
<!-- Customization: Properties View for new Promotion Type --> <extProductLevelFreeGiftProperties /> <!-- Customization: End --> - Save and close the file.
- Right-click the PromotionPropertiesView.lzx file; then click Build OpenLaszlo Project on the context menu.
Add your new property group to the promotions properties
view definitionAdd the new property group to the property pane definition,
proPromotionManageTabPaneContent, which is located in the PromotionPropertiesView.def file:- In the Enterprise Explorer view, navigate to the directory.
- Open the PromotionPropertiesView.def file.
- Locate the section of the file where the other property groups
are instantiated; here are a few examples:
<PropertyGroup baseDefinitionName="proCategoryLevelFixedShippingDiscountProperties"/> <PropertyGroup baseDefinitionName="proProductLevelPWPPercentDiscountProperties"/> <PropertyGroup baseDefinitionName="proMultipleItemsPercentDiscountProperties"/> - Add your promotion property group to the bottom of the list by
adding the following code:
<!-- Customization: Properties View for new Promotion Type --> <PropertyGroup baseDefinitionName="extProductLevelFreeGiftProperties"/> <!-- Customization: End --> - Save and close the file.