WebSphere Commerce Version 7.0.0.7 or laterFeature Pack 4Feature Pack 2SolarisLinuxAIXFeature Pack 5Feature Pack 3WindowsFeature Pack 1Feature Pack 6

Updating the instance in a cluster on Feature Pack 6 or earlier (zero downtime)

You must manually control the node agents and servers in the cluster to ensure that your site remains available during a fix pack upgrade.

Before you begin

Ensure that you successfully completed the following tasks:
  1. Updated the installation directory with the new fix pack
  2. Updated the database
  • Ensure that the WebSphere Application Server Deployment Manager (DMGR) and all node agents are running.
  • Ensure that your store is online and serving traffic.

About this task

This method of updating multiple instances with zero downtime is supported if your environment satisfies the following criteria:
  • You are on WebSphere Commerce Fix Pack 7 or later
  • You are on Feature Pack 6 or earlier
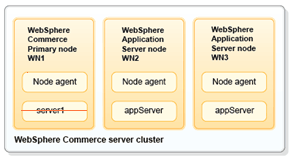
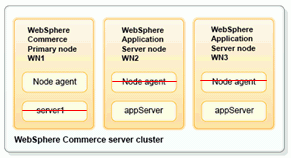
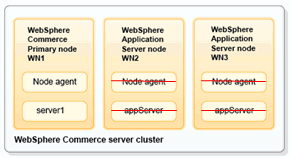
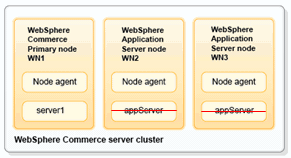
  • You have a clustered environment similar to the following diagram:
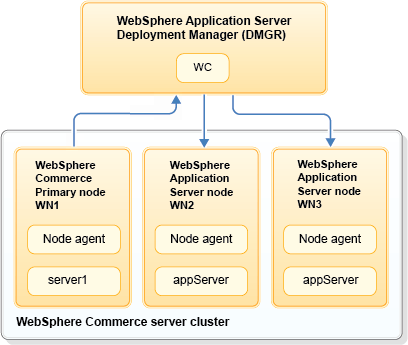
    Cluster with three nodes
Note: This task assumes that you have three nodes in your cluster. If you have more than three nodes, group multiple nodes to conform to the diagram and group the nodes in a way that ensures site availability during the update. Consider the states of your servers and decide how you want to group your nodes:
  1. Initially you take down the servers in node WN1, therefore your site initially relies on nodes WN2 and WN3 to serve traffic.
  2. When the nodes in WN1 are updated, you update nodes WN2 and WN3, which forces your site to rely solely on the servers on WN1 to serve traffic.
For example, if you have nine nodes you might want to group the nodes in the following manner:
  • Group four nodes to represent WN1, three nodes to represent WN2, and two nodes to represent WN3. Therefore, your site has the five servers in WN2 and WN3 to serve traffic while the servers in WN1 are updating. After the update, your site can rely on the four updated servers in WN1 while WN2 and WN3 are updating.

Procedure

  1. On the machine where WebSphere Commerce is installed, shut down the Primary node WebSphere Commerce server (server1) in WN1 but leave all node agents online. If you have more than 3 nodes and grouped your nodes, shut down all WebSphere Commerce servers that belong to WN1.


  2. On the other nodes (WN2 and WN3), shut down all node agents but keep the servers online.
    The servers on nodes WN2, and WN3 continue to serve traffic while the server on WN1 is down.

  3. Ensure that your site is online and serving traffic.
  4. Update the WebSphere Commerce instance:
    1. Launch WebSphere Commerce Update Installer (UPDI) and apply the fix pack on the machine where WebSphere Commerce is installed. The WebSphere Commerce EAR file is updated on the primary node WN1, and on the DMGR profile.
    2. Launch UPDI and apply the latest cumulative interim fix and interim fix JR52690 for the fix pack level on the machine where WebSphere Commerce is installed. The WebSphere Commerce EAR file is updated on the primary node WN1, and on the DMGR profile.
      Important: After the application is ready, sometimes the WebSphere Application Server takes time to synchronize the servers with the updated application. It is recommended that you wait approximately 10 minutes before you continue to the next step.
  5. Verify that the nodes were synchronized on the machine where WebSphere Commerce is installed.
    1. In a shell window or command prompt, navigate to WAS_installdir/profiles/instance_name/bin
    2. Run the following command to connect to the 'DMGR' profile.
      • For IBM i OS operating systemSolarisLinuxAIX./wsadmin.sh -lang jacl
      • Windows./wsadmin.bat -lang jacl
      Ensure that a message is displayed to confirm that you connected to the DMGR profile.
    3. Run the following command after you connect to verify that the EAR file was copied properly:
      $AdminApp isAppReady applName
      • applName: The name of the application, for example WC_instance_name
      If the last line of the output is true, then the application is fully distributed.
    4. Type Exit to exit from the wsadmin script.
  6. On WN1, start the WebSphere Commerce server (server1). If you have more than three nodes and grouped your nodes, start all WebSphere Commerce servers that belong to WN1.
  7. On the nodes WN2 and WN3, shut down only the WebSphere Commerce servers.


  8. On the nodes WN2 and WN3, start the WebSphere Commerce node agents. This action automatically triggers the sync process from DMGR to the nodes.


  9. Once the sync is complete, start the WebSphere Commerce servers on the nodes WN2 and WN3. All WebSphere Commerce servers are updated to the latest fix pack. Verify that the nodes were synchronized by completing step 5 again.

Results

You successfully installed a WebSphere Commerce fix pack to the instances that are in the cluster.

What to do next

Depending on your environment, you might have to complete some final steps. For more information, see Installing final steps.