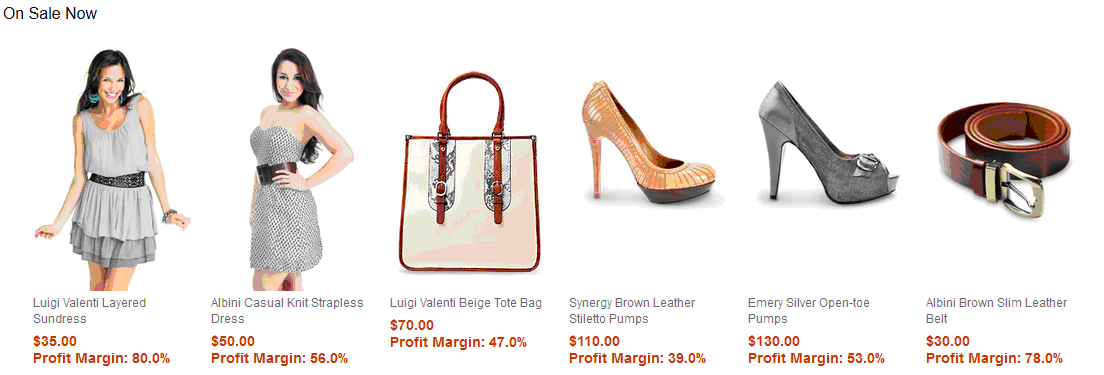
In this lesson, the Aurora starter store is customized
to display the profit margin for recommended product in store preview
only. This can help us verify the result in later testing.
You
must configure the profit margin field to map the fields into your
UserData within the CatalogNavigationViewType noun. This noun is used
for search results. With the mapping complete, the fields can be extracted
and displayed in the Aurora starter store.
Since the profit
margin is related to price, it makes sense to display it after the
offer price. Therefore, we will modify the price display widget to
display profit margin after the offer price.
In this lesson,
we will update the Site Level widget as example so that the change
takes place in all of the stores.
Procedure
- Open the following file:
/Stores/WebContent/widgetdir/com.ibm.commerce.store.widgets.CatalogEntryRecommendation/CatalogEntryRecommendation_Data.jspf
- Locate the following code:
<wcf:rest var="catalogNavigationView1" url="${searchHostNamePath}${searchContextPath}/store/${WCParam.storeId}/productview/byIds" >
   <c:forEach var="id" items="${catentryIdQueryList}">
<wcf:param name="id" value="${id}"/>
   </c:forEach>
   <wcf:param name="langId" value="${langId}" />
   <wcf:param name="currency" value="${env_currencyCode}" />
   <wcf:param name="responseFormat" value="json" />
   <wcf:param name="catalogId" value="${WCParam.catalogId}" />
   <wcf:param name="profileName" value="IBM_findProductByIds_Summary" />
</wcf:rest>
- Change the value
profileName to be your
new search profile. For example, X_findCatalogEntryProfitMargin.
<wcf:rest var="catalogNavigationView1" url="${searchHostNamePath}${searchContextPath}/store/${WCParam.storeId}/productview/byIds" >
   <c:forEach var="id" items="${catentryIdQueryList}">
<wcf:param name="id" value="${id}"/>
   </c:forEach>
   <wcf:param name="langId" value="${langId}" />
   <wcf:param name="currency" value="${env_currencyCode}" />
   <wcf:param name="responseFormat" value="json" />
   <wcf:param name="catalogId" value="${WCParam.catalogId}" />
   <wcf:param name="profileName" value="X_findCatalogEntryProfitMargin" />
</wcf:rest>
- To define the new profit margin variable for the price
display widget, open the following file:
/Stores/WebContent/widgetdir/Common/PriceDisplay/PriceDisplay_Data.jspf
- Add the following code at the bottom of the file:
<c:set var="profitMargin" value="" />
<c:if test="${env_inPreview && !env_storePreviewLink}">
   <c:forEach var="userData" items="${catalogEntryDetails.UserData}" >
       <c:if test="${!empty userData.ProfitMargin}">
           <c:set var="profitMargin" value="${userData.ProfitMargin}" />
       </c:if>
   </c:forEach>
</c:if>
- To allow the price display widget to show the new profit
margin only within the store preview, open the following file:
/Stores/WebContent/widgetdir/Common/PriceDisplay/PriceDisplay_UI.jspf
- Add the following code at the bottom of the file:
<c:if test="${env_inPreview && !env_storePreviewLink}">
       <c:if test="${!empty profitMargin}">
           <div> Profit Margin: ${profitMargin}% </div>
       </c:if>
</c:if>
Note: The profit margin displays only in store preview
and only if the value exists and is not empty. Also, profitMargin is
the example index field name that is used in this tutorial. Ensure
that you use the same index field name, which you defined when you
updated your search schema.xml, in the code snippet
above.
- Save your changes and close the file.
Results
If you launch store preview from the Management Center and
navigate to any secondary category page, for example, Women, you will
be able to see the profit margin after the offer price:

