Creating Bare Metal Profiles for Windows Images
Create Bare Metal profiles from the Image Library dashboard to perform bare metal deployments on Windows targets.
Select a Windows image and click Create Bare Metal Profile.
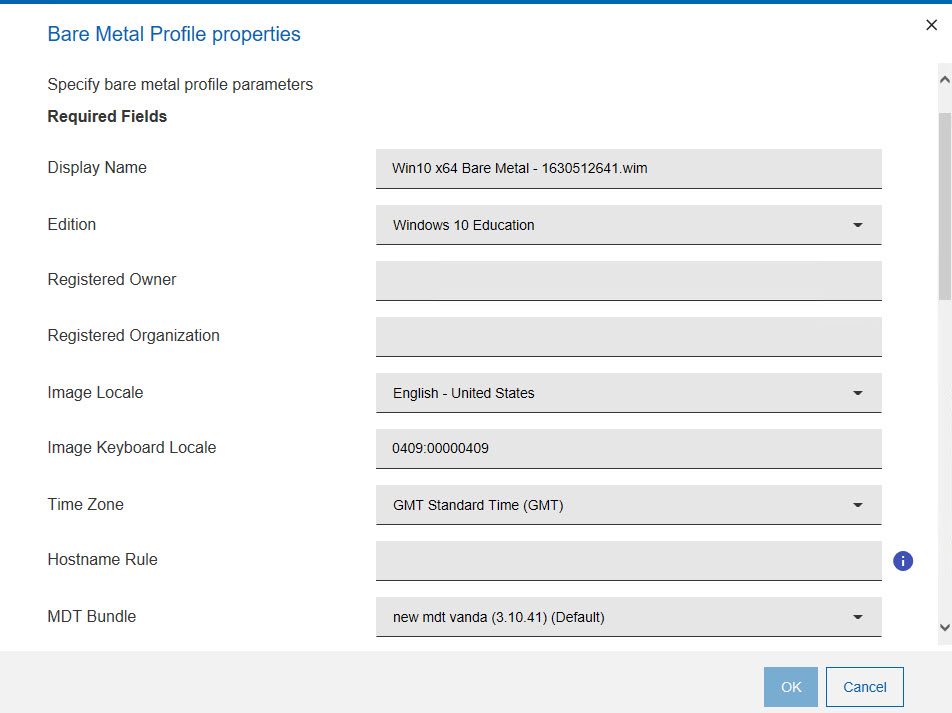
A wizard with the information retrieved from the image is displayed. Depending on whether the type of WIM image you select is captured or created from installation media (ISO), some of the required and optional fields are different. Values for some fields are already set but you can change them as appropriate.
If you have profiles that were created with earlier versions of OS Deployment, when you edit them, some fields might be preset to values that cannot be changed to ensure compatibility.
If your network supports multicast communication, and you want to deploy bare metal profiles using multicast, you can specify multicast parameters in the Multicast tab.
You can specify network configuration parameters for the targets receiving the profile by using the Network tab. The default network configuration is DHCP. If your targets have multiple interface cards (NICs) use the Change Bare Metal Target Network Configuration task (354) to configure them.
{{yes}- Common bare metal profile fields (both ISO and captured images)
-
Required fields:
- Display Name
- The name of the bare metal profile created from the image that you selected. By default, the name is derived from the image name and the type of profile (in this case Bare Metal). You can specify a maximum of 70 alphanumeric characters.
- Registered Owner
- Specify the name of the person registered to use the operating system
- Registered Organization
- Specify the full name of the organization to which the registered owner belongs.
- Image Locale
- Choose the image locale for the operating system if different from the preset one.
- Image Keyboard Locale
- The keyboard locale is automatically set to match the image locale.
- Time Zone
- Select the time zone of the target operating system
- Hostname Rule
- Specify the hostname rule that will be used to build the hostname, computer name, and full
computer name of the target. You can specify values in the following forms:
- A prefix.
- A prefix and one or more variables.
- One or more variables.
[variable]enclosed by square brackets. You can concatenate variables. Allowed variables are:- [IP] - IP Address of the primary interface that has performed a PXE boot
- [MAC] - Hardware Address of the primary interface that has performed PXE boot)
- [UUID] - System UUID as found in DMI (SMBIOS)
- [SN] - Serial number as found in DMI (SMBIOS)
- [AT] - Asset TAG as found in DMI (SMBIOS)
- [BBSN] - Base Board Serial Number as found in DMI (SMBIOS)
Every variable keyword supports a range extension, and you can decide to include only part of the information. The range starts at value zero. The value [IP3] corresponds to the last byte of the IP address. In IP addresses bytes are separated by dots. For example, if you specify a hostname rule of
pc-[IP3]and the IP address of the target is192.168.0.232, the hostname becomespc-232. If you specify[IP0-2], the first three bytes of the IP address are included. For SN, UUID, AT, and BBSN values, the range corresponds to a substring. You can also addRat the end of the range to start it from the last character specified. Dots are always removed from the IP address in the final string.Note: If the deployment is started from network boot media, the IP address used in the hostname rule is the one assigned during the network boot. - MDT Bundle
- The MDT Bundle to be used for the deployment of the bare metal profile. The MDT Bundle is preset based on the operating system that you want to deploy.
- Deployment Final Action
- Select a final action to complete on the target at the end of the deployment.
- Restart
- The target computer is restarted. This is the default action for all new profiles.
- Shutdown
- The target computer is shut down.
- Log off
- The target computer is logged off.
- No action
- The current user stays logged in. This is the default action for all profiles that were created with OS Deployment versions earlier than 3.8.
Note: If you are joining the target computer to a domain, onlyRestart
orShutdown
are allowed. If you are editing a profile created with earlier versions of OS deployment and you select an MDT Bundle Version 3.8 or later, the default action is forced toRestart
. - Administrator Password
- Specify the password of the Administrator account on the target system. You are asked to enter the password twice for confirmation. This field is mandatory only for images created from installation media (ISO). It is optional for captured images.
- Required Domain Credentials
-
Specify the required Domain Credentials. For a description of the possible values, see Domain Credentials.
Optional fields:- Product Key
- Specify a valid Windows Product Key.
- Assign relays
- Select this option to disable automatic relay selection on the target system, and to set the
Bare Metal server to which the target connects as Primary Relay, and the BigFix server as Secondary Relay. The following client
settings for the target are updated at deployment time:
__RelaySelect_Automatic = 0, to disable automatic relay selection__RelayServer1, which is set to the relay with the Bare Metal Server to which the target connects__RelayServer2, which is set to the BigFix server
- Client Settings
- Use this field to set named variables that are assigned to the deployed computer. The values you
assign can be used either as labels to identify computers with specific roles or as filters
in Fixlet actions and in Fixlet relevance to exclude an action on a target. You must
specify the variables in a
NAME:VALUEformat. If you specify multiple variables, each one must be separated by a vertical bar|
Edit Computer Settings
. The settings are listed underCustom Settings.
Examples of how to use client settings to configure the target after a deployment are available on the Endpoint Manager wiki at this link: Using the Client Settings field to configure targets during deployments.A complete list of available client configuration settings, and a description of how to use them is available on the BigFix wiki at this link: Configuration Settings.
- Prompt end user for properties
- You can optionally select this option to prompt the user at the target computer for a hostname and network parameters. When the deployment starts on the target, a user interface is displayed and the user can configure the hostname and network settings for one or more network interfaces (NICs) available on the target system. This option is useful to view and check the network parameters that will be applied to the target at deployment time, and to change them if needed. For more information about the properties you can specify, see Specifying target network parameters at deployment time.
- Deployment Password
- Providing a deployment password protects the profile during deployment. Protected profiles are installed only after you provide the correct password at the target when prompted
- Auto Deploy Timeout
- If you specify a value in seconds, a counter is started during the PXE boot on the target machine, and when the specified time expires, the profile is automatically installed on the target.
- Image Setup Timeout
- If you specify a timeout value in seconds, the setup of the WIM image is interrupted when the specified time expires. This option is available only for BigFix Bare Metal Server version 7.1.1.14 or later.
- Repartition the disks
- This check box is selected by default. Clear it to avoid re-partitioning the disks on the target machine. In this case, only the specified partitions are deployed on the existing partition layout.
- Disable enhanced error detection
- Select this option to prevent modifications to the boot sequence during the bare metal deployment. If you are deploying the profile to UEFI targets with the Secure Boot option enabled you must select this option. For more information, see Enhanced error detection.
- Bitlocker Method
- Use this option to specify if you want Bitlocker on the target computer and which method to use.
Bitlocker might not be supported on some editions of the operating system. The available choices
are:
- No Bitlocker
- No Bitlocker will be enabled on the target computer.
- On TPM
- Bitlocker will be enabled and the computer will be protected with TPM only.
- On TPM and use PIN
- Bitlocker will be enabled and the computer will be protected with TPM and a pin. The pin must be specified in the field "Bitlocker PIN" which is a numeric field between 6 and 20 digits long.
- On TPM and key
- Bitlocker will be enabled and the computer will be protected with TPM and a startup key. The startup key will be created and saved on a USB Flash Drive. The startup key must be connected each time the computer starts. You can specify the drive letter of a removable disk where to save it in the field "Bitlocker key location". If not specified, the first available removable drive will be used.
- On key
- Bitlocker will be enabled and the computer will be protected with TPM and a startup key.
You can additionally create a recovery password for Bitlocker by selecting the option "Create Bitlocker recovery password". The file containing the password is saved in the same location of the Bitlocker key. If you are not using a Bitlocker key, the file is saved on the first available applicable device.
Note: When you enable Bitlocker, the "Disable enhanced error detection" option is automatically selected and cannot be unselected.Note: For Bitlocker on server operating systems (such as Windows Server 2019), MDT Bundle Version 3.10.21 or later is required. - Set the high performance power plan
- This option is available only for Windows 10/11 and, if selected, sets the high performance power plan on the target computer. This will also prevent the standby during the deployment on laptops when the lid is closed on AC. MDT Bundle later than Version 3.10.16 is required.
- Unique fields for creating a Bare Metal profile for an ISO image:
-
Required fields:
- Edition
- The operating system edition you are deploying. Expand the list to select a different edition.
- Client Version
- The displayed version depends on the MDT Bundle that is used. For MDT Bundles earlier than version 3.7, the best match is displayed. For MDT Bundle versions 3.7 or later, all client versions are supported. To select a Client version your Bare Metal OS Deployment server must be at version 7.1.1.18 or later.
- Unique fields for creating a Bare Metal Profile for a captured image:
-
- Enable Administrator
- You can choose to enable the Administrator account on the target system. If you select this option, you must also specify the password.
- Administrator password
- Specify the password of the Administrator on the target system. You are asked to enter the password twice to confirm.
When you create bare metal profiles, you can specify the partition layout. The Partition Mappings section is the same as in Mapping partitions but the behavior is different in bare metal deployments. When you add partitions, the size of the partitions can be specified using percentages. If you did not select to re-partition the disks, you must adapt the partitions of the source image to match the physical partitions of the target.
If you decide to repartition the disks on the target machine, the disks are formatted and the partitions are recreated on the target machine as you mapped them in the WIM. If you do not repartition the disks on the target machine, the same rules that are described for the number of partitions for reimaging apply.
If the number of partitions you send to the target is less than the number of partitions that exist on the target, the results of the validation depend on how you mapped the partitions. For example, a target has Windows 7 with a bootable partition and a system partition. If you deploy a Windows 7 customized bare metal profile with only the system partition and you map this partition to the first partition of the target, the deployment fails. If you map the partition in your profile to the second partition of the target, the deployment is successful.
If you are deploying a bare metal profile on a UEFI target, a dedicated boot partition (ESP) is always created on the target, regardless of how these partitions were mapped in the WIM (system and boot partitions are mapped on the same target partition in the partition editor.)
CustomSettings.ini file. 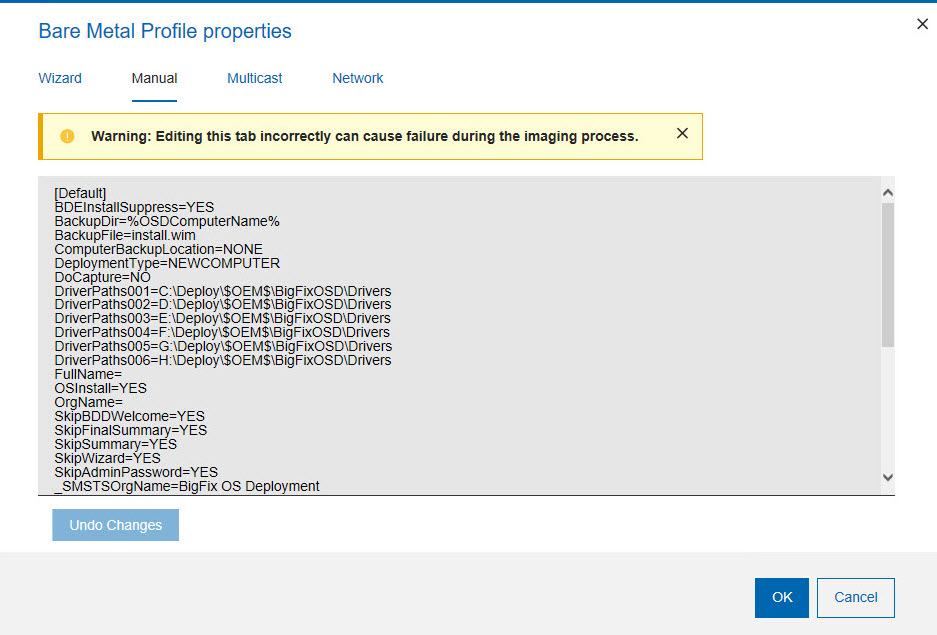
The following settings are not present in the Manual tab because they are
handled separately by encryption: AdminPassword, DomainAdmin,
JoinDomain, DomainAdminDomain,
DomainAdminPassword, and MachineObjectOU. The settings in the
Wizard tab take precedence over the settings that are found in
Manual tab for these values.
Requirements and limitations
For the MDT Bundle requirements needed to deploy Windows 10/11 and Windows Server 2016/2019/2022 bare metal profiles, see Installing MDT Bundle Creators.
If you are deploying to a UEFI target with the Secure Boot firmware option enabled, your MDT Bundle must be Version 3.9.0.6 or later, and must have been imported with the option to overwrite the preinstallation environments (using "Yes" or "Auto" options when importing the bundle).
Deploying bare metal profiles in multicast
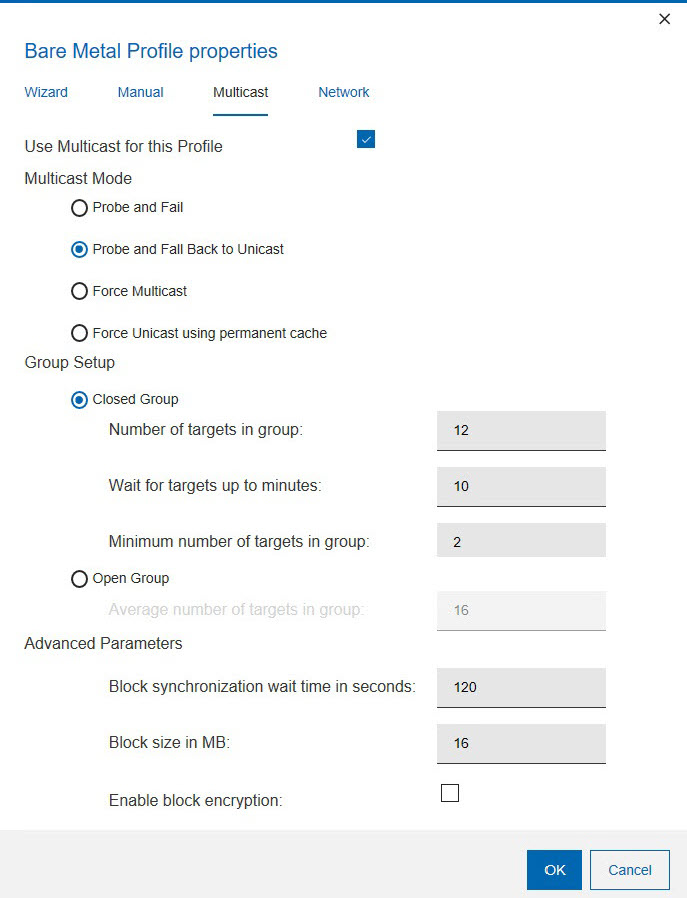
- Multicast Mode
- Defines how the multicast distribution is managed on the targets
at deployment time for the profile:
- Probe and Fail
- If the probe on the target fails, the deployment task also fails.
- Probe and Fall Back to Unicast
- If the probe on the target is successful, deployment occurs in multicast. If the probe fails, deployment of the profile occurs in unicast, using the Bare Metal Server cache, instead of the relay cache.
- Force Multicast
- Deployment on the target is forced to multicast regardless of probe results.
- Force Unicast using permanent cache
- Deployment on the target is completed in unicast using the Bare Metal Server cache. This option is useful when you want to ensure that all necessary files are available at deployment time.
- Group Setup
- Select the type of multicast group that is used for the deployment.
You can accept or change the associated parameters.
- Closed Group
- Targets join the group as they are ready. When the following criteria
are satisfied, the group is closed and distribution begins. This is
the default.
- Number of targets in group
- Specify the maximum number of targets allowed in the group. The default value is 12.
- Wait for targets up to minutes
- Specify the maximum number of minutes to wait for targets before starting the multicast deployment. The default value is 10 minutes.
- Minimum number of targets in group
- Specify the minimum number of targets that must join for a multicast deployment. If the specified value is not reached, deployment is completed in unicast. The default value is 2.
- Open Group
- Targets can join the group as they are ready, at any time during
deployment. You can change the associated parameter.
- Average number of targets in group
- Specify the average number of targets expected in the group. This value is used to optimize block synchronization. The closer the number of actual targets is to this value, the more efficient the multicast deployment. The default value is 16.
- Advanced Parameters
- Multicast advanced customization and tuning options that apply
to both multicast group types.
- Block synchronization wait time in seconds
- Specify how many seconds the server must wait before sending the next block. This value is preset to 120 seconds. If you specify a value less than 5 seconds, the block synchronization wait time is forced to 5.
- Block size in MB
- The image is divided into blocks that are sent to the targets. This parameter sets the maximum size of the data blocks (in megabytes) sent in each transmission packet. The default value is 16 Megabytes.
- Enable block encryption
- Specify if the blocks must be encrypted during transmission.
Before deploying bare metal profiles in multicast, you can check if multicast is enabled in the subnet that is used for Bare Metal deployments by running the Probe Clients for Multicast Deployment task (80) against a target in the same network. The BigFix client must be running on the target.
Specifying target network parameters
You can define bare metal target network configuration settings with Task 354, by specifying them in the bare metal profile in the Network tab, or using a combination of both.
The actual network configuration settings used by the targets receiving the profile is determined by the type of configuration (Static or Dynamic), by the selected configuration policy, and by the Change Bare Bare Metal Target Network Configuration Settings task (354), if you have run it on targets before deploying this profile.
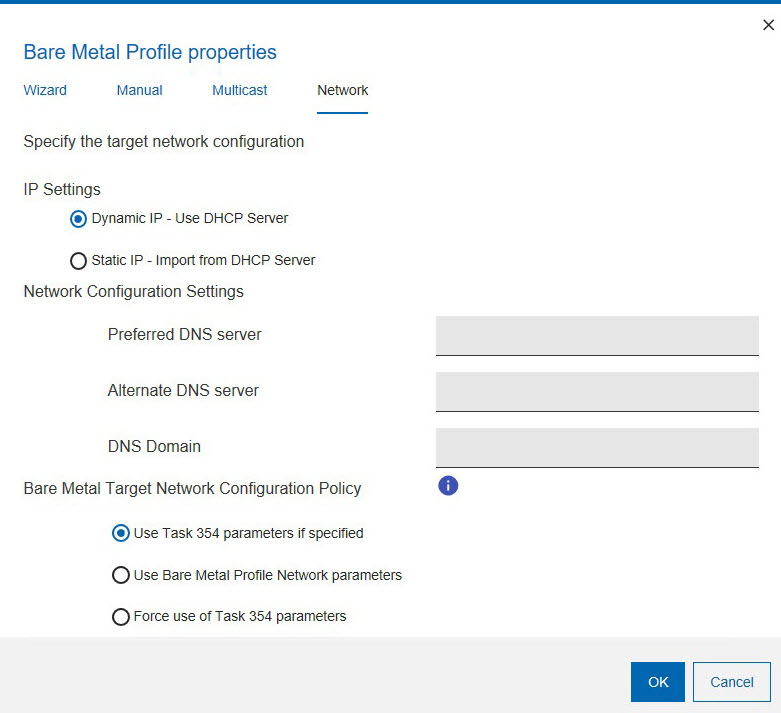
- IP Settings
- Specify the type of configuration for the targets:
- Dynamic IP - Use DHCP Server
- Ths is the default selection. A dynamic IP address is assigned by the DHCP Server
- Static IP - Import from DHCP Server
- IP address, gateway, and network mask are imported from the DHCP Server
- Network Configuration Settings
- Optional. These parameters are used only if you select a static IP configuration. If your policy is to use the bare metal target configuration parameters previously defined with task 354, the parameters that were not already set with the task and specified in this section are considered. If there are parameters in common, the ones specified in the task take precedence. The parameters specified in this section are also used if you select a static IP configuration and you select to ignore any parameter defined with task 354. The configuration settings in this section are disabled if you are configuring a dynamic IP and you have selected to ignore any previously defined target network configuration using task 354).
- Bare Metal Target Network Configuration Policy
- Choose the configuration policy that must be applied to the selected targets for this profile.
- Use Task 354 parameters if specified
-
If you have run the Change Bare Metal Target Network Configuration Settings task 354 to configure network parameters on targets of this profile, and you have selected this option, the parameters you specified in the task will have precedence over the same parameters specified in the profile. A field by field check is performed, and the profile parameters that were not specified in the task are also used.
- Use Bare Metal Profile Network Parameters
-
Select this option if you want to ignore any previously defined target network parameters with task 354. Only the parameters specified in the profile are used.
- Force use of Task 354 parameters
-
Select this option if you want to use only network parameters defined with Task 354. If you have not previously run task 354 on the targets of this profile, the deployment fails.
Specifying target network parameters at deployment time
- Network interface card (NIC)
- All settings defined with task 354 or specified in the Network tab of the bare metal profile properties wizard are displayed. If the target has more than one network interface card (NIC), a separate configuration window is displayed for each one. Each interface is identified by the corresponding MAC address.
- Hostname
- Displays the hostname previously set with task 350 if used, or
the final hostname value resulting from the application of the hostname
rule you specified in the bare metal profile.Note: If you set the hostname for a target at deployment time, this value is maintained for any subsequent bare metal deployments, independently of the hostname rule specified in the bare metal profile. To change the hostname, you can either use task 350 or deploy a new profile selecting the "Prompt end user for properties" option.
- Partition mapping
- Displays the partition mapping information that was specified using task 350. You can resize the partitions or accept the current mapping. If this information is not available, the related page is not displayed at the target.